WelCome To AppJetty
AppJetty At A Glance
 Activities in Dynamics 365 are tasks related to customer entity like a call, setting up a meeting, appointment, sending pricing quotes or emails, etc. You can assign these activities to yourself or other team members. Here the question arises, how can you make the most out of them? For example, if you are in a meeting with your customers, you need to be specific with what they are looking for in your services. Did they ask for enhancements in your current package or expressed concerns for budgets? Or any highlights of the meeting. Chances are that you might forget these little details. In such cases, you can open your Dynamics CRM in mobile and add these notes in the specific appointment created for the meeting. This can help you focus on the details leading to more clients for your organization. So, let’s see how you can manage activities in Microsoft Dynamics CRM Calendar to make the most out of it. Step 1: Find your activities: → Click on the sitemap and select activities. From the list, select an activity type to manage a particular activity. You can perform the following operations on any activity with the default Dynamics calendar: Add activity For customer: You can add activity associated with a particular customer, account, or another type of record. To do so, – Open the record for which you want to create the activity. – In the Timeline section, click on ‘+’, and from the drop-down list, select the type of activity you want to create. 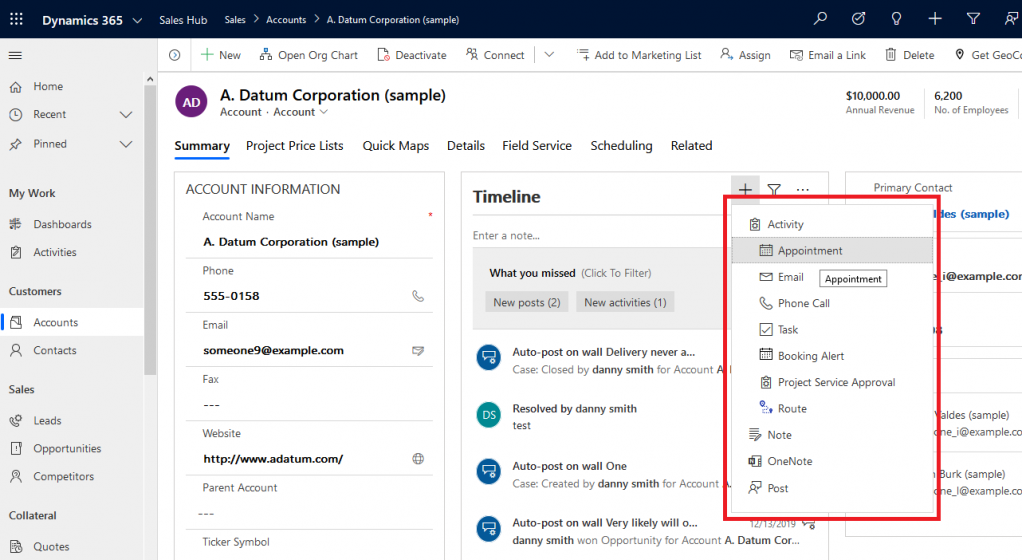 For yourself: – In the site map, select Activities. – From the command bar, select an activity type. – Once you are done filling in the details, click on save to save the particular activity. 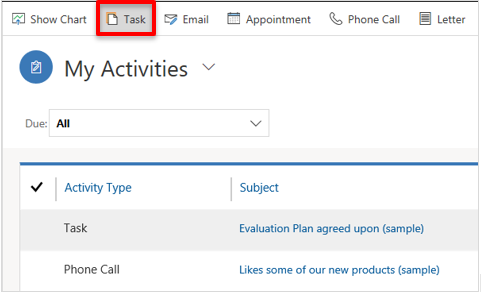 You can also add other people to the record or contact based on who’s handling that particular customer. As you work with that customer over a period of time, it can help you maintain its history and see what can be done for better outcomes.Add task or note for yourself to remember something important, add new activities and assign it to others, mark it complete, etc. to manage it further. Challenges with default activity management: Managing activities this way means a lot of back and forth and wasted time. Every time you will have to select the record, create an activity and then manage its related activities. To cut down this back and forth, you can look for a calendar solution or extension which provides a unified interface to conduct all the operations from a single screen. In this blog, we’ve taken Calendar 365, a Dynamics CRM Calendar, to show how you can manage activities from a single calendar screen. If required you can view your team’s schedule via a shared calendar and assign activities to them as well. Let’s see how you can manage activities from a shared calendar. Step 1: After installing Calendar 365, navigate to the left panel and select the Calendar 365 option. 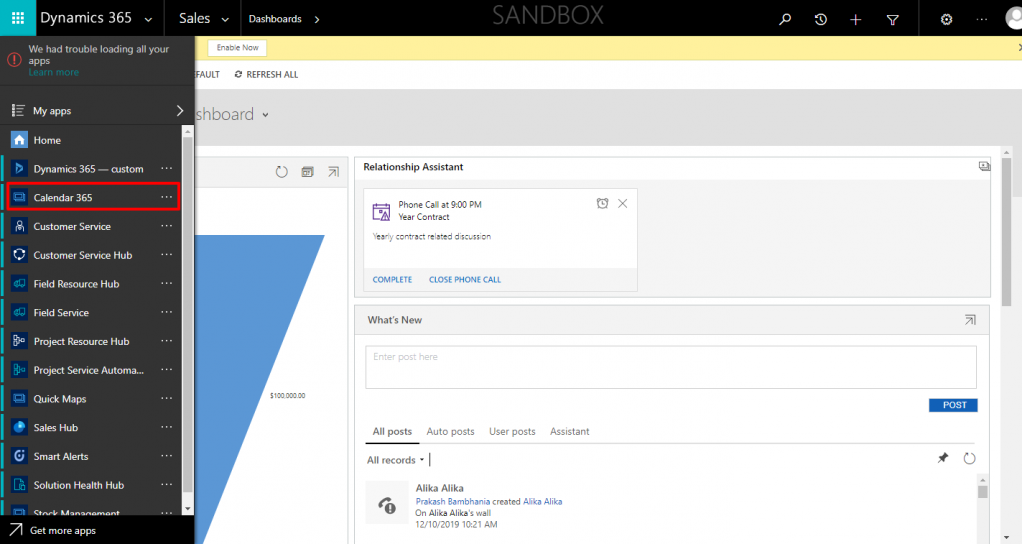 Step 2: Click on ‘View Calendar’ from the second panel and then click on the select calendar to select the view/shared calendar. Step 3: Check the available time slot for the day to assign activities to users. Step 4: Click on the available time slot to create activity. Step 5: Select the activity type from the available options. Step 6: Add details regarding, subject, priority, adding notes, etc. and click on create. 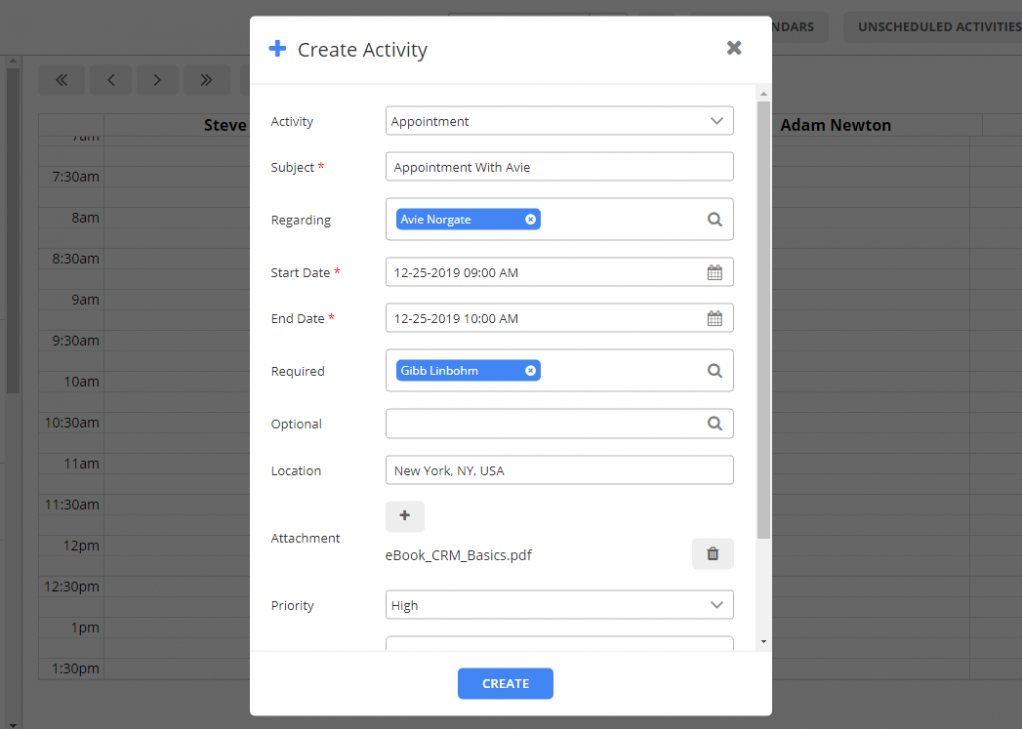 Here are the fields explained in detail: Activity: To select the type. It can be an appointment, phone call, meeting, task, SMS, etc. Subject: Add something to remember the activity from. It will be displayed on your calendar as well. Regarding: Here you can select the record, regarding which you are creating this activity. Date Range: Select a date range during which you will be working on this activity. Priority: As there would be multiple activities in your calendar, you can set its priority to manage the overall schedule. Description: Add notes or any other required details. It helps you remember highlights. Apart from these options, based on your activity type, you will get other options like for Fax, Phone calls you get extra fields like To, Phone numbers, etc. Step 7: Once you are done creating an activity, it will be displayed like below on the calendar. When you hover on it, it will display the tooltip with all the required details. 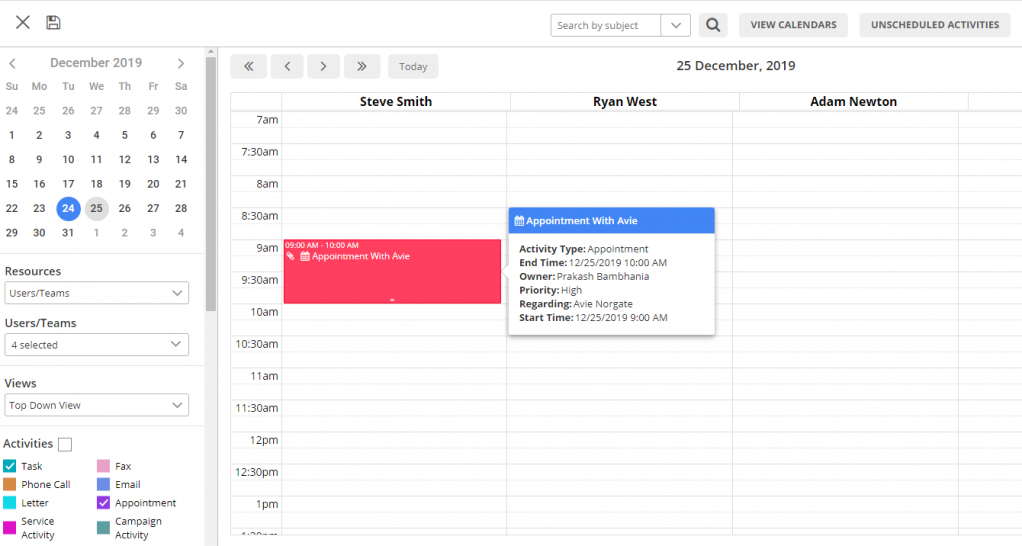 You can work further on this activity, and access it whenever needed. For example, if this activity is an appointment, you can mark it completed once your meeting is completed with that person. And later, you can edit the details from the calendar.
To edit this activity, click on the activity from the calendar and this popup will be displayed. From there you can perform various operations like edit the appointment details, change its status, mark it completed, make it a case, etc. and it gets updated in CRM as well. How to Manage Unscheduled Activities in Dynamics CRM: There might be situations when you would have to manage sudden priority work in your schedule. Those are considered as unscheduled activities. To manage the unscheduled activities, it is important to check the Active box. On enabling the Unscheduled Activities option, you can manage unscheduled appointments and service activities without attendees and assigned resources respectively from the calendar. After enabling the Unscheduled Activities option from the configuration, the button will appear on the header on the main calendar page. By clicking on it, there will be a dialog box with a list of Unscheduled Activities. Select the start date, end date, and activity type to create the view of unscheduled activities as required. You can also type in the subject line in the search box to look for a particular activity. – If the activity type is ‘appointment’, it will show all the appointments that don’t have any required attendees assigned. – To assign attendees to an appointment, select appointment as the ‘activity type’ from the dropdown, select activities and click on Set Required button. – By clicking on the ‘Set Required’ button, it will open a dialog box to select the required attendee. – Select the attendee as required and click on the Save button. – After saving, attendees get assigned and that activity gets removed from the list of unscheduled activities. – If ‘activity type’ is a service activity, the list will have all the service activities that don’t have resources assigned. – To assign resources to the service activity, select service activity as the activity type from the dropdown, select the service and click on Set Resource button. By clicking on the ‘Set Resource’ button, a dialog box will open. From there, select the required resource and click on the Save button. – After saving, resources get assigned and that activity gets removed from the list of unscheduled activities. Original Blog: https://www.appjetty.com/blog/how-to-manage-activities-with-dynamics-calendar  To keep up with the fierce competition in the ecommerce industry, you constantly need to think of ways to broaden your market and increase the sales of your online store. Having a multilingual website helps you to reach out to markets that your competitors are yet to reach; hence you have a good chance of setting up your brand image in the markets with different language and currency preferences. Moreover, you don’t need to exhaust additional resources to run a multilingual site. The cost of operating a unilingual and multilingual site is about the same. You just need to set up multiple languages and currencies on your current Magento site by following some easy steps.
In this blog, we have provided a step-by-step guide to help you create a multilingual store in Magento by yourself: Step 1: Download Language Packages The first step would be to download the relevant language package(s) you require to set up your website in. Visit Magento Connect store for available translations. From the array of packages available, choose the ones that are suitable for your needs. After selecting and downloading it, you will get a file in the .gzip format. Open it to access the folder app. Upload the folders of design and locale to add the unique files relating to the language you have downloaded. Now, you can move to create the new store view. Step 2: Add a new store view To display your website in different languages, you will require adding a store view for each of the languages. If you had installed Magento without the sample data, only the English language would be preconfigured as your default language. In case of installation with sample data, it will have three store views namely French, German, and English. But you still need to download the corresponding language pack to display the frontend in that particular language. Follow the following steps to add a new store view: - Login to your admin panel - Go to ‘System’, and further to ‘Configuration’, reach for ‘Manage stores’. - Click on ‘Create Store View’ on the top left. - Once you are redirected to the ‘New Store View’ page, enter the field name and code. For example, if you want to create a Swedish store, write Swedish. - Save the store view. Now your store had been created. The creation of a store doesn’t show up your website in the selected language. You need to configure the store by installing the language pack or by translating the default text strings manually. Step 3: Install and Configure the Language Package(s) The language pack is equipped with the translation files of the of the default text that appears on the front-end of your website. Before these translations reflect on your site, you will need to change the locale settings. Let’s see how to do this: - Go to ‘System’ and then ‘Configuration’. - You will find the ‘Current Configuration Scope’ in the upper left corner. Select the store view for the language you want to configure. - Go to the General section on the left. Expand the ‘Locale Options’ - Unmark the ‘Use Website’ check box that appears besides the options and set the drop down menu to the preferred language. - Click on the ‘Save Config’ button on the top corner. To change the language of your back-end functions, go to the bottom of the admin panel, then to the ‘Interface Locale’ drop down menu, and choose the language. Magento has a default in-built tool that helps you translate default text strings. If you don’t want to go for the language package and translate it yourself using this tool, follow the given instructions: - Go to ‘System’ >> ‘Configuration’ - Click on ‘Developer’ which you will find in the ‘Advanced’ menu. - Click on ‘Translate Inline’. - If you want to translate the text in the front end, save the ‘Enabled for Frontend’ option to ‘Yes’. - If you want to translate the text in the back end, save the ‘Enabled for Admin’ option to ‘Yes’. - ‘Save configurations’ and move towards editing the translations by using the tool. Step 4: Change the product descriptions and categories For each of the store views, you will need to change the descriptions and categories of the products. Follow the given instructions to complete the process: - From the admin panel, go to ‘Catalog’ menu, and then select ‘Manage Products’ from the options provided. - Find the product and click on the ‘Edit’ button. - Go to product settings and select the store view from ‘Choose Store View’, unmark the ‘Use Default Value’ and change the value for the option. - Click on ‘Save’ or Save and continue Edit’. You can edit the categories by following the same process from ‘Manage Categories’. Bypass Step 3 & 4: Use a Language Translator Extension If you don’t want to manually install all the language packs and modify all the product descriptions and categories on your own, you could simplify this process with this Magento 2 Multi language It is a best selling language translator extension from AppJetty and is available for both Magento and Magento 2. With this extension you can translate product details, category details, CMS pages content, product reviews, search strings, etc either one by one or all in one go. Step 5: Set Up multiple currencies and currency exchange rates You are expanding your business to geographical locations beyond national boundaries, so along with their native language; you need to show them their respective currencies as well. Here’s how you can set up multiple currencies for your store: - Go to ‘System’, and then ‘Configuration’. - Mark ‘Default Config’ for ‘Current Configuration Scope’. - Go to ‘Currency Setup And select your ‘Default Display Currency’ e.g. U.S Dollar. - Now, choose the currency options you want to provide on your site. - Click on ‘Save Config’. Now, to set up currency exchange rates, - Go to ‘System’ >> ‘Manage Currency Rates’ - Import the required currency rates by clicking on ‘Import’. - Click on ‘Save Currency Rates’. You are now done setting up your multilingual site. Clear the cache by going to Admin panel > Navigation System > Cache management. Refresh your site, change the store view and go through a test to see if it works fine. You are now ready to generate more revenues from your ecommerce store. Original Blog: https://www.appjetty.com/blog/creating-multilingual-store-magento-guide  Smartphone users are forecast to reach 3.5 bn in 2020! And this is 2020! A jaw-dropping figure, right? You definitely can’t afford to miss this opportunity. Of late, Magento has gained huge popularity as an e-commerce platform among businessmen due to its simplicity and versatility. It's time for Magento store owners to think of something beyond responsive websites and make their presence strongly felt with a snazzy e-store app. A Magento mobile application for your store is a must due to many reasons, one being its lowest cart abandonment rate of only 20%. While it is 97% on mobile sites and 67% on desktop sites. So, imagining an e-store without an app today is hardly possible. But what if your mobile app turns out to be incompetent or irresponsive? With a plethora of mobile app development service providers in the market, you may find it confusing to pick the right one for yourself. However, if you know what features you can’t let go of in your mobile app, you can be clear with your app requirements. And can select the right Magento 2 native app. So, what follows is an exhaustive list of features that your app must have. Functionalities You Can’t Forgo in Your Magento Store AppDynamic LayoutsThe homepage of your app creates a huge difference. The more attractive it is, the more it will engage users. The more it engages users, the higher the chances of sales are. So, make sure that your Magento 2 mobile app gives you the freedom to customize the layout fully. Users should have a seamless shopping experience with no complexities. Easy Management of User ProfileIf users find it easy to update personal details, manage wish lists, recover passwords, they will like that app more. Enhancing their experience with your app paves the way for increased sales. So, make sure that the mobile app for your Magento store lets your customers manage their profiles easily. Live SynchronizationReal-time synchronization between your online store and app works wonders for you. If you upload new products or make other changes on your site, every such change should reflect automatically in your app. It will save your time and efforts that go into manual product management on two different platforms. So, it is crucial to have this feature of live synchronization in your app. Seamless Navigation ThroughoutA user should find it easy to navigate to product listings, wish lists, orders, and settings from your app dashboard. Further, they should be able to ‘filter’ and ‘sort’ to view exactly what they want in product listings. Push NotificationsAlerts and push notifications in an app are an asset. Sending notifications about offers, sale, coupon codes or other important updates helps you gain loyal customers. A customer feels more valued and they engage more with your business. Single-Page CheckoutA longer checkout process taking 3-4 pages to complete may prove to be a put-off. Users may find such checkouts longer, tiring and confusing. This may result in their abandoning the checkout process in the middle. On the contrary, one-page checkout process is faster and easier for users. This contributes a lot to the reduction in the cart abandonment rate. Order ManagementIt should be easy for customers to view their purchase history. Moreover, they should be able to manage, track or cancel their orders from within their app. This gives your customers a good reason to use your app. So, see to it that your Magento 2 native app has this feature. Voice and Barcode SearchAdding convenience to customers’ shopping experience by offering voice search and barcode search is valuable. Instead of having users type their search query, your app should provide ‘Voice Search’ or ‘Barcode Search’. Geo-TrackingThe geo-tracking feature facilitates auto address-filling for customers. It may become tiresome for users to fill shipping addresses manually every time they shop. On the contrary, if your app has the Geo-Tracking feature, it may auto-detect and auto-fill a user’s current address. Thus, checkout becomes easier and faster. Support for Multiple LanguagesBe a Roman when in Rome. True, right? The same goes with apps. If you don’t provide support for multiple languages in your app, you can’t maximize your outreach. So, the mobile app for your Magento store should provide multi-language support ideally. It also should support the RTL (Right-to-Left) format for some Arabic countries. Support for Multiple Payment GatewaysIf you offer flexibility in choosing payment methods to customers, they are more likely to buy products. So, ensure that your mobile app provides support for PayPal, bank transfer, COD, and Cheque/Money Order, etc. Hassle-Free RegistrationApps with too many steps for the sign-up process make registration complex and time-consuming for users. So, make sure that your mobile app provides a simple registration process for users. Your Magento 2 native app should ask for minimum details including username, mobile number and email address for the registration process. A simple registration process will encourage more customers to register themselves with your site. Which ultimately will increase your customer base. Integration of Social MediaYour app should also provide users with the social media authorization feature. So, that the users can log in to your app via FB or any other social media accounts. Having this feature in your app simplifies the login process further. Also, it comes in handy for situations where a user has forgotten his login password. They can reset or retrieve their password by using the social media account they used for registration. High Loading SpeedIn this fast-paced world, you can’t afford to have a slow-loading app. An app that takes more than 3 seconds to load can put off 43% of customers. So, it is crucial to optimize your app in a way that it loads fast. For that, the mobile app for your Magento store should match the standards of the underlying user’s device environment. Final Words:So, it is important for you to understand that merely having an e-store won’t be enough. To get an edge over your competition, you need to invest and understand m-commerce and mobile marketing. And before investing, make sure to create a checklist with the above mentioned features. Oroginl Blogs: https://www.appjetty.com/blog/powerful-ecommerce-mobile-app-features  Online and offline marketing are the two pillars of the marketing department of any company. While companies still practice offline marketing, they have shifted their focus on the online marketing of late.
The reason? The rise of the digital age. In online marketing, content forms a crucial part. And content marketers need to know when, where, what content to deliver and to whom. For them to deliver the right content at every stage in a buyer’s journey, asking questions is a surefire way. And a CRM survey is the best way to ask those questions. So, if you’ve not yet taken advantage of surveys to nurture your customers, then let’s walk you through the know-how. The Buyer’s Journey and Its Three StagesMost of the buyers will pass through at least the three stages of the buyer’s journey before finally buying your product(s). So, let’s understand these three primary stages first and learn how to frame the right content and survey questions. AwarenessThis is the first stage of the buyer’s journey where buyers are just experiencing some problems and searching for solutions. They haven’t decided on what approach to follow to solve their problem or what solution to look for. You can tap into customers’ pain points at this stage and provide them with content helpful in addressing their problems. The first thing to understand is: Content here should be purely for the purpose of problem-solving, and not for sales. How? Suppose you deal in electronic gadgets. If you have to sell wireless headphones, consider the following two questions. 1. ‘Do you want to buy wireless headphones from our site?’ or 2. ‘Having trouble using wired headphones when working at home? Which question is more suitable to start your survey with? The second one, right? The reason is that it acknowledges the users’ pain point. While the first question is too straightforward and doesn’t have any mention of pain point. So, always design your questions to ensure users that you are there to solve their problem, not sell your product(s). You can also take help from ‘website intercept surveys’ to create your survey. A Website Intercept Survey is a short survey to gather users’ online experience. It can be in the form of a pop-up survey or an on-page survey. It gives you real-time feedback and actionable information to prepare your main survey. Always include ‘Other’ as an option in questions. Especially when your questions may have more response options than you might provide. Include some open-end questions in your survey to let buyers freely express their views. The content types suitable to share at this stage are: – Whitepapers – Ebooks – Checklists – Informational videos – Guides – Analysis Reports – Blog Posts Once you gain customers’ trust with a problem-solving approach, they may consider buying your products. ConsiderationIn this stage, prospective customers get the hang of the possible solutions to their problem. And they start examining different solutions and approaches cost-wise and quality-wise. At this stage, content in the form of webinars come in handy the most. Videos, podcasts, and case studies are also good forms of content to consider. A webinar is, however, one of the most suitable contents at this stage. For Webinar: Consider asking quizzes or puzzles for early webinar-attendees. Some good questions you can ask at this stage include: – How do you think the webinar will help you? – What’s the biggest problem/obstacle/hurdle you are facing at present? (Remember to customize this question to make it more specific to your webinar’s topic.) These are some examples of ice-breaker questions that help audience get ready before you start the webinar. Here also, ensure that your questions don’t focus on only your brand and products. Rather, they should focus more on the audience and their needs. Always ask for feedback immediately after the webinar ends. It will help you get the highest response rate. A good idea will be a Net Promoter Score (NPS) survey to evaluate the effectiveness of your webinar. Or you can ask 4-5 webinar-specific questions to get exhaustive insight into attendees’ experiences. Further, you can also include a link to your survey in the follow-up emails to all webinar attendees. DecisionOnce a customer has vetted all the possible solutions, they decide to go for the best-fitting solution for them. This is why this stage is the ‘Decision Stage’. This stage is where you have to actually start pitching for your products. The content suitable for this stage may be in the form of: – Product Demos – Product Comparisons – Product Reviews – Testimonials, etc. – Promotional calls – Promotional emails, etc. Remember, you should leave no stone unturned in answering all the questions your buyers might have. And assure them that they will definitely benefit from your solution(s). Only this way, you can close the deal with your prospective customers. Talking of the CRM survey, it should be sales-oriented. You may also include incentives, promo codes, or offers, etc. to engage the audience to attend your survey. ConclusionYou see that preparing the right content and sending the right surveys at every stage of the buyer’s journey is highly rewarding. With some good survey tools like our SugarCRM survey module for Sugar and SuiteCRM, you can ease the tedious tasks of conducting surveys. Our module comes with features like survey automation, data piping, skip logic, and many more. So, good luck with the conversion of visitors to prospects and finally to your loyal customers!! Original : https://www.appjetty.com/blog/crm-surveys-to-enhance-your-buyers-journe |
Author
Appjetty is a digital software products store specializing in extensions, plugins and apps for host of software platforms like Magento, WordPress, SugarCRM, SuiteCRM, Odoo, Dynamics CRM, etc. Archives
January 2021
Categories
All
|
 RSS Feed
