WelCome To AppJetty
AppJetty At A Glance
 If customers place orders on your site, they also expect a hassle-free delivery experience. While several glitches can ruin this, delivery failure is one of the most common ones. This is where integrating a Magento 2 Delivery Date extension with your Magento store, or practicing some ways to avoid delivery glitches may come in handy. Read on to know more about delivery failure and other glitches in detail. And ways you can fix them. Problem: Delivery Failure You can attribute a delivery failure to various reasons: Receiver’s Unavailability at the Delivery Time Several e-store owners often face this shipping problem. They ship orders without knowing whether the customer will be available to receive the delivery or not. What follows then is the delivery failure. Due to this, deliveries don’t only get late but also increase unnecessary expenditure of store owners. As they have to dispatch the same order twice adding to the overall shipping cost. Pro Tips: Deliver products to customers when and where they want. Let customers select delivery date and time which will: – Reduce the chances of delivery delays to almost zero. – Save you any unnecessary expenditure. – Create a good impression on customers by providing them with flexibility of scheduling delivery as per their convenience. Integrating an extension that lets your customers choose Magento 2 delivery time slot and date can fulfill your purpose. Giving them a call before delivery can also be a good idea. You can keep the option ‘Call before Delivery’ for customers. Mistake in Documentation Even a single minor mistake in the shipping details can create obstacles in the shipping process like the shipment to the wrong address, etc. And rectifying such mistakes and that too after dispatch may be impossible. Or worse, you may even lose your valuable customer due to a documentation flub. Pro Tip:A shipping extension that validates the address your customers fill can be of great help. You should let customers view their delivery details like order date, shipping date, price details, price breakup, all in one place before checkout. This will avoid any confusion about shipping or other details. Shortage and Delay in Raw Material SupplyLet’s say, your customer wants to order a t-shirt with a red ink design. However, due to some reasons, it is unavailable for a long time. A situation like this one may be disheartening. Not just for you but also for your customers. The consequences? Customers may lose interest in your brand and might never return to your e-store again. Pro Tip: Choose your vendor carefully after researching the market well. If you are a small business owner, you can opt for the print-on-demand or drop-shipping option as well. It will save you from the inventory management expenditure. Thus, your consumers will hardly face the ‘Out of Stock’ situation anytime. Delayed Deliveries13% of shoppers won’t order from a retailer again who failed to deliver on-time. Factors responsible for late deliveries may be: Non-Specific Grace-PeriodGrace period is the minimum count of days between the order date and delivery date for a product. If you don’t specify it, customers don’t get an idea of the number of days they would have to wait and presume a delivery date. The order they receive after the date they presumed is a ‘late delivery’ for them. Pro Tip: Always specify a ‘grace period’ for customers, especially for those orders that aren’t one-day deliveries. This will save you unnecessary grievances, complaints or queries. Non-Marking of Dates and Delivery Time Slots To be at the beck and call of customers helps a lot. But you too are a human! And need rest or break. When you don’t specify your non-working days, your customers won’t be able to know whether you are operating on a particular day or not. So, when they order a product from your e-store, they consider that as a working day and then your late delivery countdown buzzes. Thereafter you know, customers have already framed a bad opinion about your service and are never going to return to your e-store. Pro Tip: Mark your non-working days and non-operative time slots. It will make it easy for consumers to know the estimated delivery date and time. Not Setting Cut-Off Time and Delivery Quota in the BackendConsumers will place orders as and when they like, you may not be able to fulfill them at times. Pro Tip: Set cut-off time beyond which an order won’t qualify as the order on the same date. It will help you put a cap on the count of daily orders and manage them more efficiently. Besides, set a delivery quota per consumer (the maximum count of orders one places on a single day) also. It will help you limit daily orders from a single customer. Hence, you can serve a consumer better by preventing overflow of orders and facing difficulty completing them. Delayed DispatchesKeeping track of numerous orders can be hard at times. If you have umpteen orders but no proper reminders, you may mess up completing orders. Pro Tip: Install an extension to send you email notifications about the latest orders. Such an extension will help you stay on top of order management. Keeping a repository of orders will also become easy. Thus, tracking orders and on-time deliveries will become easier for you. Mother NatureNatural calamities like floods, earthquakes, hurricanes, etc. are inevitable. If any such nature force delays your delivery, the best you can do is inform your customers about the possible delay. This way, you will instill a sense of trust in them. Lost/Misplaced OrdersSometimes, an order may get misplaced or lost on its way to the customer. They may end up questioning you about that once it has surpassed the estimated delivery date. A few possible reasons behind this goof-up may be: Package Not Shipped in the First PlaceThough quite unseemingly, a picker may haven’t picked up the right order(s) itself from the origin. So, unbeknownst to the shipper, a package may haven’t even been dispatched. Unscanned Package Sometimes, a package may enter the supply chain in the shadows. This means the carrier may have forgotten to scan or confirm the order. Damage Beyond RecognitionSome accidents like car/truck accidents, fire incidents, or fluid leak from other packages may damage a package beyond recognition. Pro Tips: Proper Inventory ManagementThe more efficiently you manage your inventory, the lesser the probability of misplaced packages would be. Research Your Options WellMultiple shipping providers are there for you to choose from. However, you can’t just pick any random shipping provider. Research shipping providers, compare reviews, quotes and service quality before the final selection. Proper PackagingTo ensure the maximum safety possible, do your packaging well. Choose a water-resistant packaging for items susceptible to damage from water like documents, files, etc. Similarly, wrap a foam sheet around delicate things like glass crockery items, and use a hard outer covering. Live Track your Orders Use an extension that lets you live-track all your shipments. Also, send notifications from your end to keep them abreast of their parcel whereabouts. Let them track their shipments themselves as well by providing the ‘Live Tracking’ feature. Shipment of the ‘Wrong’ ProductSometimes, a consumer simply orders a product from your store. But don’t get to mention any specific order requirements. Afterwards, when the product finally gets delivered to them, they notice flaws and request the product return or replacement. This scenario is more common in custom products. Pro Tip:Use Labels and CommentsCreate a ‘Comment’ box under a label of your choice. This comment box is for consumers to fill out any special requirements about the order. This way, you can deliver the exact order in the way they want. These comments will personalize the delivery process and deliver the ‘right’ product. To Sum UpSeveral common shipping glitches may bring you in your customers’ bad books. Analyzing them and upgrading your shipping practices by using a Magento 2 Delivery Date and time scheduler can really make a difference in your operations Original Blog: https://www.appjetty.com/blog/common-shipping-glitches-and-ways-to-fix-them 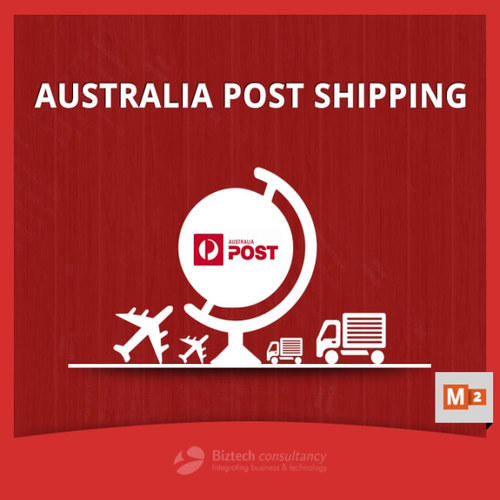 With the shift to online, we no longer need to buy things by going to brick and mortar stores. Estores have taken over. From last eCommerce enterprises to small niche stores, we have all our needs covered. You can easily order an item from anywhere in the world and have it reach somewhere else. It’s just you and your phone against the world!
Stats show that over 20% of people shop online and they prefer this because of the sheer logistical ease. Just check out any store you want, at any time of the day, add items to a wish list if you want and order away! Home delivery is just the cherry on top of the very sweet cake that is online shopping. Additionally, with the competition among stores both online and offline, the number of sales they have has gone up. And everyone offers competent pricing. The flow of an online transaction is browsing (based on need or want), finding the right product, ordering, and paying, ending in delivery. Delivery almost seems like an insignificant aspect when put last on that list. But it is hardly insignificant. Product delivery determines customer satisfaction: how, when, how much access and control they have in the matter, etc. When customers place their orders, they often abandon their carts because they suddenly see a huge shipping cost or a high tax rate. If they see this, it often leads to them abandoning the cart. No one likes unexpected costs. If you want to make sure your customer actually goes through with the purchase, you have to give them a detailed shipping rate from your shipping partner. If your store is on Magento 2 and you ship to Australia, the easiest way is to use Australia Post as your shipping partner. They offer top of the class services like live rates, tracking, delivery date choice, parcel packaging choice, etc. You can partner with them and have them manage all your shipping. Though, you might face certain challenges: You’ll have to keep switching from your CRM to the AusPost database.
Let’s look at the advantages of this integration:
This works because Australia Post has an API that you can integrate with your Magento store. It fetches the required data from Australia Post to the Magento store. Therefore, your customers see the shipping data that they would see on the Australia Post website, live. They can also use this to track every step of their parcel’s journey with the Australia Post tracking app. All this, right from within your estore. You can get this extension from any extension store that is the official partner of Australia Post. This guarantees you a quality product and security of your client’s data, which is definitely more important than the shipping quality your clients have come to you for. Lastly, we can end on the note that shipping is one the most important stages of the buying cycle that a customer has on your estore. If you miss taking care of this step, you will lose out on them. But attend to this, and you will have customers that come back and some loyal ones as well. Take care of everything that comes to mind regarding the customers. They may not always notice the convenience they get while shopping, but they will most certainly notice the inconvenience if any.  You can use your CRM to the most when it comes to on-field activities. You need the right tools for this, and a Dynamics 365 map is the way to go about this. The reason for using a third-party tool is simply because Dynamics itself does not provide an extensive default option. But let’s look at how a map integration like Quick Maps gives features like proximity search to maximize your efforts. Your on-field team can leverage this to get their schedule, plan a route based on proximity and add the records to their calendar easily. Let’s walk through how to enable it: Step 1: Redirect to “Map” page - Click on the Dynamics 365 menu and then click on “Quick Maps” from the slider menu or find the “AppJetty” tab from the header menu and click on Maps to open QuickMaps.   Step 2: Enter the Location name in Default Location or pinpoint the current location on Map. - When the map loads, if the default location setting is saved then it will display location name in default location textbox. - If the default location is not set and you want to search records for a particular location, right-click on that location on the map and click on the “Set As Current Location” option. This will add selected location into the Default Location textbox also. 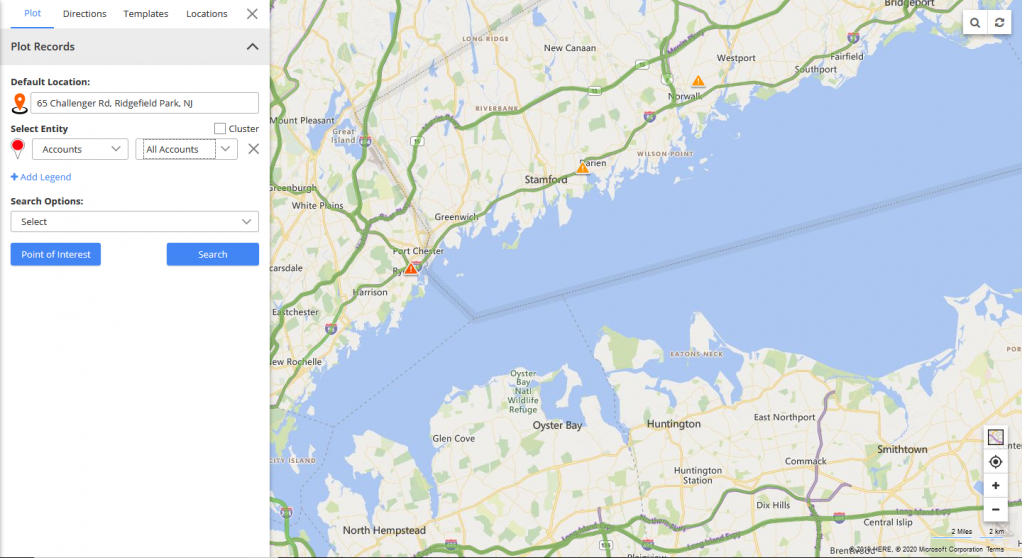 - If no value is provided in the textbox, the Proximity search (Radius search) will work on logged in user’s current location which is inserted in the configuration. 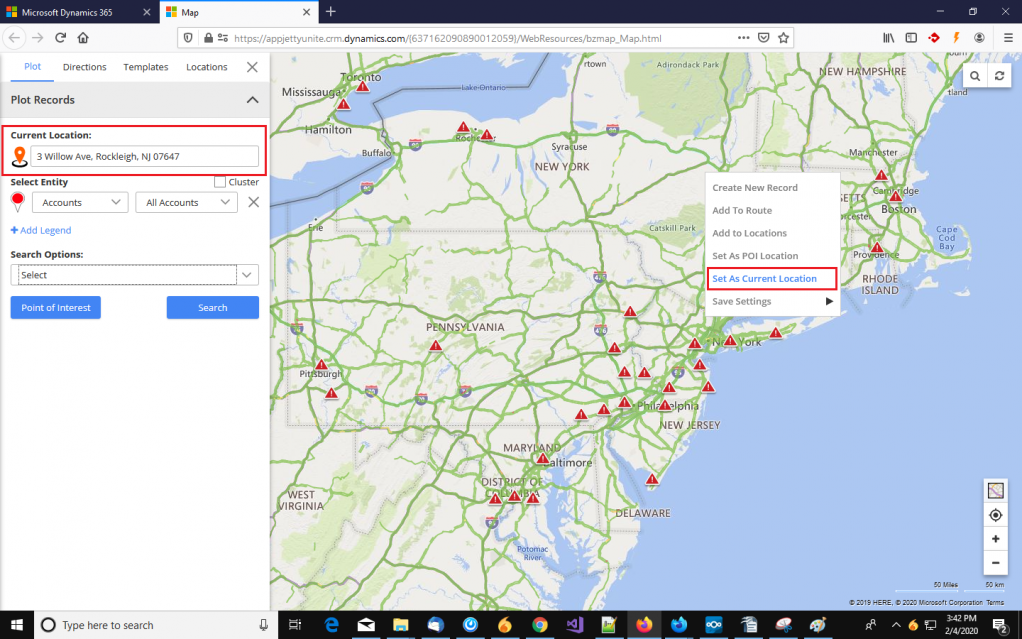 Step 3: Perform Proximity Search (Radius Search) - Now select the entity for which you want to search the data near the current location. - Select the Entity and its view under the ‘Select Entity’ option and select Proximity Search in ‘Search Options’ dropdown. - As you select ‘Proximity’, Distance and Time options will appear. Distance-based Proximity: - Enter radius to search. It allows users to perform up to 3 proximity searches at a time. - Select distance unit KM / Miles from the dropdown option. - Click on the Search button to perform a Proximity search (radius search). Time-based Proximity: - In case of proximity search using time, enter travel time (* in Minutes ) in the textbox. - By selecting the Time option, it will calculate data based on driving time from the current location. - You can check the distance from current location by hovering over any pushpin. You can insert a maximum 85 mins distance from the current location. 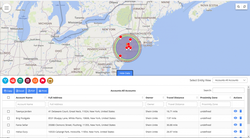 Step 4: Create Appointment/Task or add records to route- After searching the data near the current location, data of the selected entity will be plotted. - Now, to create an appointment and a task for any data, click on the pushpin of that data and the tooltip with many options will open. - From the tooltip, you will get the options to create an appointment/task and add data to the route but only for the selected pushpin data. - You can also perform these actions from the data grid by clicking on ‘Show Data’ at the bottom. In the data grid, you can see the icons of Routes, Task and Appointment>. - In the Data Grid, you can set the Routes, add Tasks and Appointments for more than one data point by multiple selections. 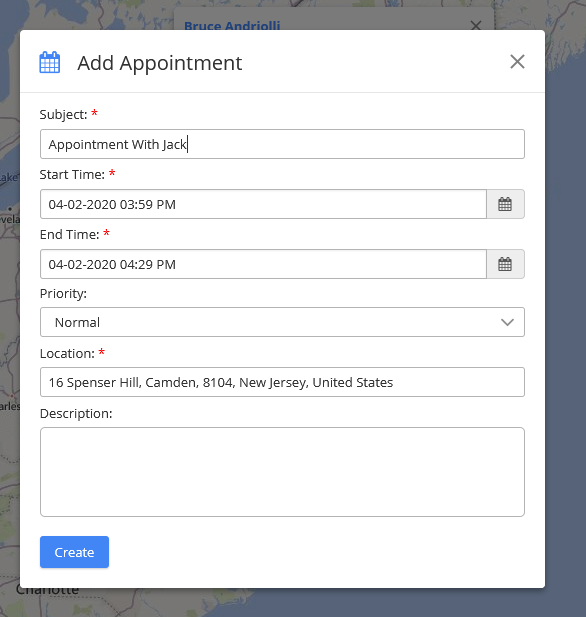 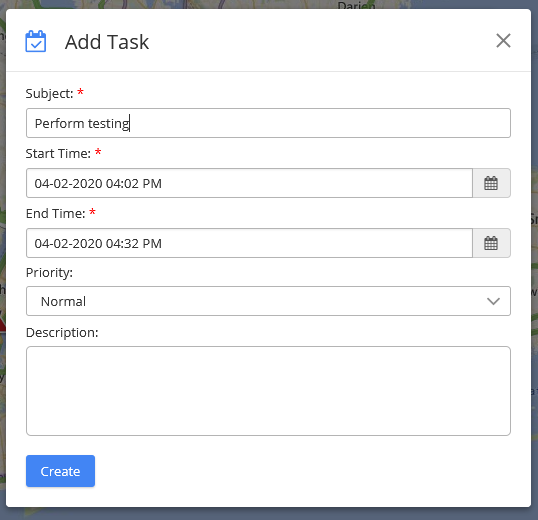 - Now, you can add the data to Route from the Tooltip by clicking on Direction -> Add to Origin or Add to Destination as per your schedule and from the data grid by clicking on ‘Route’ icon. - The Direction option will open with added Route. 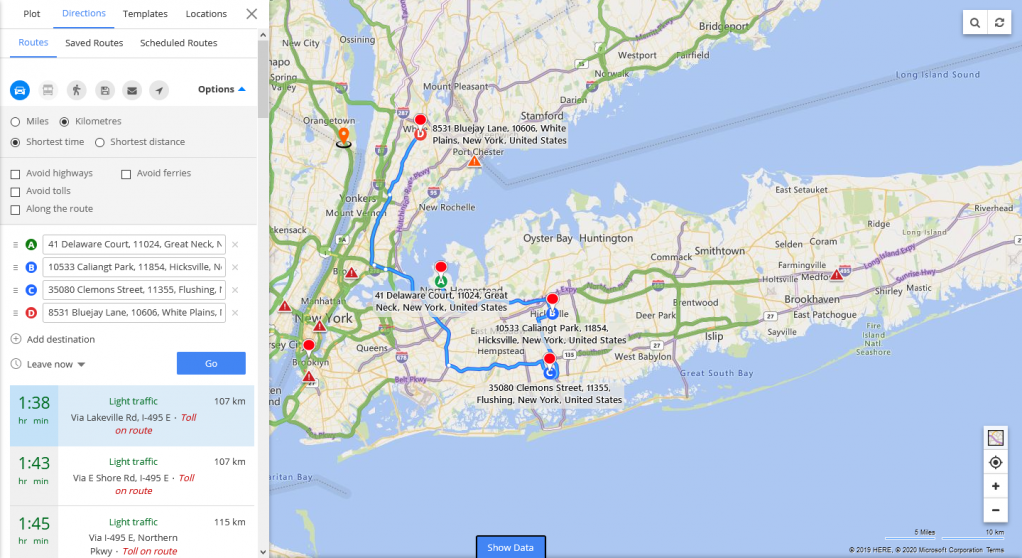 In this way, you can search nearby data for selected entities based on the current location using Proximity Search in Quick Maps. You can perform certain actions like Creating Appointment / Task for the data and add to Route in your schedule. Proximity Search enables you to carry out result-oriented work in a particular area and region.
Original Blog: https://www.appjetty.com/blog/stay-top-of-your-clients-with-nearby-data-search  Dynamics CRM allows you to plot one entity record on the map at a time directly. We wrote a guide explaining how you can do it. On the other hand, a Dynamics CRM Map integration allows you to plot multiple entity records. On top of that, you can use a drawing tool to visualize your records in a particular area or region. One such tool is Quick Maps. You can search data on Quick Maps based on Region, User, and there is even an option for Proximity Search. You can also search and manage records by defining shapes on the map. You can search records by drawing shapes on the map to get the geographical view and visualization of the records. Based on that you can perform your marketing/sales related actions and activities. To visualize records in desired shapes on the map for selected entities follow the below steps: Step 1: Redirect to “Map” pageClick on the Dynamics 365 menu and then click on the “Quick Maps” from the slider menu or find the “AppJetty” tab from the header menu and click on Maps to open Quick Maps.   Step 2: Select the required entity and its view from Select Entity option and select “Drawing” from Search Options. By selecting the Drawing option, the Drawing Toolbar with various tools will be enabled. 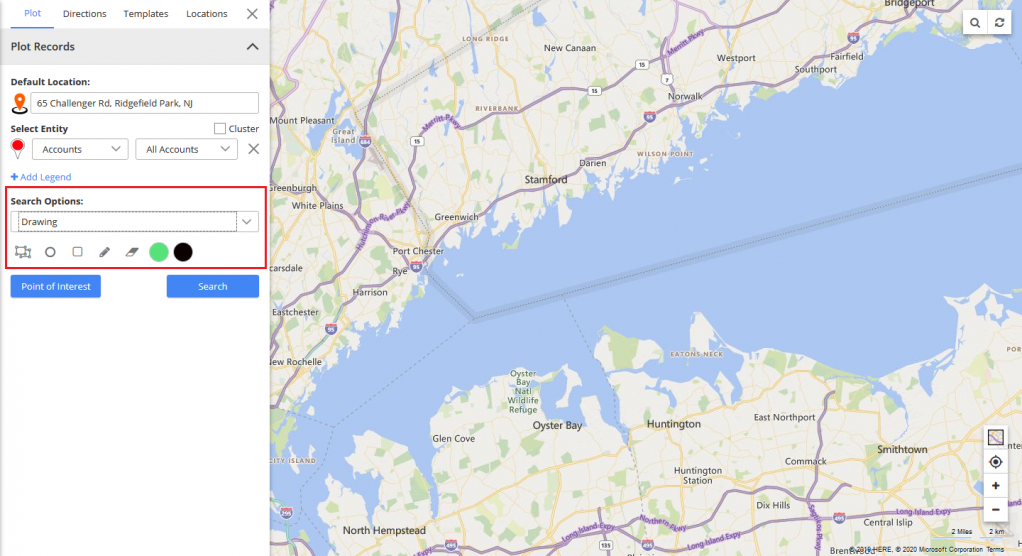 Step 3: Use ‘Drawing toolbar’ to draw the desired shape on Map You can use ‘Drawing toolbar’ to draw the shape from following available tools: - Polygon: Draw a polygon of the desired size with multiple sides. - Circle: Draw a circle using this tool. - Rectangle: Draw a rectangle using this tool. You can also edit the drawn shape and can change shape’s fill and border color using the following drawing tools: - Edit: Edit the drawn shape or resize the shape using this tool. - Erase: Erase drawn shape from the map using this tool. - Fill color: Define or change the fill color of shape using this tool. - Stroke color: Define or change the shape’s border color using this tool. Step 4: Visualize data from the drawn shape on the map - You can draw multiple shapes on the map. - After drawing the shape, click on the “Search” button to visualize data from the drawn shape on the map. The data will be plotted on the drawing shape. 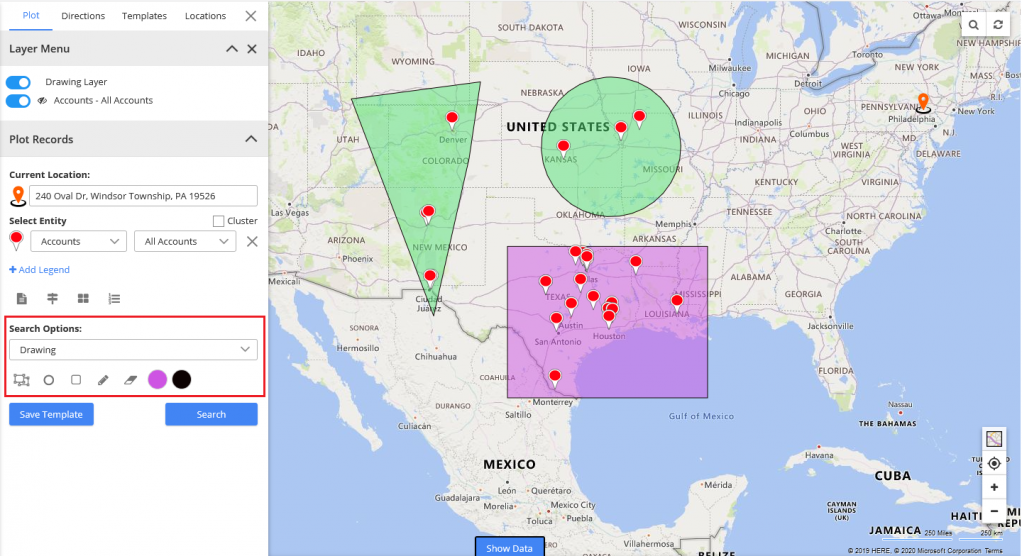 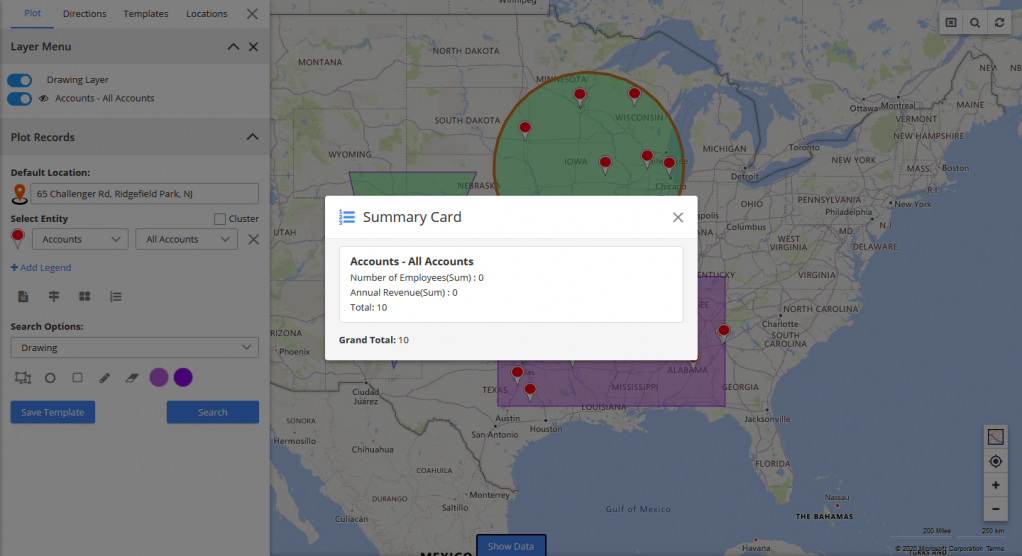 Getting the records on the map as per the drawn shape is also known as “User-Editable Shapes” as the user can draw, edit and remove the shape as per his/her requirement.
Drawing shapes feature in Dynamics CRM map integration will make it easy for you to visualize and check the records of the selected entities in a particular area of any city, state, and region. Original Blog: https://www.appjetty.com/blog/visualize-records-map-using-drawing-toolbar  Less time on the road means more time with customers, which can drive more business. Any sales rep would agree that multi-stop route planning is one of the most tedious parts of their job that consumes most of their time. An ineffective route planning can not only affect your sales rep’s productivity but also your investment. That is why we created this article with some actionable tips on how route planning can be effective for field sales teams. Plan your RoutesQuick Maps is a Dynamics CRM mapping tool. It integrates with your Dynamics CRM to let you visualize your CRM records and sales data onto the map. With the default Dynamics version, you can surely get your records onto the Bing maps. However, it allows only one record per map, making it difficult to plan your day or take any data-based decisions. Route OptimizationIt is the process of defining the best route with the shortest travel time, lesser traffic, and multiple waypoints for the sales reps. Doing it manually can be complicated as it can include making a choice from the multiple available routes, a number of intersections along the route and many other factors. The Three-Step Solution:Step 1: Gather the Locations The important step. Cluster clients’ locations based on the criticality. For example, rather than defining an area where you would want to work for the day, go through your list of prospects and leads to determine the critical, important ones you need to work on. Based on that, you can plan your entire week to pay equal importance to each one of them. Step 2: Plot Your Records Once you are done with the above exercise, you will have a list of clients to work on. In this step, you will need to open Quick Maps or any other map integration from your Dynamics CRM. After that, select records to plot onto the map. For that, entity mapping is mandatory. Here you need to add details like address, latitude, longitude, country, state, city, etc. After Entity mapping, you will need to get geocodes from your records. For that, you will need to click on get geocode option from the top for either selected or all records. After these steps, you can go to the maps to plot your records. 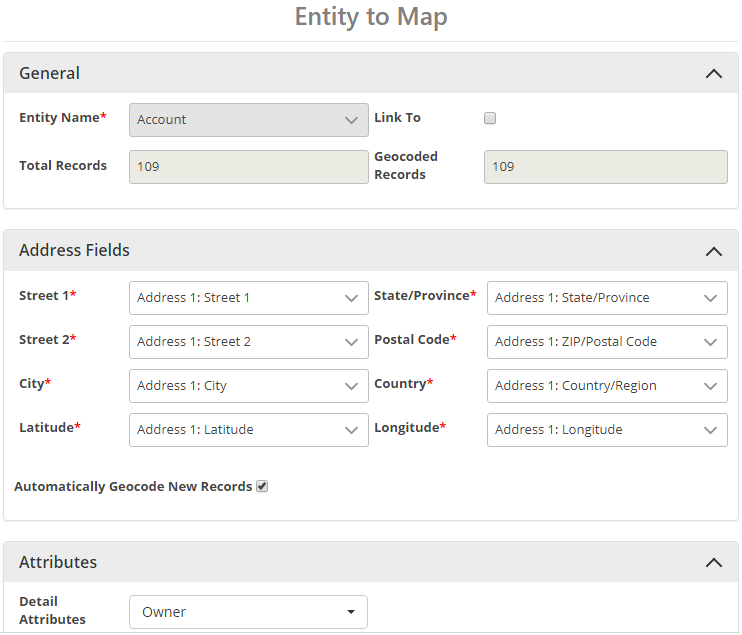 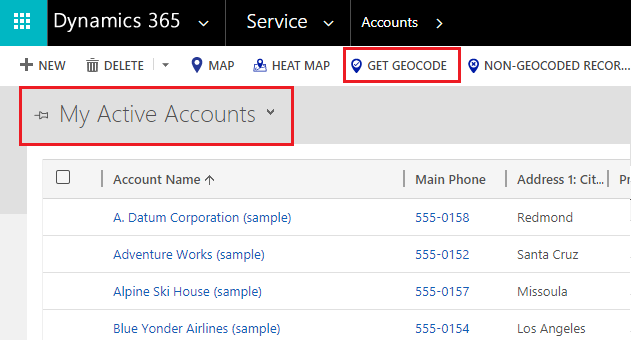 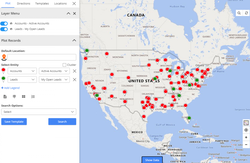 Step 3.Plan your day After plotting records, you can prioritize the areas based on the sales figures. To identify them, create a heat map to list out all your areas. From the heat map visualization, you will be clear about your top-performing areas. Now, the next step includes route optimization Add your starting point from the left panel and the records. For example, if your records are A, B, C, D, and E and if A is your starting point, Quick Maps will select the best route with shortest travel time by excluding road closures, traffic, etc. If you want to adjust this route, you will be able to do so easily by simply dragging a particular point. 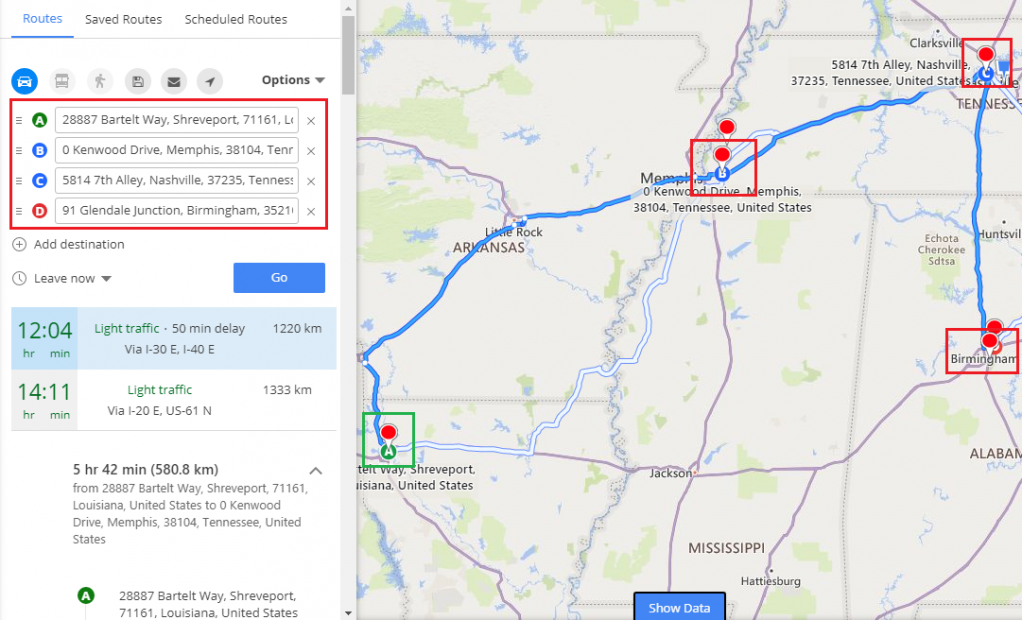 The Benefits:
- Saved Windshield time: As the sales rep gets all the information in advance, it becomes easy to get an overview of the time they might need for the whole week. As a result of it, they would reduce redundant work and focus more on conversion-driven meetings. - Increased Customer Visits: Sales reps can plan more customer visits with this route optimization. For example, they get 2 hours extra as the existing meetings got completed before time because of the shortest travel route, they can search for nearby contacts and visit some more clients. - Reduced Gas Usage: With optimized route planning and shortest travel route, your on-field sales reps will be covering more clients in lesser time and using lesser gas. This means your expenses might go down whereas your sales might go up. Drive Smart - Not EverywhereWith route optimization, it becomes easy for sales reps to focus on the quality of the journey rather than the number of destinations. Original Blog: https://www.appjetty.com/blog/steps-plan-multi-stop-routes-dynamics-crm  The more scattered your data is, the harder it gets for you to understand and make any decisions. Moreover, to understand your current customer base as well as your opportunities and leads, it is imperative to have an overview of all your accounts, contacts, and leads. So, in this blog, we are going to show all the Dynamics CRM users out there how to plot Entity Records on a map right from the CRM. The Dynamics CRM itself provides this functionality of adding an Entity record on a map. Step 1: Enabling Bing Maps To enable Bing maps, go to the Settings → Administration → System Settings. By default, the General tab will open. Scroll down to “Enable Bing Maps” option and select the “Yes” option to enable the Bing Map. Press OK to save the changes. 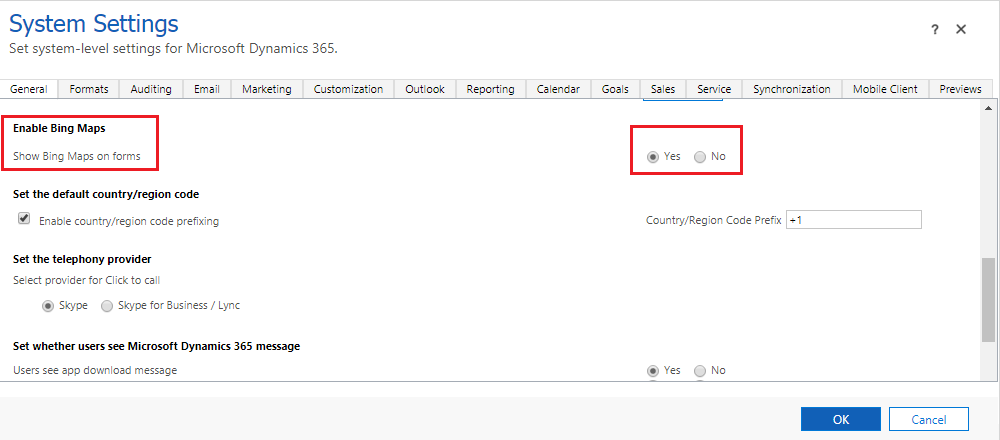 Step 2: Plotting entity records on the map After enabling Bing maps, go to any entity record and edit it. Find the ‘Form’ or ‘Form edit’ option.  By clicking on it, the PowerApps tab will open. Select the Bing maps from the ‘Insert’ tab. 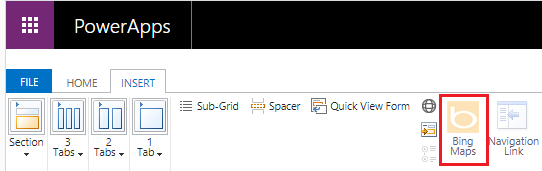 After clicking on Bing Maps, a pop-up will appear where you need to insert and select the required details. Save the changes and click on publish. Now, you’ll be able to see the plotted account on the map inside of that account as shown in the below image. With Dynamics default functionality, you cannot view multiple records on a map at the same time. You only get to see one record on the map. To see all your active accounts or all accounts or any other entity records on the map, you can opt for any Dynamics CRM Map integration from MS AppSource. One such Microsoft dynamics crm mapping Integration is ‘Quick Maps’ using which you can display all the Dynamics CRM records on the map with the required details. Other tasks that you can perform using Quick Maps are: - You can plot and see the records of the selected entity geographically. - By selecting the multiple entities, you can save your own view (template) also. To plot records of any entity like accounts, contacts, leads, etc., follow the below steps: Step 1: Import the package of Quick Maps and install it. Step 2: Navigate to “Quick Maps” from the apps menu. 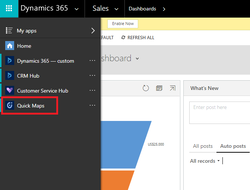 Step 3: Click on the sitemap and click on “Entity Mappings”. 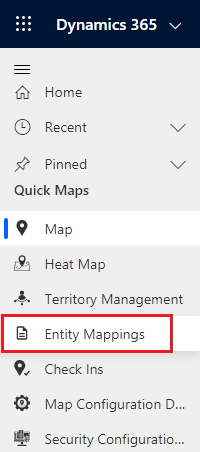 Click on the “New” button to add and configure a new entity. - Now, select an entity from the “Entity Name” dropdown and configure address fields for the selected entity. - Check the checkbox “Automatically Geocode New Records” to automatically get geocodes when any new records for configured entity gets created. - Click on the Save button to save entity configurations. Step 4: Get geocode for records - To get geocode for records redirect to a particular entity. If you want to get geocode only for selected records, select those records and click on the “Get Geocode” button. - If you want to get geocode for all the records, click on the “Get Geocode” button. It will ask you a confirmation to get a geocode for all the records for the selected entity. 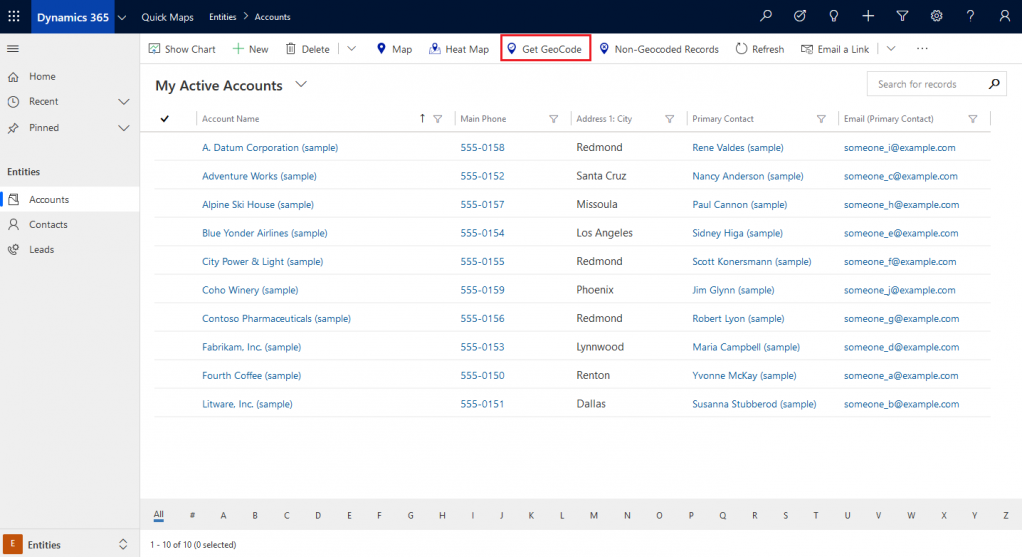 Step 5: Plot records on the map - Navigate to AppJetty → Quick Maps → Maps to plot the records of the configured entity. 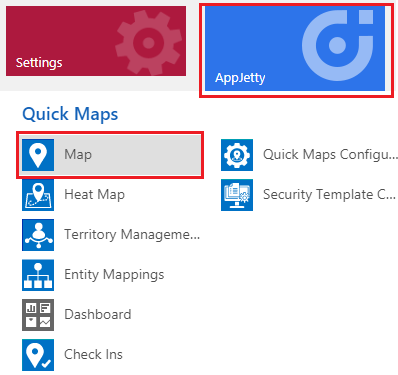 By clicking on Map, the Map view will be as per the default location configurations set by the admin. - The side drawer menu with 4-tabs will appear on the left side of the map. By default, the Plot tab will be open. - Under the Plot Records, select the Entity from the “Select Entity” drop-down to plot the records on the map. - Based on the selection of an Entity and other related options, the entity records will be displayed on the map. - If “Accounts” is selected, select its attribute which you want to plot on the map in the view options besides entity. Select “View” for Accounts like all accounts, my active accounts, inactive accounts, etc. - The account details can be seen by clicking on a Pin icon. - Plotting the records for multiple entities is also possible in Quick maps. 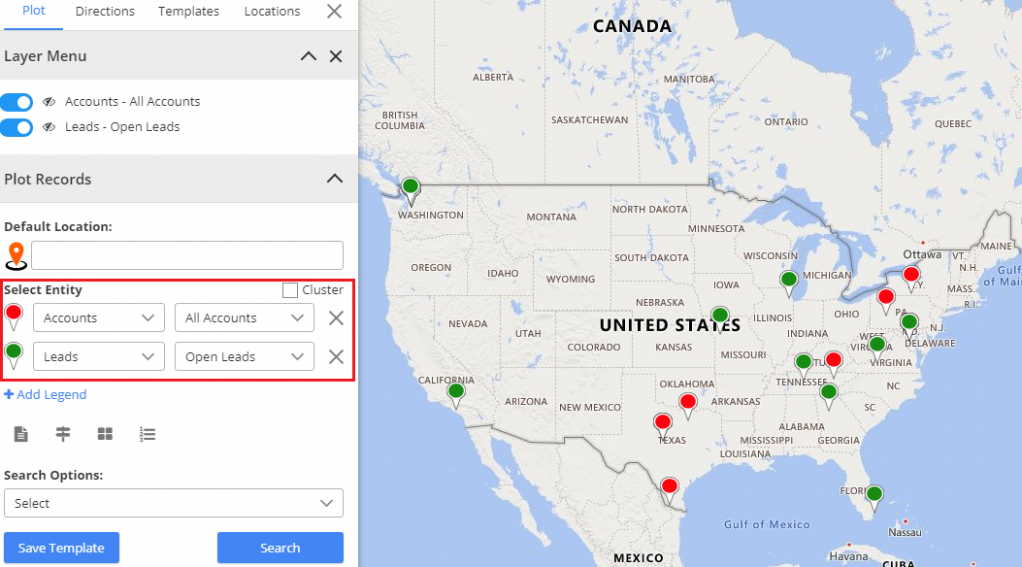 - Click on ‘+Add Legend’ text to add multiple entities. Select the entity and its detail which you want to plot on the map in the view options besides entity.
In this way, you can add and configure the entities to plot the CRM records on the map using Dynamics Map Integration, Quick Maps. You will get the geographical view of all the CRM records. Original Blog: https://www.appjetty.com/blog/how-to-plot-entity-records-map-dynamics-365  Are you a business owner who’s already made it big in domestic markets? If yes, then what’s your next venture? Out of umpteen ideas running through your mind, one must surely be of taking your business global. And it’s a great idea without a second thought. But have you braced yourself for effective website translation? Yes, you heard it right. While people often focus on building personal relationships, localizing marketing efforts and products and whatnot, they often overlook this aspect. You may be thinking that website language translation is a cakewalk – with Google Translate API. But we are afraid you might be wrong there. Mere translation using a Magento 2 Multi-Language support extension or any other such extension that uses Google Translate API isn’t enough. Understanding what all other details you need to take care of besides simply using an extension or app is also crucial. Let’s walk you through things to pay attention to when you translate a website for global expansion.
Every language is different. Translating your website content from one language to another requires you to do a lot more than you think. Though AI has improved the efficiency of language translators greatly, they still can’t outdo humans. They cannot understand cultural sentiments, references, jokes, idioms or other language intricacies of a country, state, or region. Therefore, the onus is on you to make sure that the final meaning of the translated content remains intact and appropriate. If you go for an extension like Magento 2 Multi-Language, ensure that it shouldn’t simply use Google API to translate content but must have a WYSIWYG (What You See Is What You Get) editor. This will enable you to view and verify the accuracy of translated content and if it’s matching the meaning you want to convey. You should also be able to make edits in any piece of content if it’s inaccurate. This feature will save you from big translation blunders that didn’t spare even popular brands.
Language intricacies affect not only translation but also your site SEO. What several owners do is that they search for keywords in the language they are familiar with. Whereas, one should make sure that they search for keywords in their targeted audience’s languages. This will help you drive traffic from your overseas target countries. In the beginning, you can also leverage the knowledge from local SEO experts. They will help you plan your content and place local language keywords strategically throughout. One more thing to understand is that Google is not the only search engine out there. Many countries prefer using search engines other than Google. Some have even built their own to fit their language complexities better. For instance, Baidu and Yandex have over 70% and over 50% of the market in China and Russia respectively. So, think beyond Google and search for keywords popular in other search engines too.
You must be thinking what this point has to do with language translation. Let me tell you, it has got a lot to do. How the content on your website appears depends on the language you are translating it to. Phrases in some languages may end up using fewer words than the original language does. In such a scenario, the look of your final content may appear distorted. In case a language uses more words, your content may not show up fully on the space you have allocated for it. Especially, in images, if a part of the content doesn’t adjust in the space you allocated, it may go out. This may confuse the readers and distort your site appearance. To avoid these distortions and keep your UX engaging, keep future translations in mind. Take special care of short widgets with images, menus, short category names. In the end, have a look at the final translated content to ensure that it fits on the page properly.
Branding is also a must-consider factor when translating a website. Your company’s logo color, punch line, or other such things may also impact your target audience’s viewpoint. But it doesn’t mean that you lose the personality of your brand for the sake of translation. What you need to understand is that the branding for overseas markets may differ from that for domestic markets. So, with just a few tweaks in your content, you can tailor the image of your brand to international markets. For instance, Europeans generally don’t prefer overt call-to-action (CTA) buttons unlike Americans. Hence, a softer coaxing approach for European countries like France and Germany may work wonders.
Images, videos, infographics, and slideshows enhance visual impact. Therefore, don’t focus on translating just web pages. Translate the multimedia content on your site too. Consider using subtitles or voice over translations depending on your target country. Also, ensure that your translated content is culturally fit for your target audience. Avoid using cultural references or stereotypical props that may hurt their cultural sentiments. Final Thoughts The global expansion of your business requires you to be highly calculative, determined, and optimistic. While all strategies hold importance, you can’t ignore tapping into effective website translation. However, translating a site using an extension like Magento 2 Language Switcher doesn’t suffice. Translation requires you to take care of language intricacies, local keyword research, multimedia translation, your site’s appearance, and branding. Combining all of them only will lead to your successful global expansion. Ready to take your business global with language translation? Original Blog: https://www.appjetty.com/blog/points-to-consider-to-translate-website  A strong marketing plan is the most critical aspect for the success of any business. Now, strong does not mean just working long hours. It means a plan that is focused on achieving goals that drive results; and your business. To keep your plan strong through and through in this changing landscape, it becomes important to revise your overall strategies every now and then, identify threats, opportunities, strengths, and adapt to the changes to achieve the results. In this post, we will demonstrate how you can better strategize, revise and target your marketing activities in the right market with Dynamics CRM map integration. It is an extension for Dynamics 365 using which you can plot your CRM data, especially your sales data, on the map to make the most of the opportunities. But before jumping into this marketing revision, it is important to evaluate your current strategies. And then based on the comparison between your set targets and actual results, you should be able to make a decision. There are other scenarios as well where it might be beneficial to revise your strategies like: - It is almost the end of the quarter and you are still behind your target - Potential regions not performing as expected - Assigning executives to low performing areas - Need to compensate for the previous quarter’s revenue There could be more scenarios as well when you might be needing to adjust your sales & marketing strategies. Now let’s see how you can easily identify loopholes and its possible solutions from your system with visually represented data on the map. - From a heat map where sales data is plotted, a manager can find out the least as well as the highest performing regions. 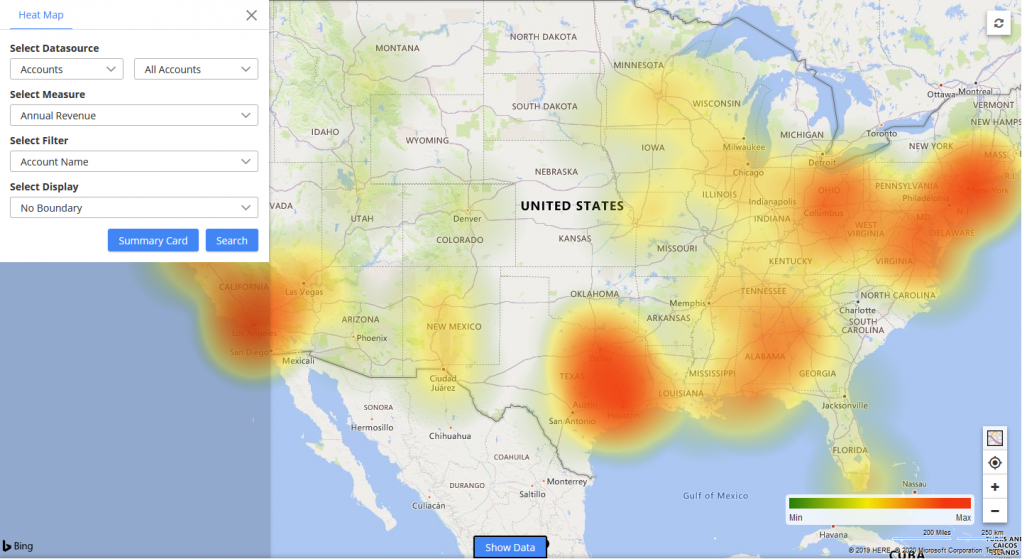 - Then they can list down the low performing yet high potential areas where they would want to invest more effort. They can also create new territories in those areas and manage those with territory management to achieve the set targets. 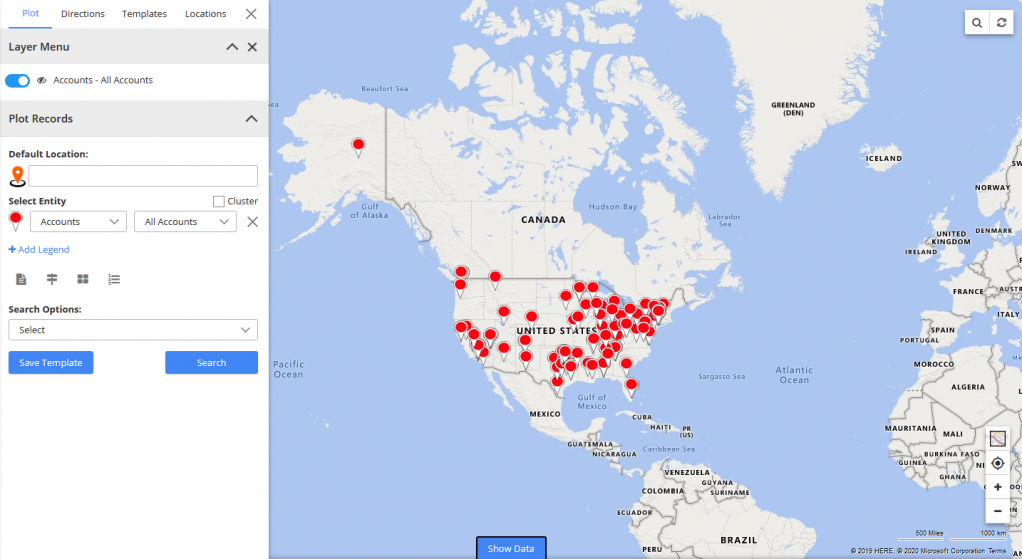 - After that, they can plot records on the map for an overall visualization of the active accounts and include them in their marketing plan. 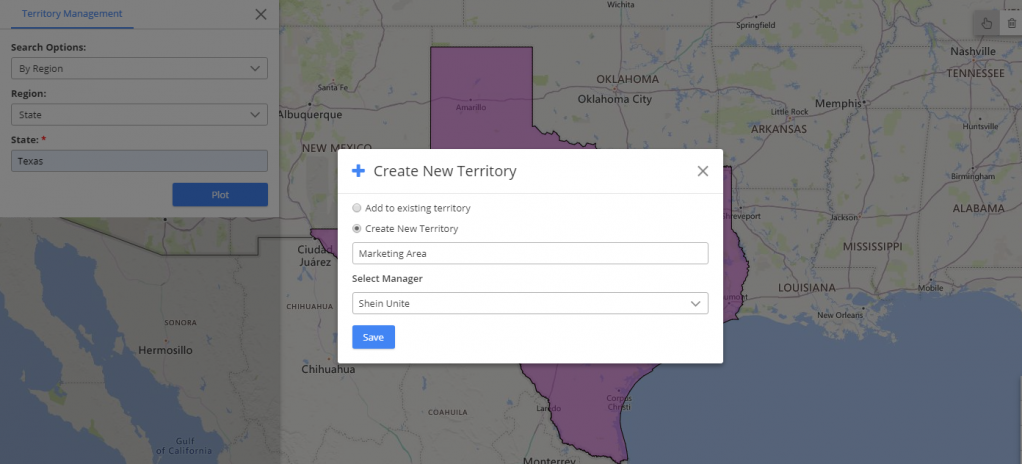 Outcomes from this activity:
- They can plan multiple email campaigns for targeted users to cover up the remaining revenue. - If required, they can prepare a separate list of accounts with the least revenue and bifurcate the target accordingly. - Plan client visits for contacts if required with auto-scheduling and route planning. This will help plan their whole day and schedule meetings accordingly. - If a team member receives any response while at a meeting, they can perform quick actions right from the map like edit details, update status, etc. without accessing CRM records and get more things done in less span of time. - After all of their meetings are completed, they get an overview of the highlights of the day and insights of the activities conducted throughout the day. These insights will help them make an action plan, bifurcate things into different categories like “things we need to stop doing”, or “things we need to start” which could make a huge difference. The major benefit here is streamlined on-field activities for each of your territory. This is how you can tweak your current strategies and meet the defined goals for the quarter. Again, this is just one way of doing it, you have to take your business flow, customer journey, and the industry trends before making any major changes. Ready to power up your on-field activities? Original Blog: https://www.appjetty.com/blog/revamp-your-marketing-quick-maps  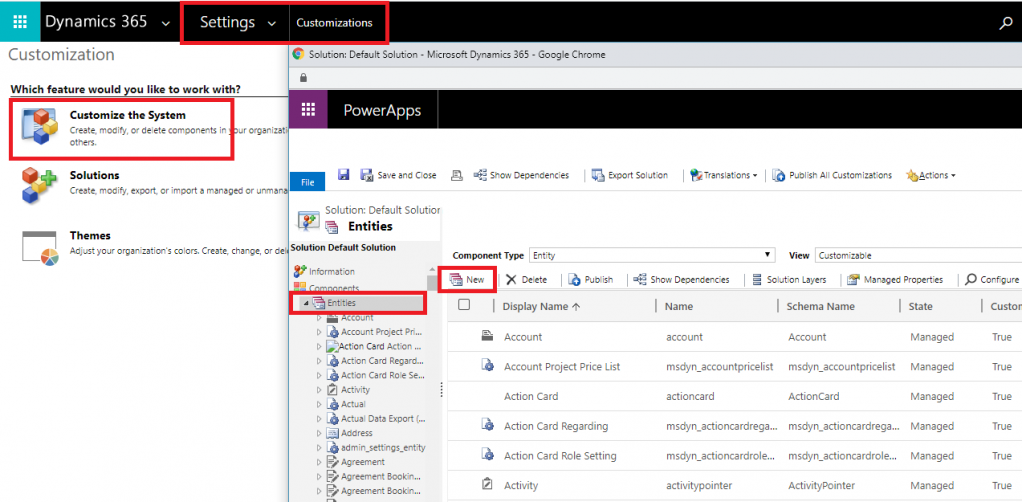 One of the most beneficial aspects of Dynamics 365; tracking activities, lets you log your important calls, tasks, emails, and appointments. It enables you to overview the interactions your sales reps have with your customers. How? Your sales team can create activities for each record according to the activities they perform like logging a phone call with all the required details like time of the phone call, setting the next task based on the response, and so on. This makes your operations more organized. Apart from the available activities in Dynamics CRM, there might be scenarios when you want to record custom activities. For example, birthday celebrations, internal team discussions, or other events. For such events and activities, you can add a custom activity in Dynamics CRM. In today’s blog, we will show you how to create and manage them with your Dynamics calendar. Navigate to Settings → Customizations → Customize the System to open the default solution. In the default solution, click on Entities → New. Add a name and description to define the activity. Check the box for ‘Define as an activity entity’. From here, you can also update other settings for the entity. When you create the activity, it has important fields like Subject, Due Date, Regarding, Owner, and Status. Apart from those, you can add additional fields such as amount, other dates, or lookups. And there you go! Now you have a custom activity entity to work with. In the default Dynamics calendar, you can view those activities. However, to manage them within your calendar, you will need to look for a Dynamics CRM calendar extension. In this blog, we have explained how to manage custom activities using one of the calendar extensions; Calendar 365. Before we begin, Calendar 365 is a calendar extension for Dynamics 365. With its unified view, you can view all your default and custom activities and can make changes to your activities from a single screen. To get started, you will need to install this extension in your Dynamics CRM. After that, Go to Dynamics 365 → Open 'Calendar 365' and you will be redirected to the calendar screen. Now you need to configure the custom activity entity to view and manage from the calendar. Click on the Configuration. A dialog box with your custom activity saved previously from the entity field will open. After selecting the custom activity, click on the ‘New’ button to configure the custom entity to the calendar. From here you will need to follow the steps by filling all the required details in the given fields. Here is what you will need to fill in for each of them. Activity: Select the type. It can be an appointment, phone call, meeting, task, SMS, etc. Subject: Add the appropriate subject to it. Regarding: Select the record regarding which you are creating this activity. Date Range: Select a date range during which you will be working for this activity. Priority: You can set its priority to manage the overall schedule. Description: Add notes or any other required details. It helps you remember important things. Apart from these options, based on your activity type, you will get other options for activities for custom activities like for Fax, Phone calls, you get extra fields like To, Phone numbers, etc. After filling up all the details, go to the Calendar view and you can see the selected 'Birthday' activity in the list. 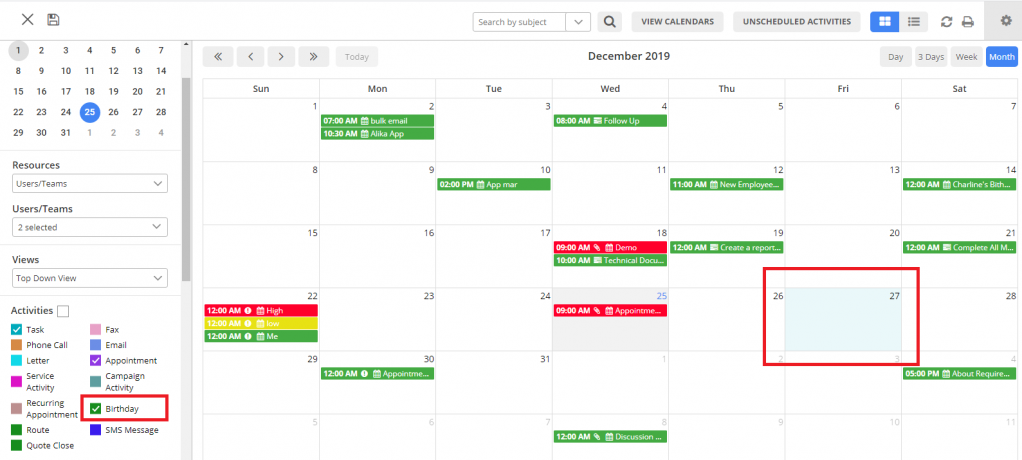 If you want to assign this activity to other users, you can select the user, time slots, and add “Birthday” records.
After allocation, you will be able to see all the details and the assigned member will get a reminder on the day you set this meeting. The Benefits You and Your Team Gets with Custom Activities - It keeps all the details in one place regarding all records, no matter how small they might be for an instant reference. - Tracking activities feature enables various people to work on a record with full knowledge of the status of the record. For instance, a customer representative may assign a case to another user to work on and all the details will be passed on quickly. - It simplifies the processes and reduces the time spent working on a record. - It is very helpful during company/team performance evaluation and auditing as you can access the details from a single place. Original Blog: https://www.appjetty.com/blog/create-manage-custom-activities-dynamics-calendar |
Author
Appjetty is a digital software products store specializing in extensions, plugins and apps for host of software platforms like Magento, WordPress, SugarCRM, SuiteCRM, Odoo, Dynamics CRM, etc. Archives
January 2021
Categories
All
|

 RSS Feed
