WelCome To AppJetty
AppJetty At A Glance
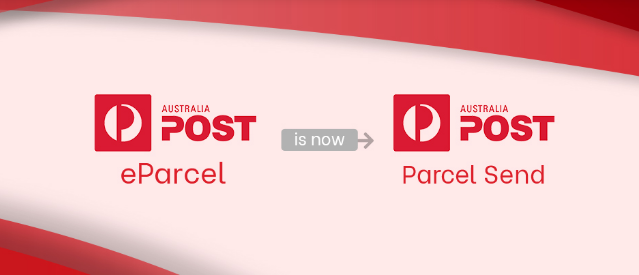 Australia Post has recently made an official announcement stating that it will be replacing the eParcel Online parcel service with the new solution Parcel Send by June 2020.
Since the acquisition of Star Track by Australia Post back in 2014, Star Track had been running as an Australia Post vertical company. However, from June 2020 onwards, Star Track won’t be functioning anymore as a vertical company. Rather, the new solution Parcel Send will replace it. It will give access to Star Track and Australia Post eParcel products. As per the Australia Post officials, “This initiative is intended to improve the security of the entire shipment process and delivery services further.” So, if you have been using eParcel so far, it’s time you upgraded/switched to AusPost Parcel Send to continue availing Australia Post mail services beyond June 2020. We would like to inform all our current eParcel extension users that we are changing the name of our current eParcel module from eParcel Online to Parcel Send in accordance with the Australia Post update. Further, we take delight in informing and assuring you all that you don’t need to worry about the switch from eParcel to auspost parcel send. As our Parcel Send (formerly eParcel Online) module is fully compatible with the new Parcel Send service of Australia Post. We also consider it important to inform our Star Track module users that they would need to upgrade to our Parcel Send module as their Star Track module won’t be effective after June. Nevertheless, we will try providing all the assistance our users need for upgrading their current Star Track module to our new Parcel Send module. For any kind of queries or concerns, feel free to drop us a line using our online chat on the bottom right corner and we’ll help you solve them all and make a seamless Magento 2 Australia Post eParcel switch to Parcel Send. Original Blog: https://www.appjetty.com/blog/auspost-parcel-send-to-replace-startrack-eparcel-online  Sales is a game of numbers. We’ve all heard it. But it has evolved from numbers to visuals. As a sales manager, you don’t have to crunch numbers all the time when you can simply see sales data on the map. And in this blog, we are going to demonstrate how to visualize region-wise CRM data in a Dynamics CRM map integration. By visualizing CRM data region-wise, you get an overview of how your regional sales and marketing team are performing which can help you make data-driven decisions. Without further ado, let’s dive into how you can visualize region-wise CRM data on a map. Note: For this example, we’ve taken Quick Maps which is a dynamics 365 field mapping tool. You can explore more such extensions from MS AppSource. Step 1: Redirect to “Map” pageClick on the Dynamics 365 menu and then click on “Quick Maps” from the slider menu or find the “AppJetty” tab from the header menu and click on Maps to open Quick Maps. 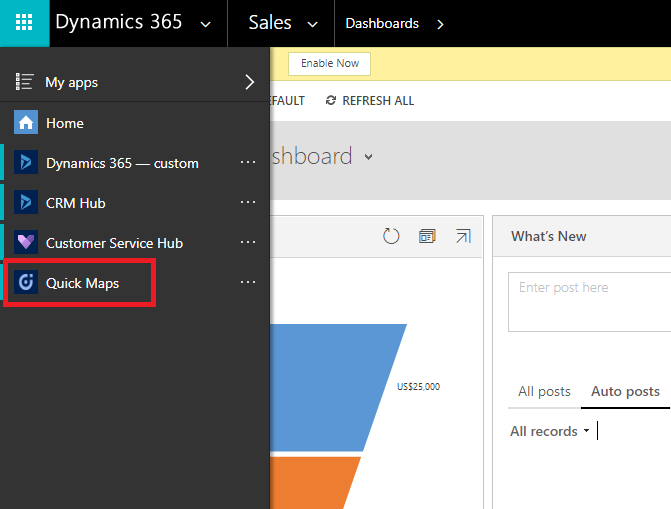 Step 2: Select the Entities you want to view records of on the map. In other words, visualize. 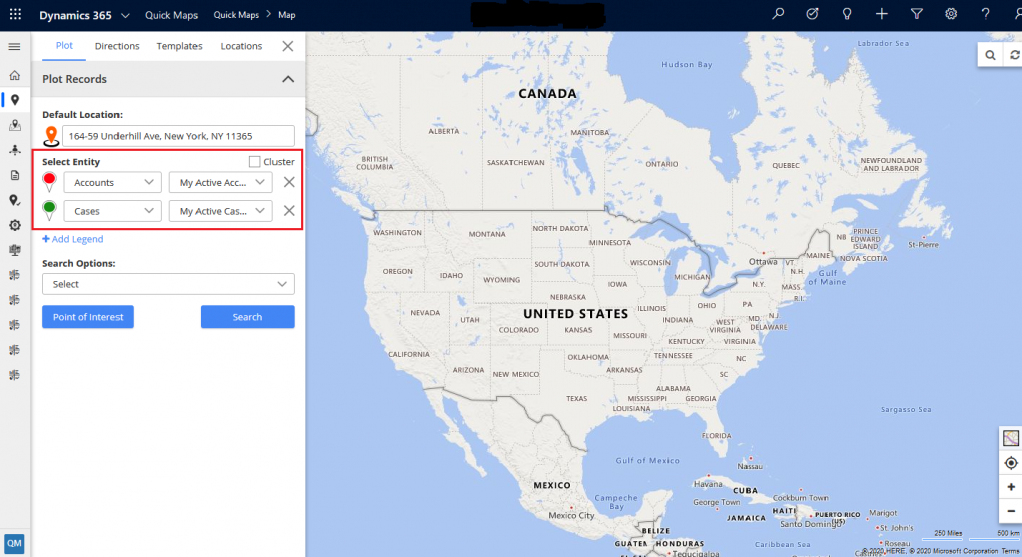 Note: Here you can select up to 5 entities to map and visualize its data. Step 3: Add Multiple Regions to visualize data- Select “Region” from “Search Options” dropdown. - Select the region type from “Region” dropdown. The available options are City, State, Country, and Postal Code. 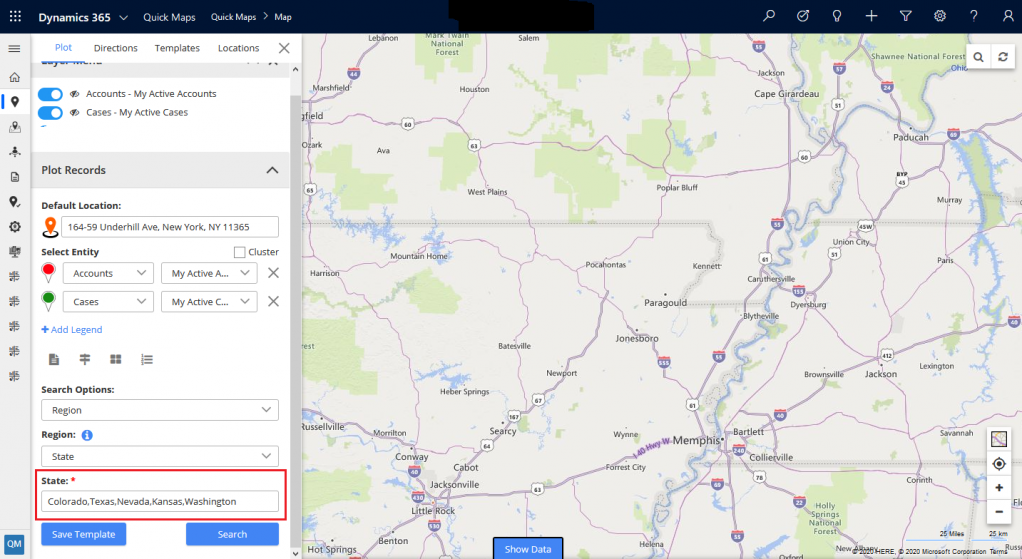 After adding all the required data, click on the search button to visualize your data. 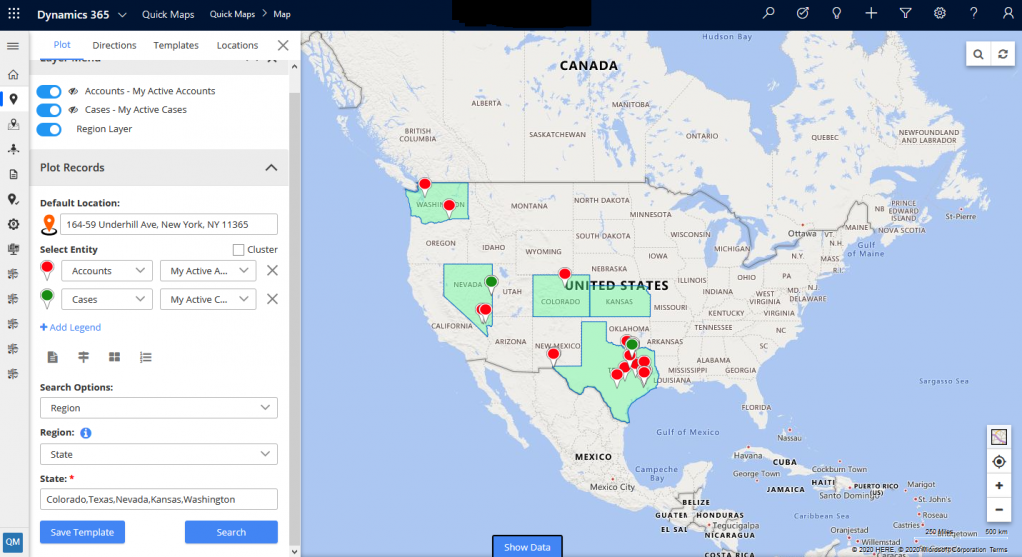 Now if you want to view region summary and data/records inside that region you need to click on the region and it will display the summary that particular region. The selected region will be highlighted with a different border. If you want to see detailed data of a particular region, click on the ‘Show Data’ button available in the center bottom. Data in Grid View will be according to the selected region. You can select multiple entities from the dropdown of ‘Select Entity View’, if selected region contains multiple entities records/data. 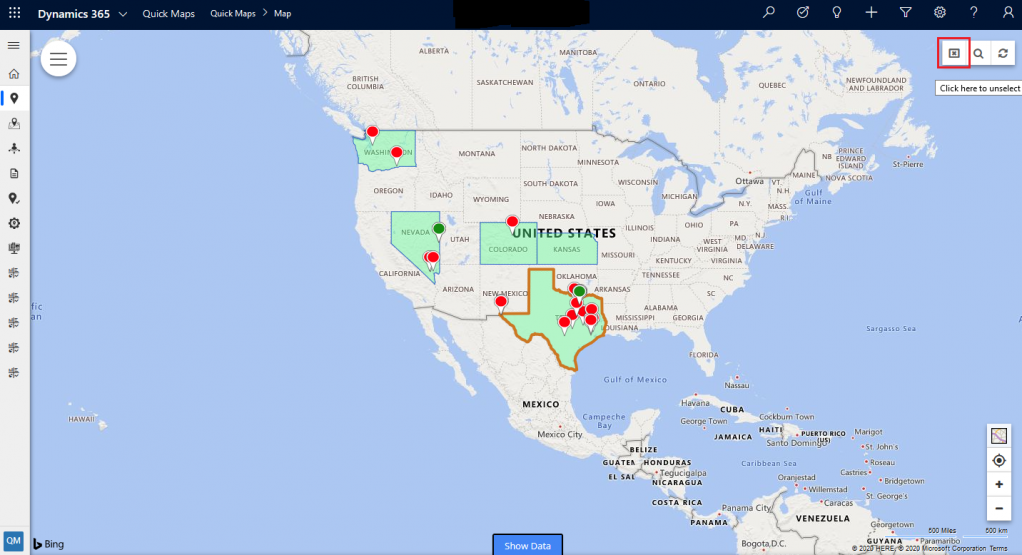 Once you are done understanding the data of a particular region, you can clear the selected region by clicking on the cross button in the top-right corner.
Original Blog: https://www.appjetty.com/blog/how-to-visualize-region-wise-crm-data-in-dynamics-crm-map-integration  A well-crafted survey has the potential to provide insights into how your customers interact with your industry, product, or service and enable you to improve your offerings further.
However, for ANY business, the direction of distributing the Survey is very important. Otherwise, it won’t do any good if sent to the wrong audience, or at the wrong time. When employing the Survey Distribution Methods, Survey Rocket Team identified that sending surveys via WhatsApp could get you a better response. And that’s not us alone, data speaks itself. - WhatsApp had 450 million daily active users in Q2 2018. - On average, 1 million people register on WhatsApp daily. - WhatsApp has 300 million daily active users worldwide. - Most importantly, the average user checks WhatsApp more than 23 times per day. Now if you calculate the probability of your survey getting noticed by the users, then multiply (300,000,000*23). Hence, in the new release of Survey Rocket, we have added a feature of sharing surveys via WhatsApp. That means, now you can directly send the survey link to your users via WhatsApp. making your surveys easily accessible to users. While doing so, here are some quick tips for maximum results: - Use a business account - Perform timely followups - Make broadcast lists of users categorized by personas On top of that, you can also leverage the feature of sharing surveys via SMS. Want to make the best use of your Sugar CRM or SuiteCRM data? Check out how SurveyRocket works with your business by starting a free trial: Start a 30 Days Free Trial Source Link : https://www.appjetty.com/blog/share-surveys-via-whatsapp-surveyrocket  Every online retail store has got a tedious task to deal with – inventory management. The larger the store, the tougher the inventory management becomes. Of course, you can depend on your desktop software for the management of orders, stocks or deliveries, etc. when in office.
But what if you are out of office or town? And you need to quickly check your orders or stock levels? It won’t be possible, will it? Here comes the role of a Magento 2 inventory management app to help you wade you through this situation. So, let’s see how a Magento 2 inventory management extension can help you efficiently manage your inventory from everywhere. Benefits of a Magento 2 Inventory App for Your Store:Inventory Details on Finger Tips With an inventory management app, you can easily manage your inventory anytime anywhere. Whether it is stock updates, orders, sources, suppliers, major store operations or anything else, a single tap accesses it all for you. This helps you in streamlining all your inventory activities. Efficient Supply Chain Management A store inventory app can help you smartly track the stock movements including inflow and outflow and get updates on insufficient stock. You can also enable/disable products or update their quantity. With access to real-time stock updates, you can easily manage all aspects of your supply chain and boost its efficiency. Supplier ManagementBy letting you add and manage suppliers and their details, and inventory management app can give your vendors a dedicated area to view purchase orders, create orders, edit their own details, etc. This bridges the communication gap between you and your suppliers. Therefore, the management of suppliers becomes more efficient and easier for you. Purchase Order Management With just a few taps, you can easily create purchase orders on the go. Further, you can view all POs and apply filters to understand your customers’ behavior and demands. You can also generate ‘Stock received’ for POs with details like quantity received, shipping charges, etc. Interactive Sales Reports With various interactive sales reports that provide insight into valuable data like country-wise sales, average item per order, best seller items, etc. you can get a deeper understanding of your business. Some apps let you view reports narrowed down to criteria like sales in a given time period, like the last 24 hours or a week. Accordingly, you can plan future marketing strategies and target customers more efficiently on the basis of demographics and their shopping habits. Multi-Store Support Several inventory management apps offer multi-store support as well. With such an inventory app, you can generate reports of different products and supported currency on the basis of sales and customer modules’ data for the store you select. These in-depth reports let you manage several facets for all your stores. Configurable Dashboard With a configurable dashboard that several inventory apps provide, you can easily customize your app dashboard as per your business workflow. With easy management and arrangement of modules and filters to view the specific ones, you can manage operations in a more organized way on the go. Review Management You can also get to view the full list of reviews and their details for all products/stocks. You can also decide whether to approve a review, reject it or delete it by deciding whether it is genuine or a spam review to ruin your brand image. In a Nutshell Thus, you see that a Magento 2 Inventory Management app can help you access all your inventory details easily and quickly. With every bit of information available along with real-time interactive sales reports, you can easily smoothen supply-chain cycle and order management process. So, ready to consider one for your store? Original Blog: https://www.appjetty.com/blog/magento-2-inventory-management-on-the-go  Online survey is an approach to better customers’ behavioral analysis for a business. Creating an outstanding survey is no longer a herculean task. Various CRM survey modules and online survey tools have made survey creation a cakewalk.
However, an outstanding survey isn’t enough. How effectively you distribute it also matters. Poor distribution strategies may lower your survey response rates. Consequently, your surveys may turn out to be of little avail. Again, higher response rates alone won’t give you much insight. Instead, quality responses will give you the answers you might be seeking. So, how to distribute a survey for higher and quality responses? Below are survey sharing methods that can help you with that. 5 Surefire Survey Sharing Methods:Email SurveysAn email is an age-long medium to directly connect with your audience. So, an email survey is undoubtedly a good choice. Besides, you can narrow down your survey distribution to your customers or broaden it by including your prospects. Batch sends and transactional sends are two main types of email distribution. Batch sends include creating an email list and sending an email to all recipients at once. They help target a specific group or present your survey instantly before a large audience familiar with your organization. Batch sends also increase the chances of high-quality responses. It’s possible to narrow down your recipient lists further by applying conditions. This way, your surveys become even more targeted. Transactional emails are the emails you send after a user completes a particular action or event like getting a support ticket resolved or making a purchase. Transactional email surveys help collect customers’ feedback about good areas and areas that need improvements. With several CRM survey modules like our SugarCRM survey module, you can send a survey right from within your CRM system. You can use its survey automation feature to automate the sending of transactional email surveys. Just ensure to insert a proper CTA button and follow driving subject lines for better response rates. Website/Blog SurveysIncorporating surveys into your website is a good idea. Your website traffic consists of a highly relevant audience who know what they want. You can use surveys to: - Gather the audience's general perception about your organization. - Collect feedback about a new product or service. - Collect opinions about possible areas of improvement. - Ask a user whether a page, help article or just a single piece of content was useful for them. - Capture a lead. Ensure to keep an option ‘I’m not interested’ in your survey. Otherwise, imposing surveys without valuing their choice may backfire. A visitor might never return to your site. To increase response rates of an existing survey, you can use: - A home page pop-up invitation - IFrame to embed it in a permanent location Remember, your surveys should be easy to open and fill in both mobiles and desktops. The reason is, the count of smartphones has largely increased of late. Embedding a relevant survey in a blogpost can also help. Let’s say, you write an informative blog on a new technology your product uses. At the end, you can insert a link to your relevant survey asking them their opinions about improving your product or article. Social Media SurveysUse social media platforms to share your online surveys. Giving your customers the opportunity to share their thoughts makes them feel you value their opinions. You can share surveys on social media by: - Directly sharing your online survey link. - Partnering with relevant social media influencers to help spread word-of-mouth. - Offering a reward to your survey participants to encourage higher participation. Make your audience feel surveys are for their benefit rather than yours. Only when they acknowledge the value of surveys, they’ll be willing to participate more. SMS SurveysSMS surveys give you valuable feedback from your current customer base. By sending an SMS survey, you can collect instant feedback on your product or support service. You can either embed a link to your survey in your SMS or can survey in text only by providing a single choice, multiple choice or free response options. The benefit of these surveys is that they give you real-time feedback from target respondents. Moreover, they are more cost-effective and easier than traditional in-person surveys. Random Device EngagementRandom device engagement is delivering a survey in mobile apps to engage app users. You can partner with several mobile app publishers to distribute your surveys. You can pay them to embed your surveys in apps to target mobile app users. In turn, they can offer in-app non-monetary incentives to the survey respondents. These incentives encourage them further to take surveys. To Wrap UpAs long as you don’t know how to share your outstanding online survey effectively, it is of no use. So, it is imperative for you to understand effective survey sharing methods. Only then will your surveys get you high-quality responses higher in count. Ready to create outstanding surveys and share them for better survey response rates? Source Link : https://www.appjetty.com/blog/5-online-crm-survey-sharing-methods  “Umm, since I have a few hours of spare time, let me check if Jack is available for a quick meeting.” People working in sales would get it. Meeting with clients all the time no matter what time of the day it is. Who knows when a lead gets closed giving your business a major deal. Understanding the importance of catching up with your clients, you need to make sure that you are not losing out any one of them especially when in the nearby area. In some cases, when you have multiple addresses of the customers, it may take longer than anticipated to identify the current location of the customer. In such cases, searching nearby your proximity can save you time. Because you can decide on the proximity you want to travel based on the time you have. To do this, a sales rep will have to log in to Dynamics 365 and then access Dynamics CRM Map integration like Quick Maps to get started. Make sure to enable your location before getting started. There will be a location pin on the map, automatically updating the users’ current location. 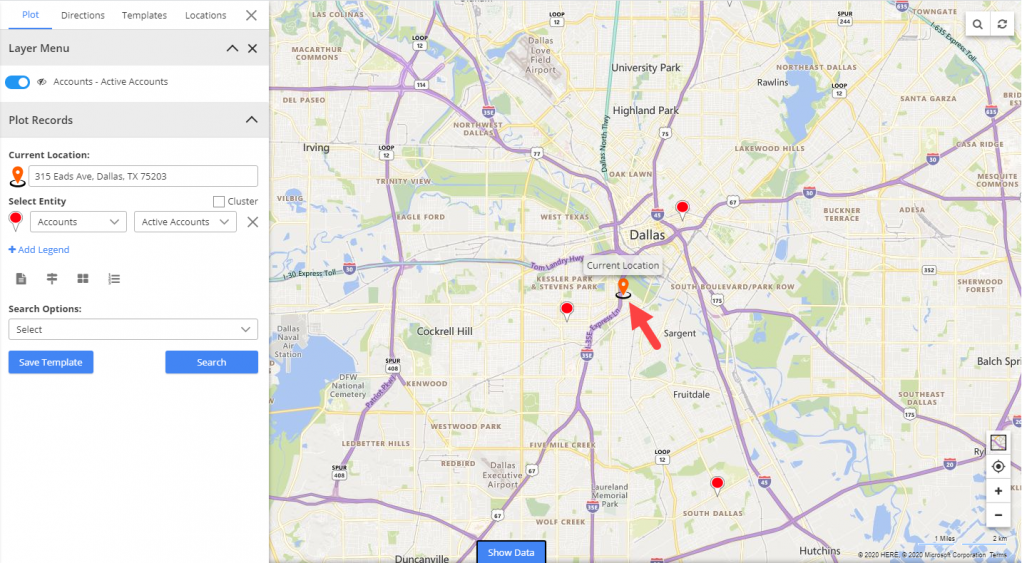 This will enable the button ‘Locate me’ on the map. Now, a sales rep can click this button to enable the application to read his current GPS location. 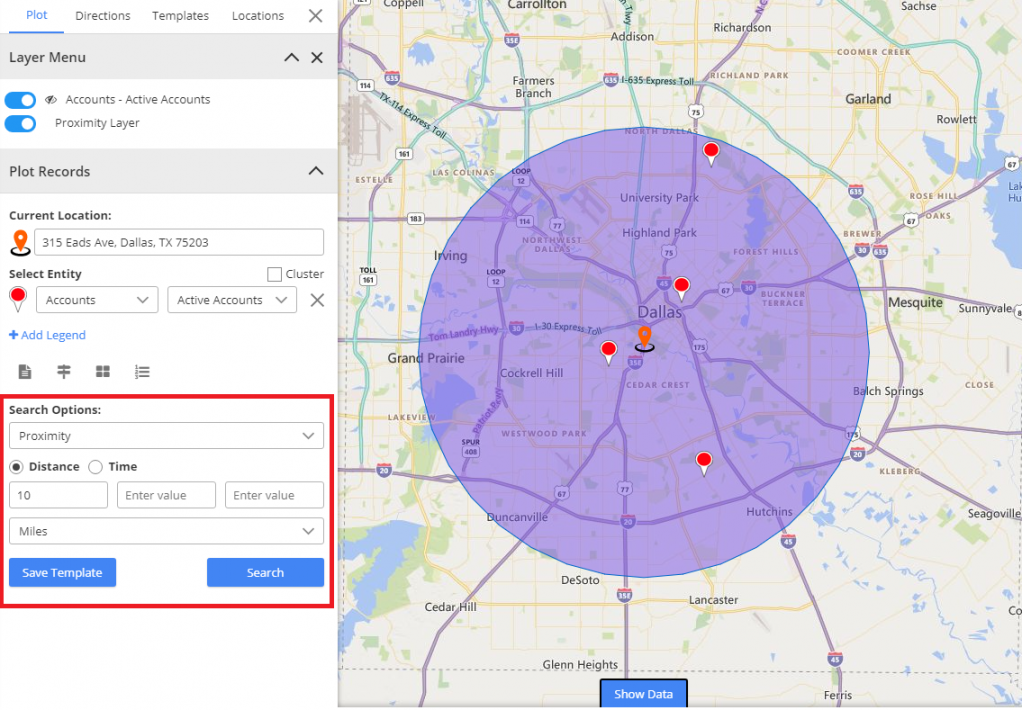 There will be a “Blue” circle on the map, automatically updating the users’ current location. 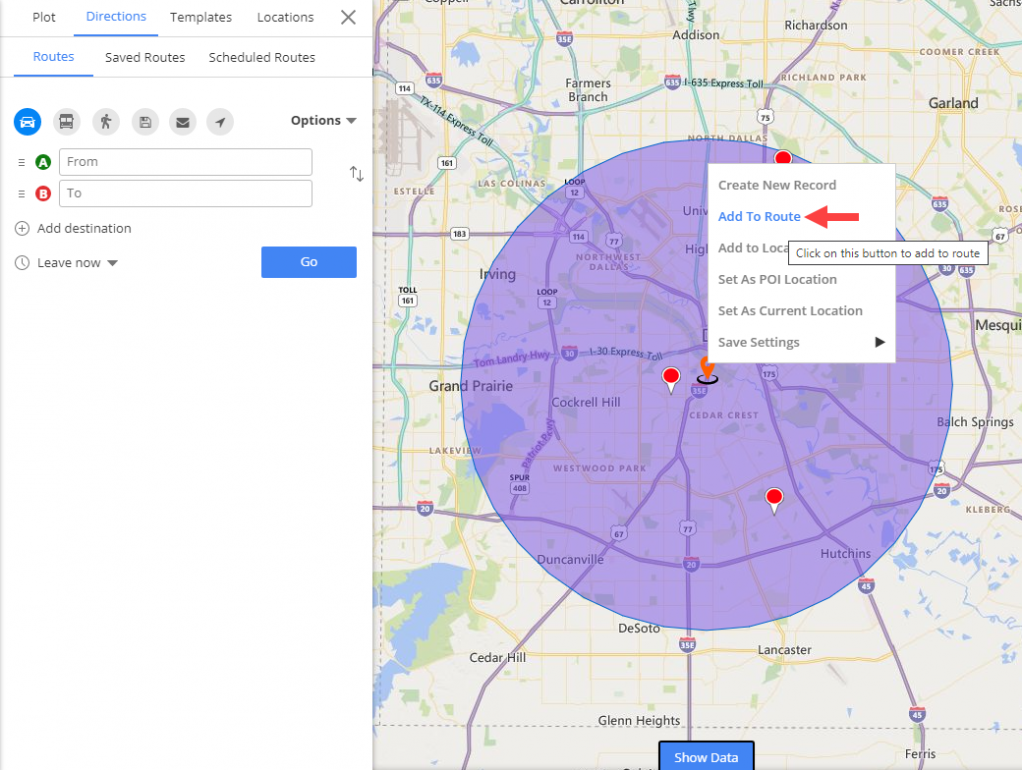 This will allow users to perform proximity search providing them all the customers within their proximity. From here, a sales rep can set their radius from the current location, let’s say 2 miles and perform the search. 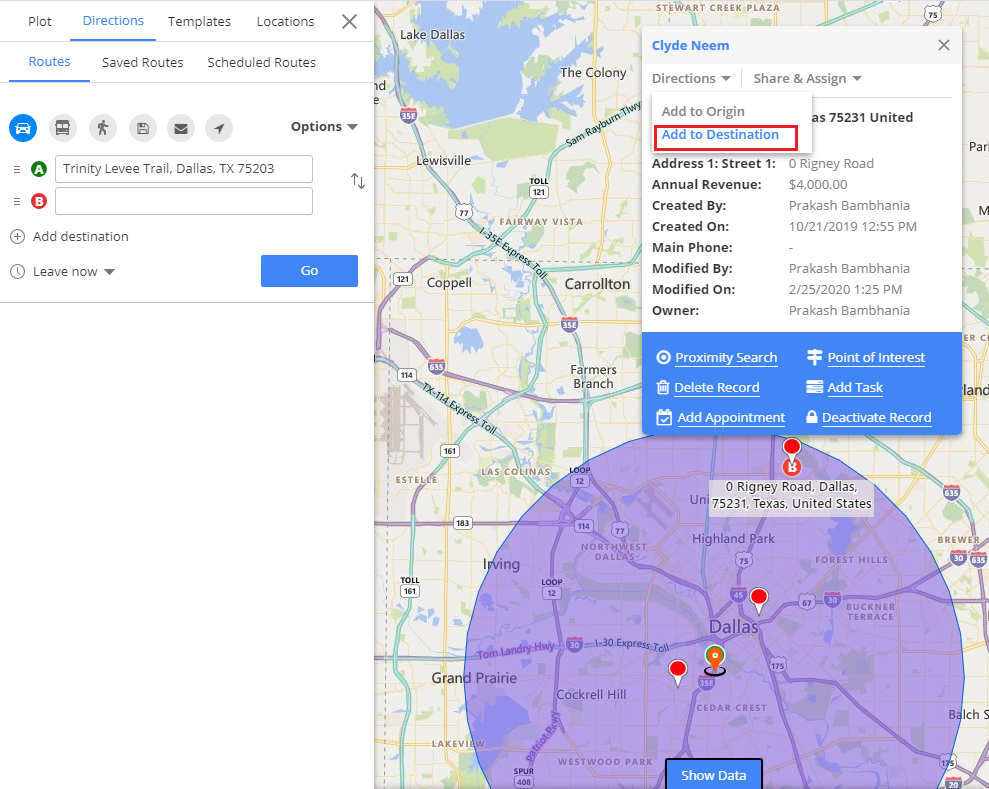 After that, a sales rep can view the available pins(customers) within the proximity. Now, they can click on any of the pins and view the details of the customers. Based on the priority, they can also plan a multi-stop route accordingly. They can also view the distance of the pin to and take the shortest travel distance route from the location. To set up a meeting with the customers, they can create an appointment with the tooltip card. 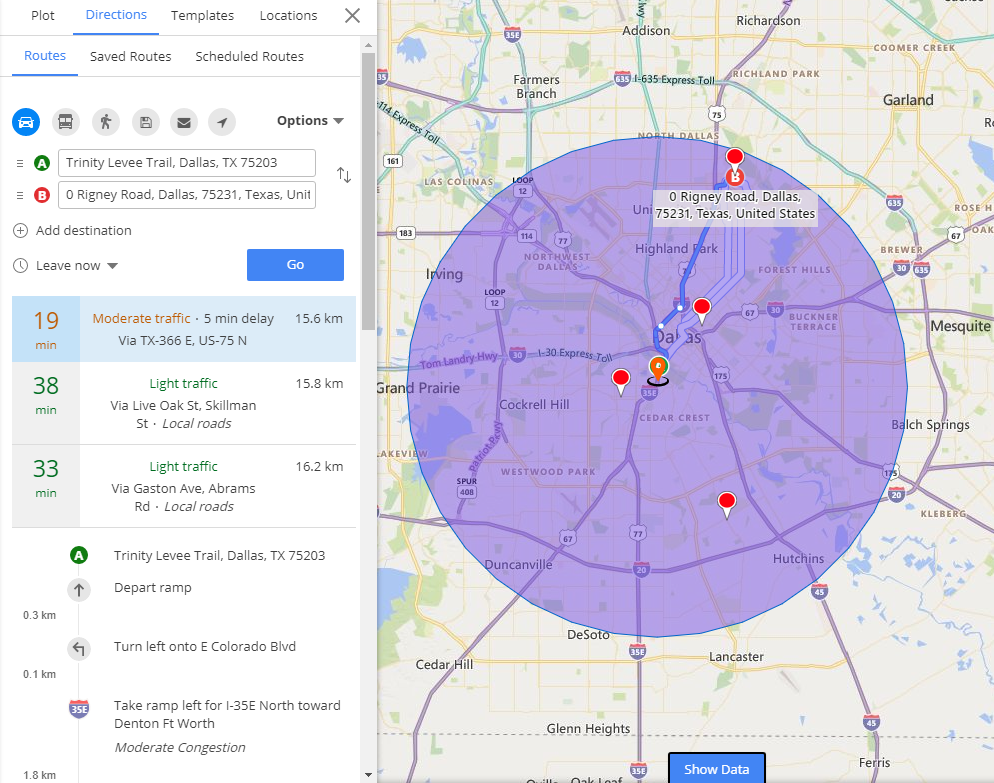 After the meeting has been scheduled and confirmed from the customer’s end, they can go to the location and then can add the details of the meeting conducted. They can right-click on the customer’s pushpin to open the record and update data, create tasks, notes, etc. 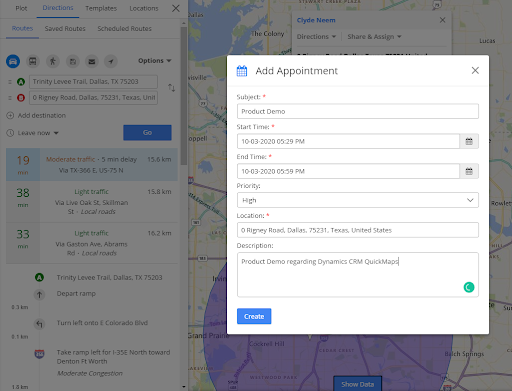 That’s how you can make the perfect use of time. By performing a proximity search with dynamics CRM map integration, the sales rep can make optimize their time to make the most out of their prospects. It not only streamline their sales cycle but also helps them identify the areas with the highest and lowest performance rates to improve their sales cycle further.
Original Blog: https://www.appjetty.com/blog/nearby-search-within-dynamics-365-crm  If we go by the basic definition, Heat Maps are the graphical representation of data with a color-coded system. It helps visualize the volume of a particular dataset of a specific location and helps in better data visualization.
However, they are much more than that. They can be the best solution when you deal with the large volume of data as with the visual presentation it becomes easier to make sense out of the raw data. You can easily evaluate top or low performing regions on a map. When you have no time to look over the raw data, here is how you can simplify and take powerful decisions to make the most of your Dynamics CRM data. Here is how you can use them to derive actionable insights: Visualize a Large Data Sets The other times you have to filter out the important data, with heatmaps you can have a quick overview of the whole data. Based on the color intensity, you can identify the influential factors and prepare the actionable items. With the color gradient, you get a continuous range instead of breaking the data into different ranges. This way, you can analyze the overall performance that helps you unleash the hidden opportunities, trends in your data. Analysis Becomes Easy Heat maps provide a visual experience that any standard analytics report doesn’t. As there are no numbers, complex shapes, it eliminates the time-consuming process of analyzing the data. With Dynamics CRM Map Integration, sales reps get a summary card in which they can view the plotted data in the form of average or sum value. To get any specific details of any region, they just have to click on it. Users can Personalize Them If required, the user can add a category to filter the data. They also get an option to change the colors and set as per their preferences. Hence, analysis becomes swifter for different attributes including sales, opportunities, revenue, etc. Gives You Data That’s Actually Required Instead of spending time on the endless data, with heat maps sales reps can filter out the areas where the most attention is required. For example, if some of the areas are not churning enough revenue but they have the potential, a sales rep can set those areas as their priority. Track the Success As time goes by, you can leverage heat maps to evaluate if your strategies are working or you need to tweak them a little. Further, you can check the factors that are causing failures in the system which can help you reinvent things. Along with that, it unclutters business data and helps you create effective strategies with bedrock data that actually make a difference to your business. Original Blog: https://www.appjetty.com/blog/leverage-the-power-of-heat-maps-with-dynamics-365-crm 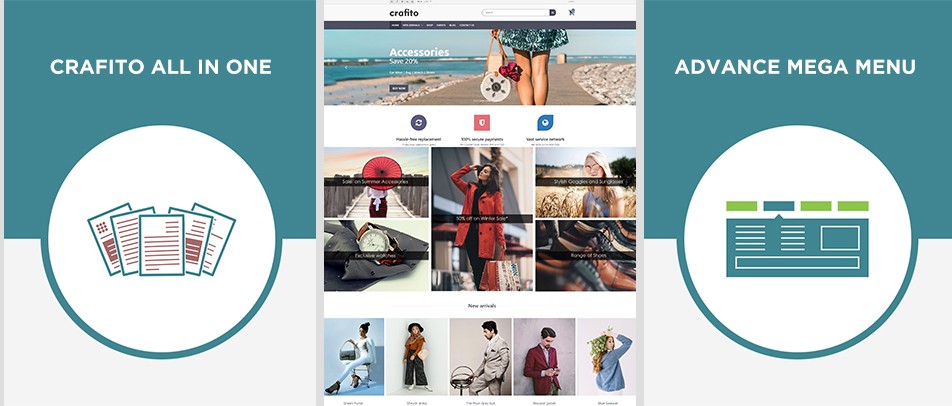 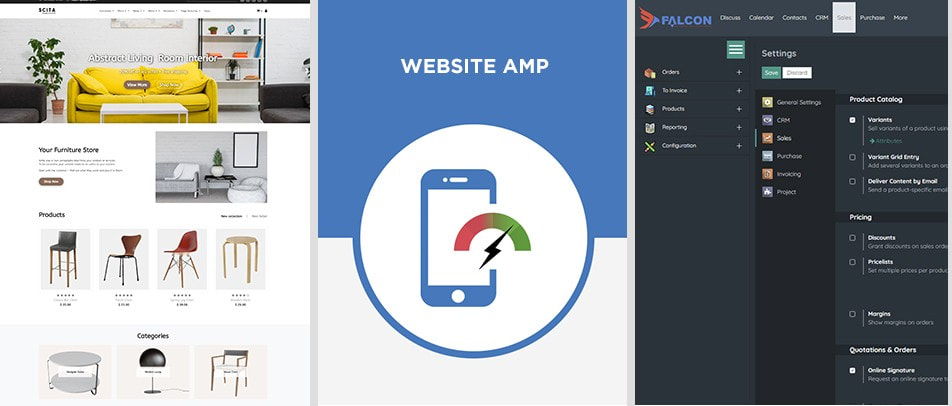 Odoo is a highly popular business management software today as it is cost-effective and easy to implement. While several Odoo apps simplify your different business functions, several Odoo themes help make your site more engaging.
In this blog, we are going to introduce to you several apps and themes that our team has developed to help you stay on top of your business. Odoo Apps - To Streamline Your Business Functions 1. AMP for WebsiteThis exclusive AMP-validated Odoo app will help you make your site pages load faster than your competitors’. Compatible with Odoo default, this app has features including:
2. Clever All-In-One Clever Report TemplateThe Crafito All-in-One Clever Report Template facilitates customization of your reports as per your business requirements. With this app, you can easily stay on top of creation of several reports. The features including:
and several others are the reasons why this app is going to be beneficial. 3. Advanced Mega MenuThis app helps you easily categorize your brands and products in a mega menu. With multiple mega menus like Category Mega Menu, Pages Mega Menu or List of Categories Mega Menu, you can make your e-store easily navigable. You can customize:
Odoo Themes - To Enhance Your Website Appearance1. Theme ScitaThis theme is one of the most elegant Odoo themes available. This is the first-ever Odoo theme with AMP support that is sure to make your site mobile-responsive, faster and SEO-friendly. Besides, it has got several powerful features like:
2. Theme CrafitoTheme Crafito is a mobile-responsive Odoo theme that lets you customize any portion of your site as per your preferences. Be it a single page CMS site, an event site, or any other site, this theme fits all types of sites. With features like Advanced Mega Menu, Product Videos and Multi Images, and snippets for everything like:
3. Falcon Material Backend ThemeDesigned as per the principles of the material design, this backend theme has layered interfaces with bold and vibrant graphics. With several features including:
Ready to Level Up Your Odoo Store? Take a tour of our Odoo apps and themes Source Link : https://www.appjetty.com/blog/odoo-apps-and-themes-for-odoo-store  Odoo has lately emerged as a very popular e-commerce platform. If you are an Odoo e-store owner, you can enhance the aesthetic appeal and user-friendliness of your store with a suitable theme.
However, if you have multiple sites for different purposes, one theme for all sites won’t be a suitable choice. While other platforms require you to have different hosting servers for different sites, such is not the case with Odoo. You can host multiple websites without the hassle of maintaining too many alien e-commerce platforms at once. Not only that, but Odoo also comes with a unique feature, Odoo Multi Themes, to support multiple themes for your different websites too. In this blog, we are going to cover all aspects of Odoo Multi Themes support and the themes you can go for which support this feature. Odoo Multi Themes support feature gives you the power to manage different themes for your different sites. And with a single hosting server. Moreover, you can create multiple sites sharing the same domain name. But how do you create different websites? Manage different domain names? Make a switch between them? Or apply a new theme? Let’s find out. Setting the Theme for a New Odoo Site If you already own an Odoo website and want to create another site, here are the steps: - Click Website > Configuration > Settings. - Set the name for your new website and its domain. If you want to publish the site under the default domain name of your Odoo database, you can leave the domain field empty. And voila! You’ll have a new website. You can also maintain each site’s individual identity by setting different Odoo Website themes for different sites. And make each site more purpose-relevant. Let’s see how you can do that. Select the theme you want to have for the new site. The theme you select must match the purpose and should target the audience of the site. So, you can freely choose a theme different from that of the first site. This way, the setting of theme for your new site is easy and feasible with Odoo multi themes. Switching from One Website to AnotherWhen you have multiple sites to host on the same server, you must have a means to switch between sites seamlessly. A website switcher is available in the edit bar in the right corner. When you switch to that site, it will connect to the domain of the current site. However, if you have used a different domain, you’ll need to sign in to switch to that website. Managing Multiple Domain NamesYou can decide whether your sites share the same domain name or use a particular one. Further, you can reset the content of every site as per region by setting country groups in its settings. Geo IP will then redirect visitors from a specific country to the right website. Choosing an Odoo ThemeWhen choosing an Odoo theme for your website, make sure it supports the Odoo multi theme feature. If the theme you selected doesn’t support this feature, you’ll have to use one theme for all your websites. So, if you are selecting a theme for your business, this feature is a must. AppJetty’s Odoo ThemesAll our themes, including top-selling and rated Theme Scita, Crafito, Mobicraft, etc. come with the support feature of Odoo multi themes. With these themes, you can select a different theme as per your website and its purpose. The more relevant the theme of your site is, the better will it serve the purpose. This directly increases your website’s customer engagement leading to a higher conversion rate and ultimately, better sales. To Wrap UpThus, Odoo is a great platform with its multi-theme support as the cherry on top. However, all the free Odoo themes don’t have this feature, so if you are planning to have multiple businesses, then going for a paid Odoo theme would be an ideal choice. Original Content : https://www.appjetty.com/blog/odoo-multi-themes-support-powerful-feature  Drag and drop feature has cut down our manual efforts of copying and moving files, images, etc. It’s a clean interface solution for a tedious yet important process. You can simply drag and drop elements that improve overall user experience. Because of its simplicity, need, and popularity, it’s a ubiquitous interface feature now. When you merge this action into a calendar, it can save a lot of time spent in adding redundant details to reschedule events. And we’ve done just that with our Dynamics calendar. For users who use Calendar 365, there is drag and drop functionality available for rescheduling events in real-time. Let’s say you have an appointment on the 12th of February. Now for some reason, you need to reschedule this meeting from 12th to 13th of February. In that case, with default Dynamics 365 Calendar, you will be redirected to the activity page to make the changes. Now, the problem here is that you wouldn’t be able to look at your schedule to make proper changes. You might need to repeat the process twice or thrice to make the right changes. 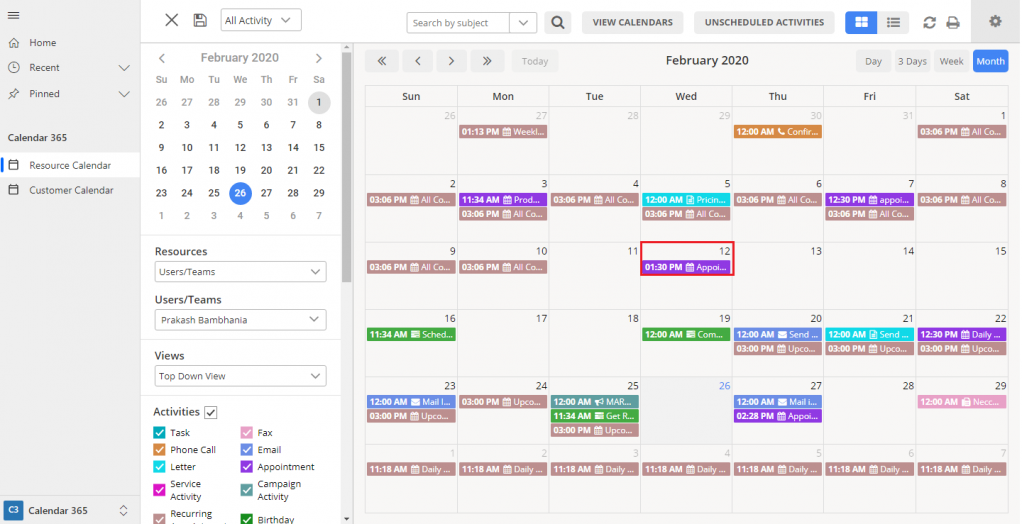 To simplify this little but important process, Dynamics Map Extension can provide you the flexibility of leveraging Drag and Drop functionality. Here is how you can do it with Calendar 365. From the calendar view, click and hold on the event that you wish to reschedule, drag and drop it onto the other day. And that’s it! Your event will get rescheduled for that day with all the same details. It will notify the users involved in it regarding the change in the event as well. 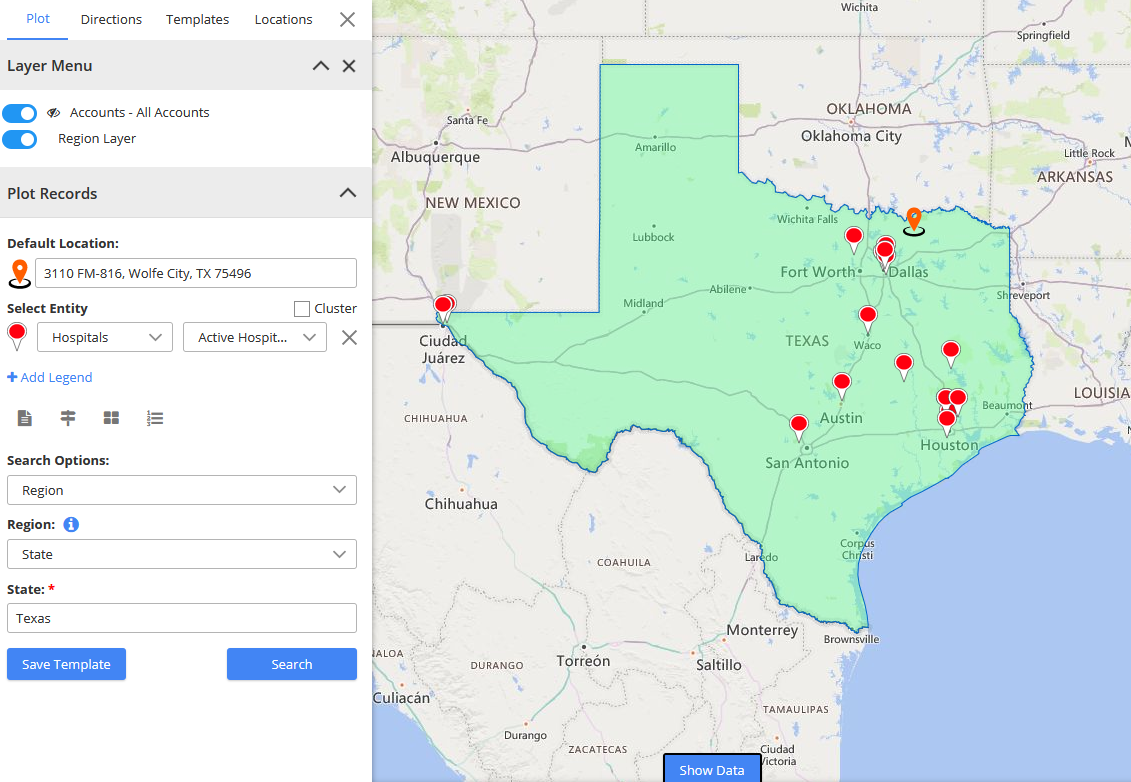 The Benefits
Best for Mobile devices When it comes to mobile devices, adding, deleting, and editing details may increase the chances of errors. With mobile drag and drop, it will become easy to reschedule events in less time with no errors. Simplified Process It eliminates the need to look at spreadsheets or manual entry. You can just place the cursor over your task and then release it onto the new date and time. Easy Visualization Get clear and concise visualization of your schedule. It makes it easier to make financial decisions, for example, when to take a new project on board, or where you need additional projects by keeping an eye out for any free slots. So are you ready to make the most out of your Dynamics Calendar? Original Blog: https://www.appjetty.com/blog/rescheduling-made-easy-with-dynamics-365 |
Author
Appjetty is a digital software products store specializing in extensions, plugins and apps for host of software platforms like Magento, WordPress, SugarCRM, SuiteCRM, Odoo, Dynamics CRM, etc. Archives
January 2021
Categories
All
|
 RSS Feed
