WelCome To AppJetty
AppJetty At A Glance
|
This blog shows how to share a calendar view with your team members or any of the Dynamics CRM users. If you are managing a team or multiple projects, then you know how messy it can get. Especially the communication part. Be it with the team or with multiple project managers, you might miss some or the other things during meetings. So, what if you could share a calendar view of all priority tasks with the required details among your team or with the project managers? And that’s what we are going to show in this blog. How to save a calendar view and then share it with other Dynamics 365 users in your organization. To do it seamlessly, you can browse on MS AppSource to find the right calendar that fulfills your requirements. In this blog, we are taking Dynamics CRM Service Calendar, a Dynamics Calendar extension, to show you how to save and share a calendar view in Dynamics 365. Step 1: Choosing a calendar extension The first step here is that you will need to choose and install the right calendar extension in your Dynamics CRM. The default calendar in Dynamics CRM doesn’t have this functionality. With the default calendar, you can only see your activities in different calendar views. You won’t be able to create, add, save or share them. Step 2: Creating and saving a calendar view with selected activities and users- Open your calendar extension from the Dynamics CRM menu. - With our instance, Go to AppJetty → Calendar 365 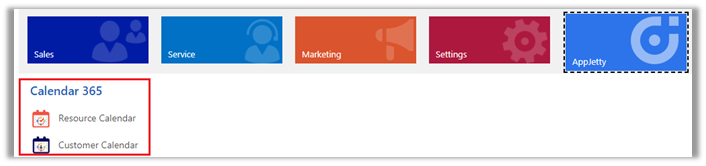 Here, you get two calendars: Resource Calendar & Customer Calendar. - Resource Calendar: For User and Facility/Equipment management. - Customer Calendar: For Contacts and Accounts management. - Select a calendar from the two options according to the calendar view you want to create. - Choose the required settings from left panel settings like selected resources, selected calendar view as well as, activities, selected status, priority, weekends and holidays to create a calendar view. - After selecting the settings, click on the ‘Save’ icon available on the left side of the calendar to save that particular view. 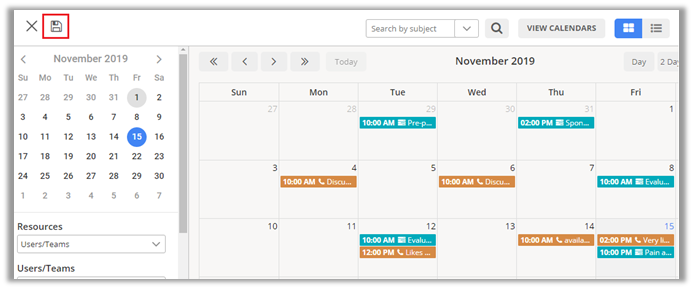 - After you click on the ‘Save’ icon, a dialog box opens, where you need to name the calendar view. Along with naming, you can define if it’s public or private. - By default, ‘Is Public’checkbox is checked. If the calendar is public, it is visible to all CRM users with under ‘shared calendars’ section. Note: You can only share a calendar with selected users if it’s not public. - Click on the ‘Save’ button to save the calendar view. Step 3: Sharing a saved calendar view - You can access saved calendars by clicking on View Calendars button on the calendar page. - After you click on ‘View Calendars’, a dialog box opens up with dropdown to select from calendar types: Saved Calendars and Shared Calendars. 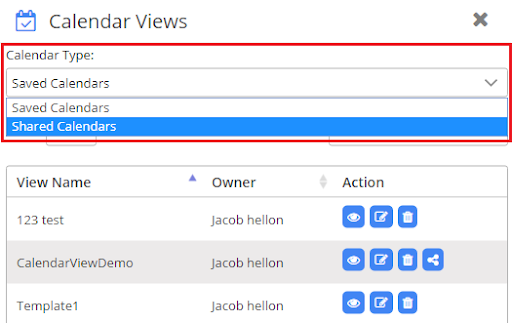 ‘Saved calendars’ are the one which you have created and saved while ‘shared calendars’ are the one that is shared with you by other users or the calendars that are made public by other users. 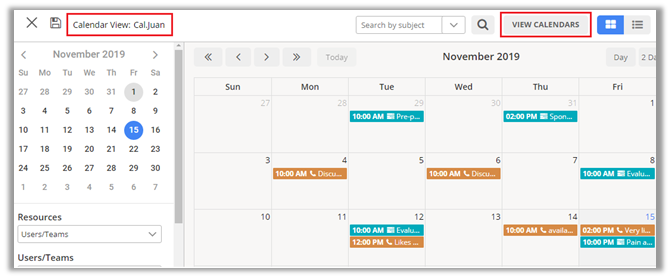 Based on calendar type selection, you get a list of calendars. - Clicking on share icon beside the calendar want to share, opens dialog box to select a user or team from the lookup records box. 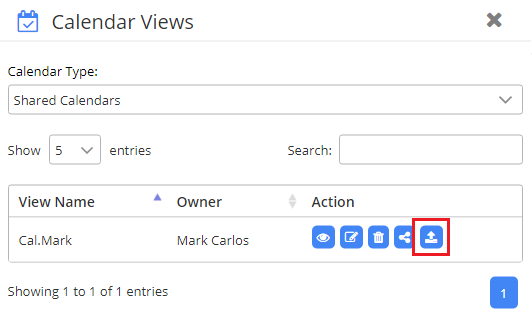 - After selecting the user, click on the Save button to complete the calendar sharing. You can select multiple users and teams to share the calendar with. How to Move Shared Calendar to Saved Calendar - You can move the shared calendar to the ‘Saved Calendars’ list by clicking on the ‘Move’ icon. 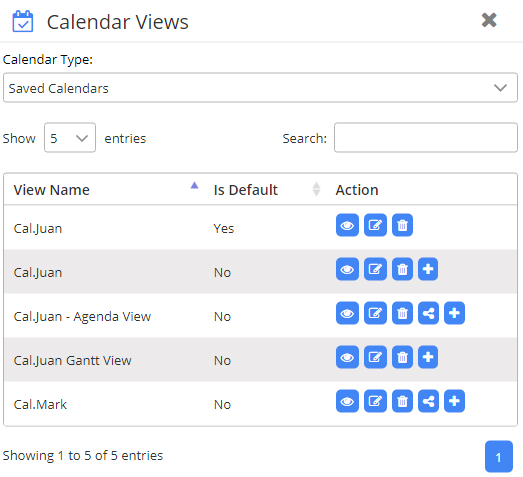 Wrap up:
CRM is not just a customer relationship management tool anymore. You can leverage its capabilities to manage almost all aspects of an organization. Dynamics CRM is one such CRM. So, the question you have to ask is, are you using your Dynamics CRM to its full potential? Original Blog:https://www.appjetty.com/blog/how-to-create-shared-calendar-in-dynamics-365  Odoo has lately emerged as a very popular e-commerce platform. If you are an Odoo e-store owner, you can enhance the aesthetic appeal and user-friendliness of your store with a suitable theme. However, if you have multiple sites for different purposes, one theme for all sites won’t be a suitable choice. While other platforms require you to have different hosting servers for different sites, such is not the case with Odoo. You can host multiple websites without the hassle of maintaining too many alien e-commerce platforms at once. Not only that, but Odoo also comes with a unique feature, Odoo Multi Themes, to support multiple themes for your different websites too. In this blog, we are going to cover all aspects of Odoo Multi Themes support and the themes you can go for which support this feature. Odoo Multi Themes support feature gives you the power to manage different themes for your different sites. And with a single hosting server. Moreover, you can create multiple sites sharing the same domain name. But how do you create different websites? Manage different domain names? Make a switch between them? Or apply a new theme? Let’s find out. Setting the Theme for a New Odoo Site If you already own an Odoo website and want to create another site, here are the steps: - Click Website > Configuration > Settings. - Set the name for your new website and its domain. If you want to publish the site under the default domain name of your Odoo database, you can leave the domain field empty. And voila! You’ll have a new website. You can also maintain each site’s individual identity by setting different Odoo Website themes for different sites. And make each site more purpose-relevant. Let’s see how you can do that. Select the theme you want to have for the new site. The theme you select must match the purpose and should target the audience of the site. So, you can freely choose a theme different from that of the first site. This way, the setting of theme for your new site is easy and feasible with Odoo multi themes. Switching from One Website to Another When you have multiple sites to host on the same server, you must have a means to switch between sites seamlessly. A website switcher is available in the edit bar in the right corner. When you switch to that site, it will connect to the domain of the current site. However, if you have used a different domain, you’ll need to sign in to switch to that website. Managing Multiple Domain Names You can decide whether your sites share the same domain name or use a particular one. Further, you can reset the content of every site as per region by setting country groups in its settings. Geo IP will then redirect visitors from a specific country to the right website. Choosing an Odoo Theme When choosing an Odoo theme for your website, make sure it supports the Odoo multi theme feature. If the theme you selected doesn’t support this feature, you’ll have to use one theme for all your websites. So, if you are selecting a theme for your business, this feature is a must. AppJetty’s Odoo Themes All our themes, including top-selling and rated Theme Scita, Crafito, Mobicraft, etc. come with the support feature of Odoo multi themes. With these themes, you can select a different theme as per your website and its purpose. The more relevant the theme of your site is, the better will it serves the purpose. This directly increases your website’s customer engagement leading to a higher conversion rate ad ultimately, better sales. To Wrap Up Thus, Odoo is a great platform with its multi-theme support as the cherry on top. However, all the free Odoo themes don’t have this feature, so if you are planning to have multiple businesses, then going for a paid Odoo theme would be an ideal choice. Original Blog : https://www.appjetty.com/blog/odoo-multi-themes-support-powerful-feature  A few years back Microsoft entered the CRM industry with its Microsoft Dynamics CRM and Dynamics 365, a product line. This product line includes apps for enterprise resource planning (ERP) and customer relationship management (CRM). Dynamics CRM has become popular among enterprises for its focused features around the Sales, Marketing, and Customer Service sectors. Now, these are the sectors that include a lot of planning, meeting with customers, execution, and time management. So, in this blog, we’ll walk you through how to create multiple calendar views in Dynamics CRM to utilize Dynamics CRM calendar to its full potential. Dynamics 365 Unified Interface provides three views of your activities: Day, Week and Month. Steps to create multiple views in Dynamics Calendar: Step 1: Go to Settings → Customizations → Customize the System 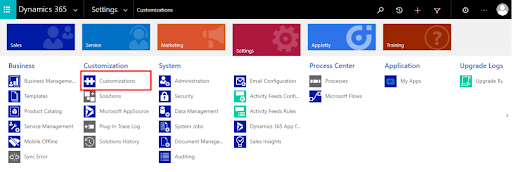  Step 2: Select Entities → Appointment  Step 3: Click on Controls -> Add Control -> Select Calendar Control and then click on "Add" 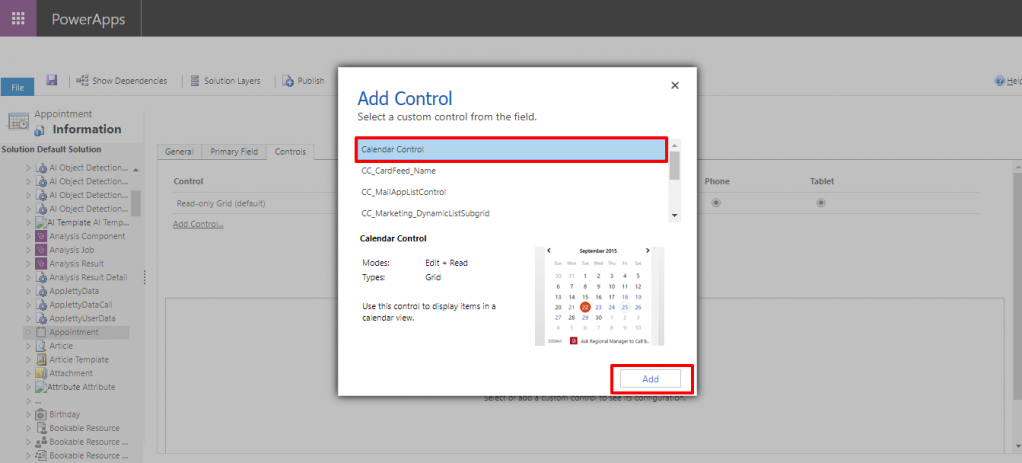 Step 4: Configure the display settings like start date, description, end date, minimum event duration, etc.  Step 5: Click on save -> Publish All Customizations 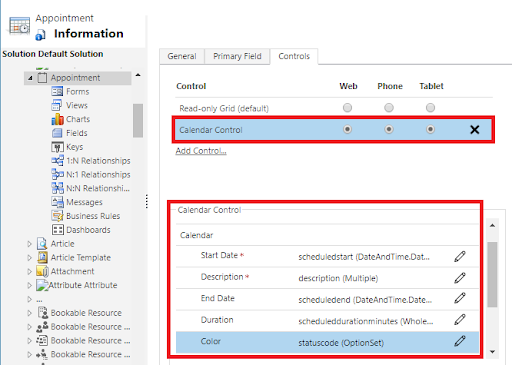 After saving all the configurations, you will be able to view all the appointments in the calendar. By default, Dynamics 365 provides 3 views in its calendar: Day, Week, Month. You can choose between them according to your usage.  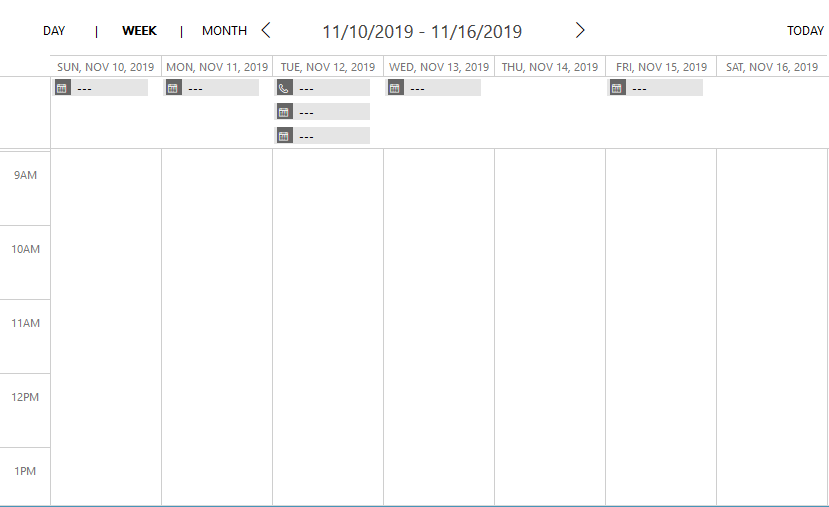 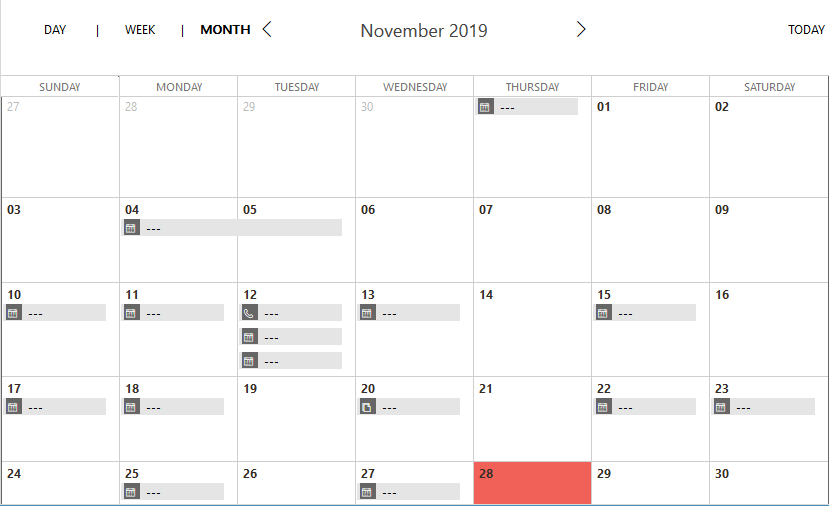 Even though there are three views for you to sort through your activities but actually you can’t do much from the calendar itself. You can not add, edit, or delete activities from the Dynamics 365’s calendar. Now if you spend a lot of time shuffling between calendars and your CRM, then it’s time to add an independent calendar solution to your stack. You can browse for such a solution on MS AppSource and choose the one which fits your requirements. In this blog, we’ve taken Calendar 365, a Dynamics CRM Calendar, to show multiple calendar views that you can create and benefit from. There are five views in Calendar 365 to check the activities as per the schedule days, dates and times. With this calendar, you get a full-functioning calendar from which you can add, edit, or delete activities. Calendar 365 comes with two calendars. Resource Calendar, to manage the organization’s resources, and Customer Calendar, to manage customers. Once you’ve installed Calendar 365 and on the calendar screen, you’ll see three options in the left panel: Resources, Users, and Views. To create a unique view, navigate to Views drop-down list. Then select the view according to your requirement. 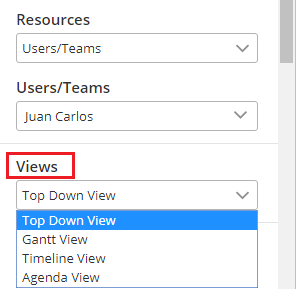 There are four types of views of Dynmaics CRM Calendar and they are as follows: - Top Down View - Gantt View - Timeline View - Agenda View Note: You can create all Calendar Views in Resource Calendar and Customer Calendars individually. Top Down View - This view provides you a Top Down view of the calendar in which you can view a column per member on the horizontal axis and time on the vertical axis, and a plain view of activities. Members can be user/team, account, contact or facilities/equipment depending on choice selected by you. - In addition, you can view the calendar in Top Down View in the Day and Week view format. Day View:- You can see the activities for the day in the Top Down View. 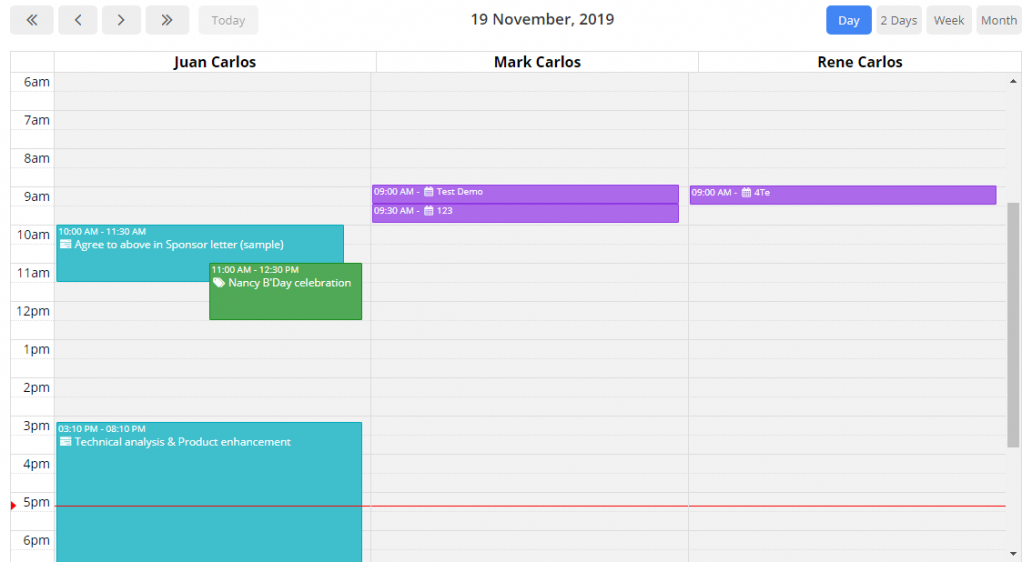 Day Span View:- You configure the number of days from default configurations in Day Span View of Top-Down view. 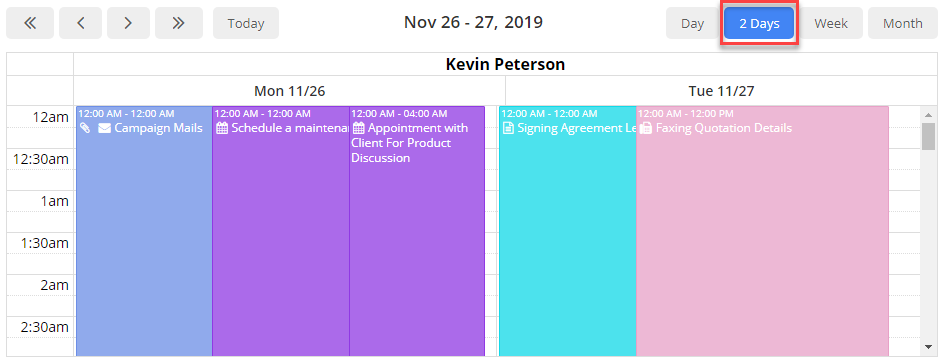 Week View: - You can see the activities for the week in the Top-Down view as well by selecting the ‘Week’ option. 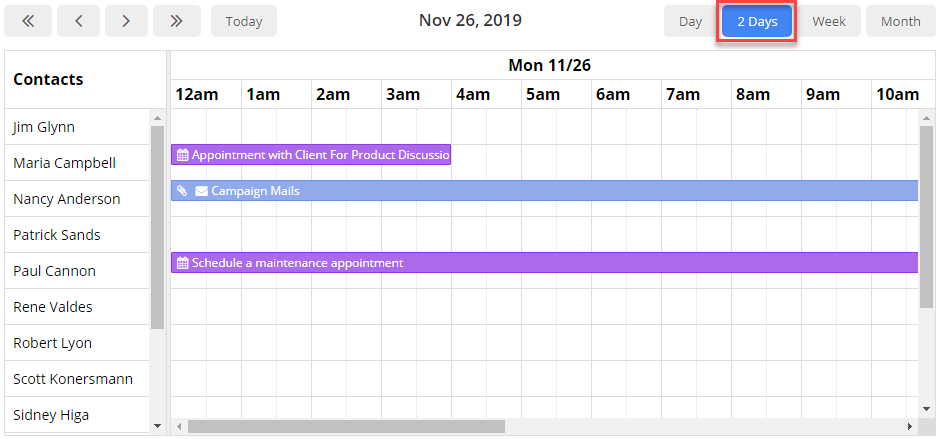 - Similarly, in Month View, you will see the details month wise with the dates. Gantt View - Gantt view is to view activities scheduled for a specific day/time. It is a horizontal bar chart that visually represents an activity or task with the start and end dates. - You can view the Resources or Customers in top-down display and date range in a horizontal display. Here, resources can be Team/User & Facilities/Equipment and customers can be Accounts or Contacts and are displayed based on your selection of calendar view. - In Gantt view, you can also view all or individual Events (Activities) along with its details like name of the event, start date, end date, and resource name (as configured to view from the configurations page). - In addition, you can view the calendar in Gantt View as per the Day, Day Span, Week or Month format. 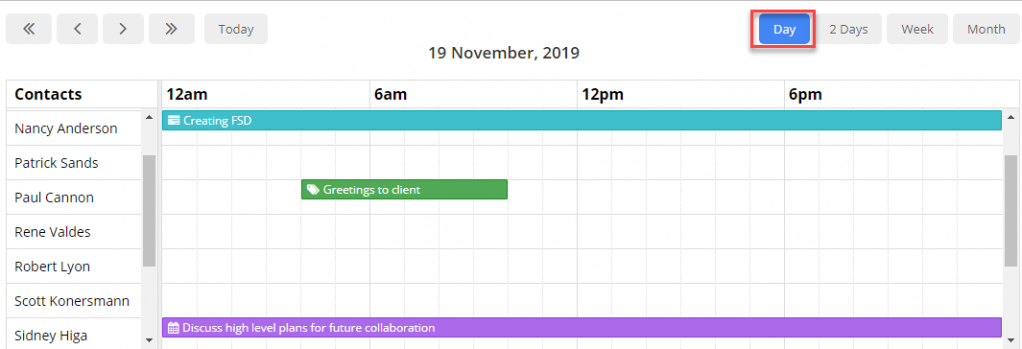 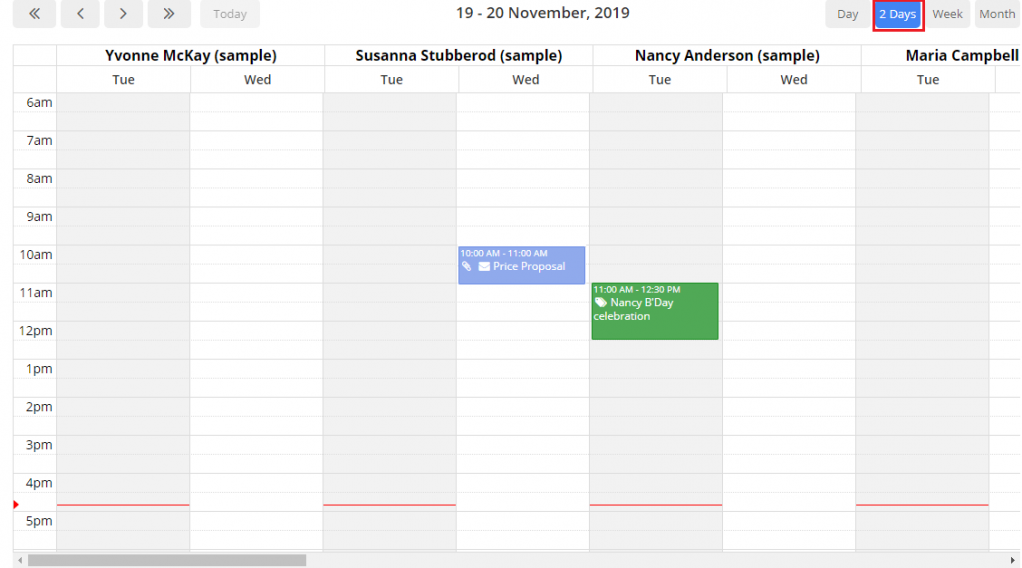 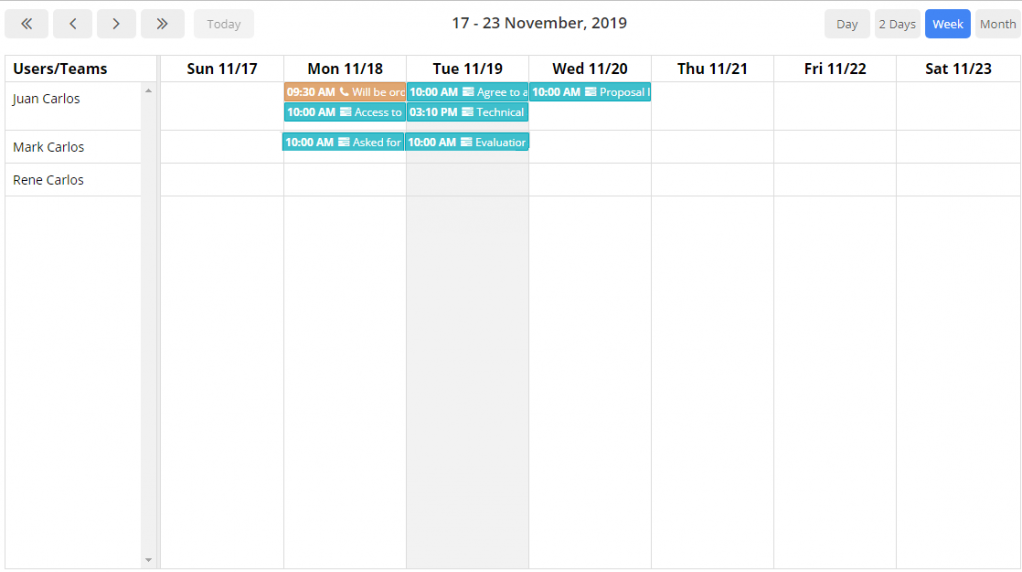 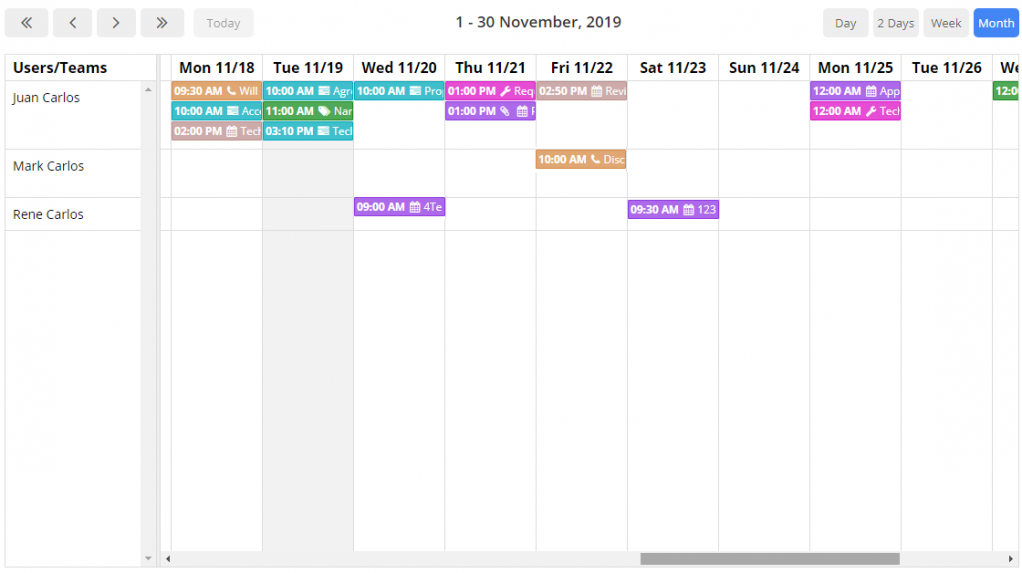 Timeline View - A Timeline view of the calendar which provides a simple sequential overview of the calendar separated by day and the selection of the Users/Teams & Facility/Equipment in Resource Calendar and Accounts, Contacts in Customer Calendar. - In addition, you can view the calendar in Timeline View as per the Day, Week or Month format. 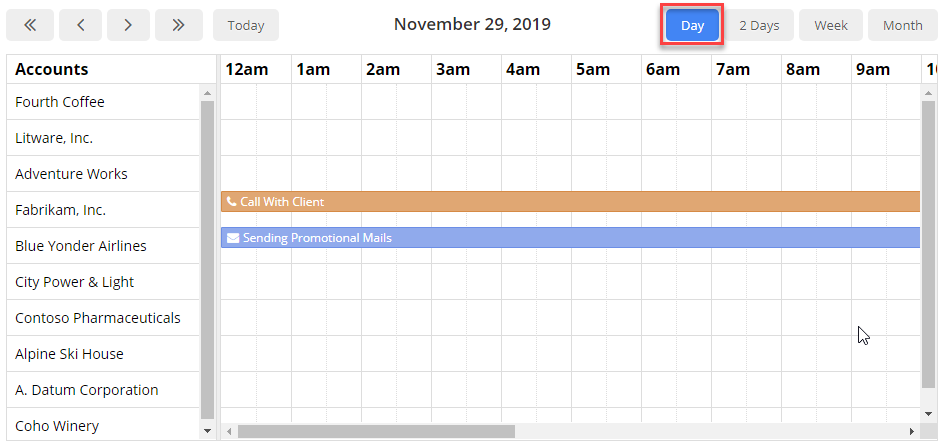 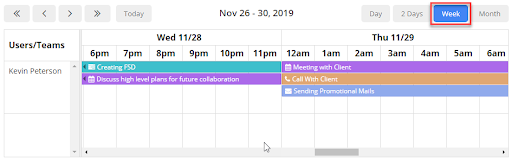 Agenda View - An Agenda view of the calendar which provides you a sequential list view with grouping options for other resources like accounts, contacts, facilities/equipment or users/teams or by date as per your requirement. - In addition, you can view the calendar in Agenda View as per the Day, Week or Month format.  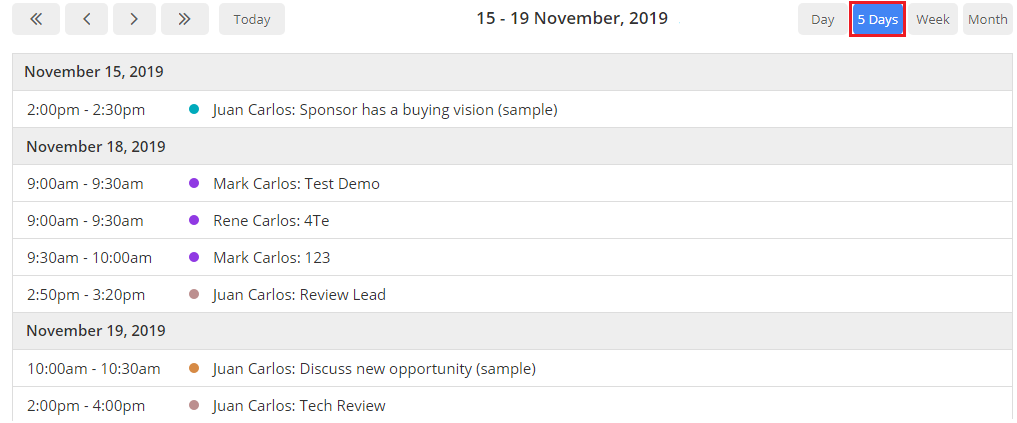 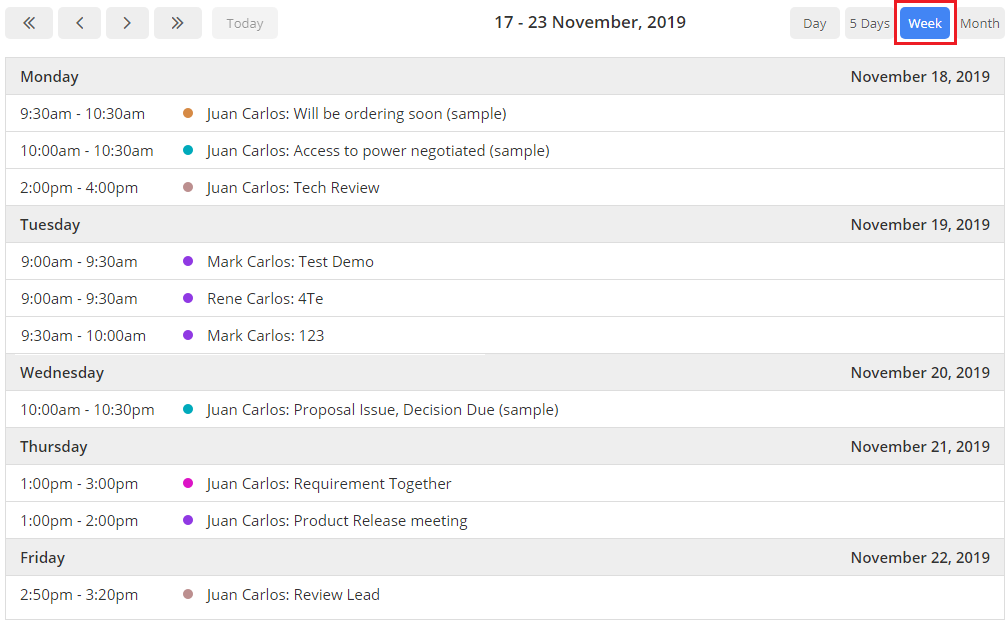 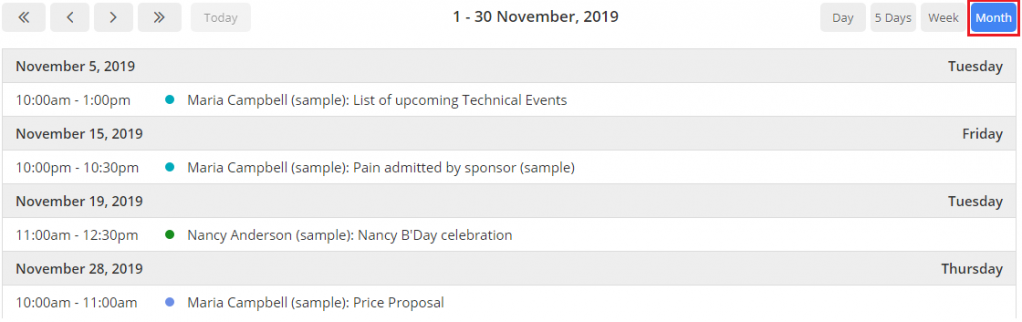 There’s a lot of untapped potential in your Dynamics CRM. And with the right applications and software, you can streamline your organization’s multiple processes.
Original Blog: https://www.appjetty.com/blog/how-to-create-multiple-views-in-dynamics-calendar  As the Christmas season is about to set in, festivity and shopping frenzy are in the air. The total US retail spending is forecast to touch a 1 trillion mark this Christmas season! And it will happen for the first time ever.
Every American will be out buying gifts, cookies, Christmas trees, gift cards and what not! And the scenario will be the same in many other countries as well. People will also eagerly look for Christmas offers and sales everywhere. And if they run out of time for preparation or find no exciting deals offline, they’ll switch to online stores. If you own an e-store, a great opportunity for super-high sales is awaiting you. You can make the best out of this festive season by offering exciting deals on your e-store. And if your deals and offers succeed in impressing customers, it’s a bonanza for you! But think again. Is throwing attractive deals and offers enough? Is your e-store ready to handle such a sudden spurt in sales and orders? Without your e-store being ready, your work is only half-done. So, it’s imperative to ensure that your e-store is ready for the Christmas season. This means you must have all the tools to streamline your sales processes. Or else, your Christmas offers and sales won’t yield as good results as they could. Equip Your E-Store with Outstanding Functionalities Whether it is titivating your user-interface or delivering orders on time, you can do that with AppJetty. We have the tools that you can integrate with your e-store to enhance its functionalities. Even better is that these products are compatible with all the big players in the industry of e-commerce platforms including Magento, WooCommerce, Odoo, etc. For instance, the Delivery Date Scheduler for Magento 2 store can let your customers schedule a delivery time for their orders at their convenience. You can also manage orders seamlessly with timely reminders of pending orders. Hence, you can streamline your delivery process and keep customers happy. Similarly, all our other plugins also come in handy for your e-store in one way or the other to help you smoothen different processes. Besides, AppJetty also deals in some plugins useful for your CRM. And these plugins too are available for all leading CRM systems like Salesforce, Dynamics CRM, SugarCRM, SuiteCRM, etc. These plugins along with the plugins for your e-store can work wonders for your business this Christmas. Icing on the Cake: 10% Off When there are sales and offers everywhere, how could we stay behind? So, AppJetty here gladly announces a Flat 10% off on all AppJetty non-recursive products. Go ahead and streamline your business processes, skyrocket your sales and customer satisfaction rate this season. Browse our site to know more about our products. Use the coupon code XMAS10 to avail flat 10% off on all our non-recursive products. And spread bliss around with offers and discounts this Christmas season! Avail 10% Off Now wish you a Merry Christmas and good luck with your sales! Original Blog: https://www.appjetty.com/blog/christmas-offers-for-your-store  A CRM integrated calendar comes with several advantages. Apart from the features, one major pro is a crystal-clear picture you get of what’s going on in the background. It is a lot better than managing a single task in a calendar and CRM system separately. With Calendar 365, activity management becomes easier because you can leverage its configurable calendars with separate views. This means you can have a separate view of all your important activities. Creating Separate Calendar Views What if you could have separate calendar views for your lead calls and opportunities? It can make your calendar less cluttered while keeping you up to date for all the activities. Just like the below screenshot, you can choose your entities from the contact calendar field. You can select any one or multiple entities and create views accordingly. 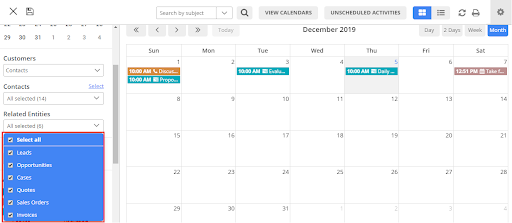 You get to select the view, the number of days to be displayed, slot duration, the title format i.e. D/MMMM/YYYY or MMM/D/YYY, etc. 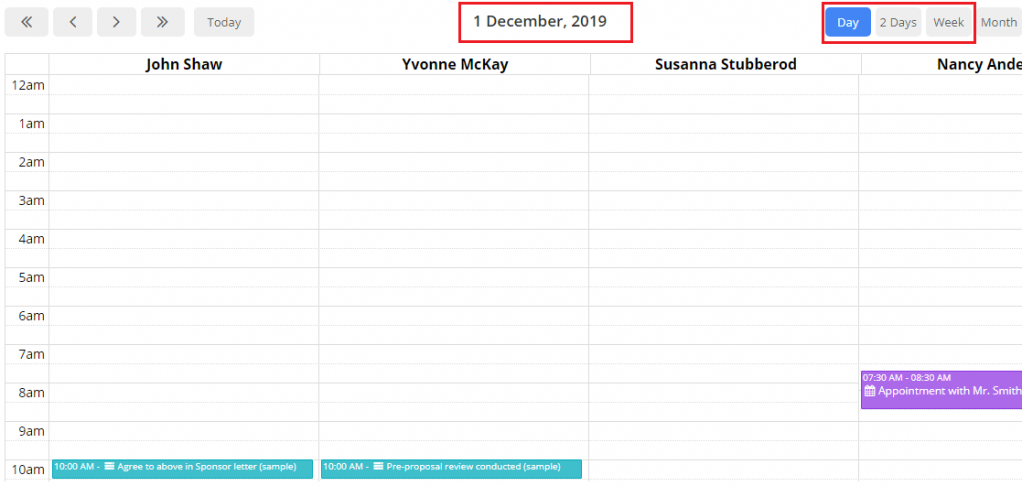 You can also create a shareable calendar. A shared calendar that you can hand out with other Dynamics CRM users. 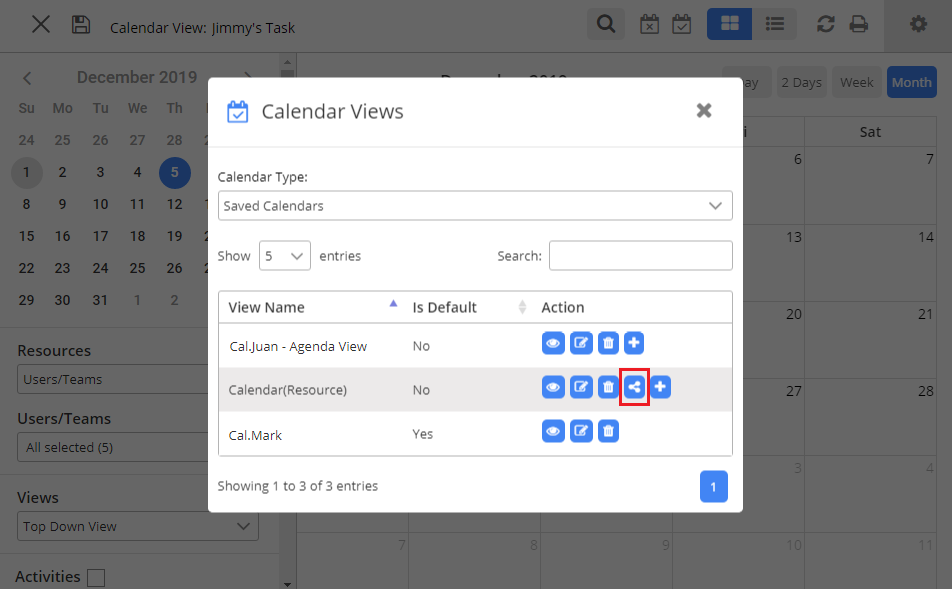 Configuring Activities In your selected views from service calendar Dynamics 365, you can select the activities to configure. Activities like Task, Fax, Phone Call, Email, Letter, Appointment, Campaign Activity, or any Custom Activity. After selecting the activity to edit, you can apply modifications to it like the color, status, tool tip, detail attribute, title, an email reminder, etc. You select any activity as required. 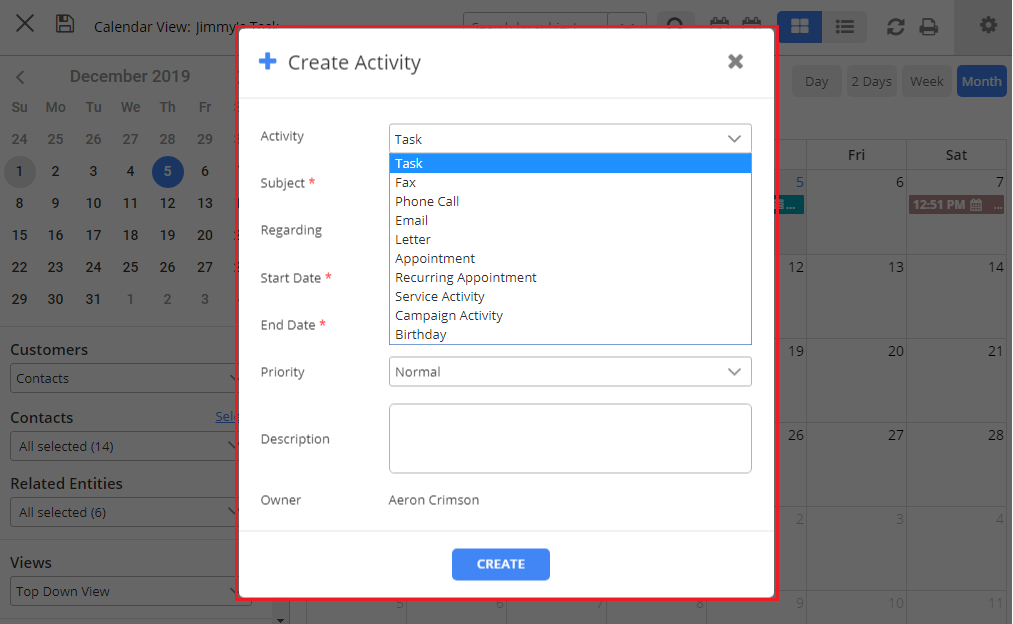 How Would You Like to Manage Your Calendar?
The major goal behind providing configurations to the users in Dynamics 365 Calendar is to make sure users get to manage their calendar in a more organized way that increases productivity. If you have a team of two or more, having a Dynamics CRM integrated calendar will give them the flexibility to prioritize the tasks with bifurcation and get more work done in lesser time. Original blog: https://www.appjetty.com/blog/configurable-calendar-views-in-dynamics-365  Managing multiple clients, appointments, and their related tasks can be overwhelming and messy. Logging in to CRM, looking for a particular client, last interaction with them, and then setting up a meeting with a particular agenda. Sounds a lot, right? Such a tedious and taxing set of steps to perform but nevertheless necessary to turn leads into paying customers. But what if you could skip the unnecessary steps and organize your day in a better way? In this blog, we are going to show how to see and manage appointments on your Dynamics 365 calendar that can help you organize your day-to-day activities meticulously. By default, Dynamics 365 provides you with calendar control to display any records or appointments on a calendar. If you want to see all your appointments on the calendar, follow the below steps to configure calendar control in appointment entity: Step 1: Go to Settings → Customizations → Customize the System 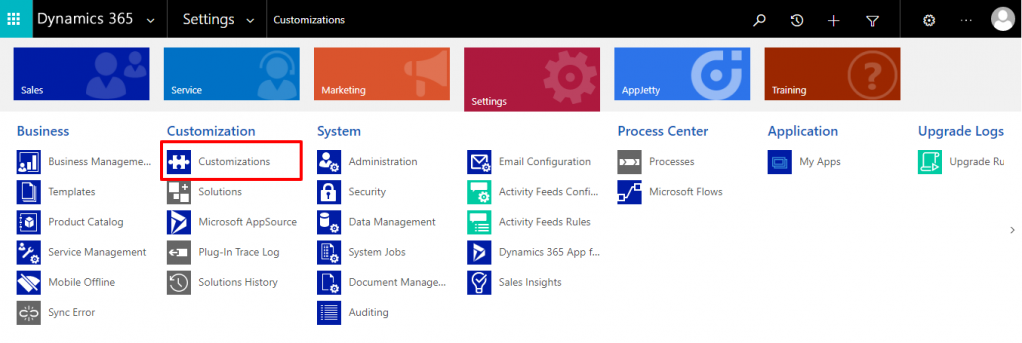 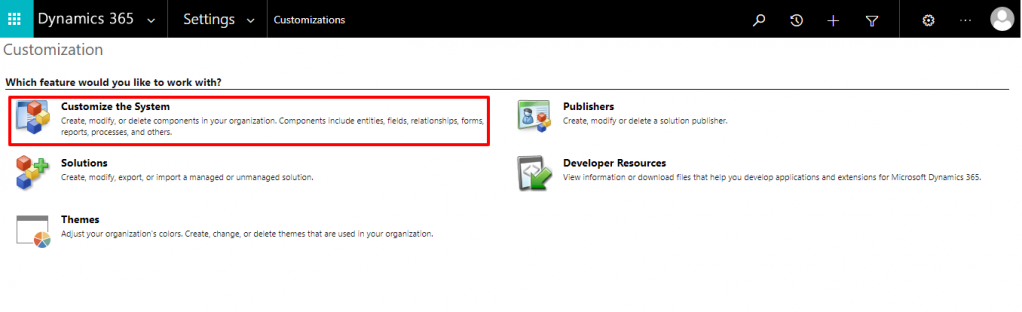 Step 2: Select Entities → Appointment 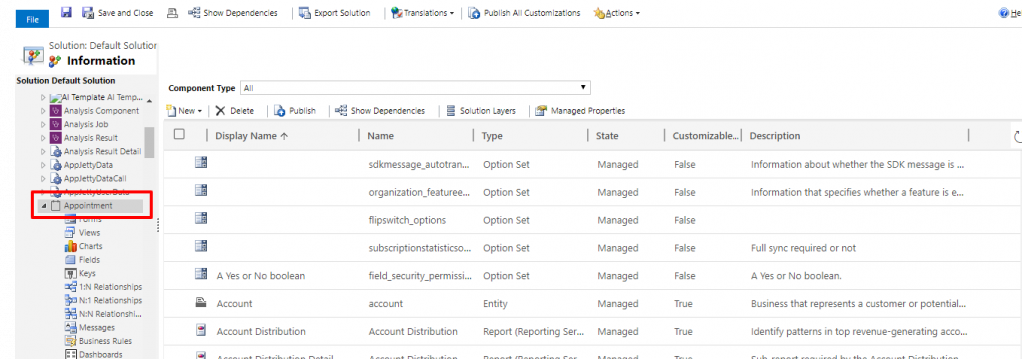 Step 3: Click on Controls -> Add Control -> Select Calendar Control and then click on "Add"  Step 4: Configure the display settings like start date, description, end date, minimum event duration, etc. 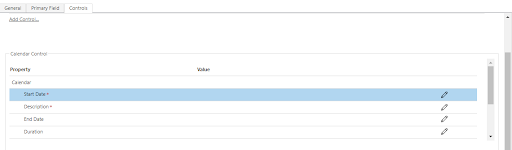 Step 5: Click on save -> Publish All Customizations  You can also choose devices to display your appointments from the calendar control. The available options are: Web, Phone, or Tablet. After saving all the configurations, you will be able to view all the appointments in the calendar. By default, Dynamics 365 provides 3 views in its calendar: Day, Week, Month. You can choose between them according to your usage. Here we have shown the month view. 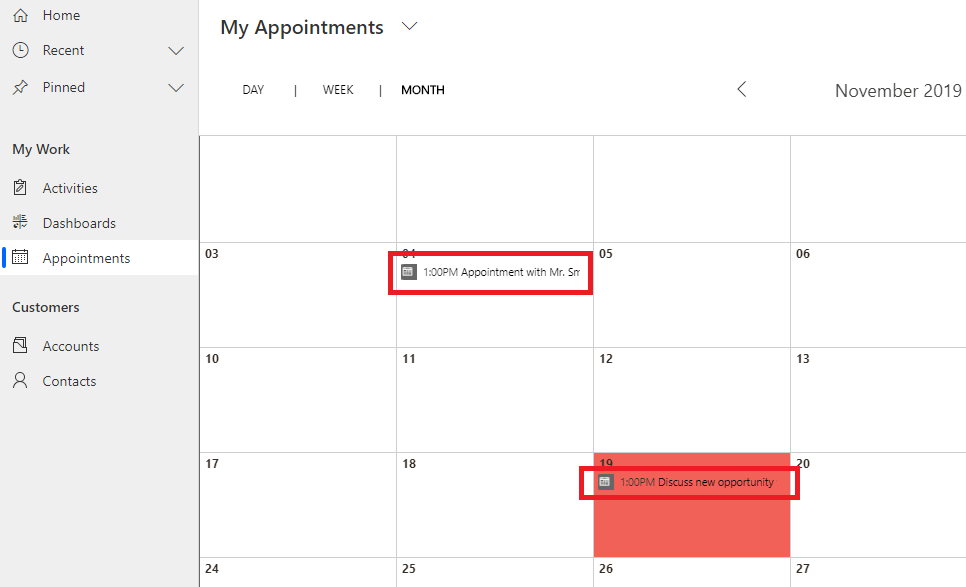 Limitations of Calendar Control: - Dynamics 365 default calendar only lets you see activities on a calendar. It doesn’t let you manage, edit, or create appointments or tasks in the calendar. - It also doesn’t provide users or customers based view of the activities. To overcome these limitations, you can always go for a Dynamics CRM calendar solution that comes with various features including activity management. Such a solution will allow you to manage all your activities including tasks, recurring appointments, phone calls, service and campaign activities, etc. right from your Dynamics CRM calendar. No more managing multiple calendars and missing events, email follow-ups, appointments, etc. You can easily create, edit and copy CRM activities as well as custom activities. Other features of Dynamics CRM Calendar Plugin: Using a Dynamics CRM Calendar 365 extension, you can manage your facility/equipment, contacts, users and accounts effortlessly. It helps you keep track of the service activities of all your company equipment like laptops, headsets, mobile phones, etc. You can easily create service activity and assign related resources, customers, and regarding accordingly. Here’s how a fully-functioning calendar with all your tasks, appointments, service requests, etc. at one place looks like: 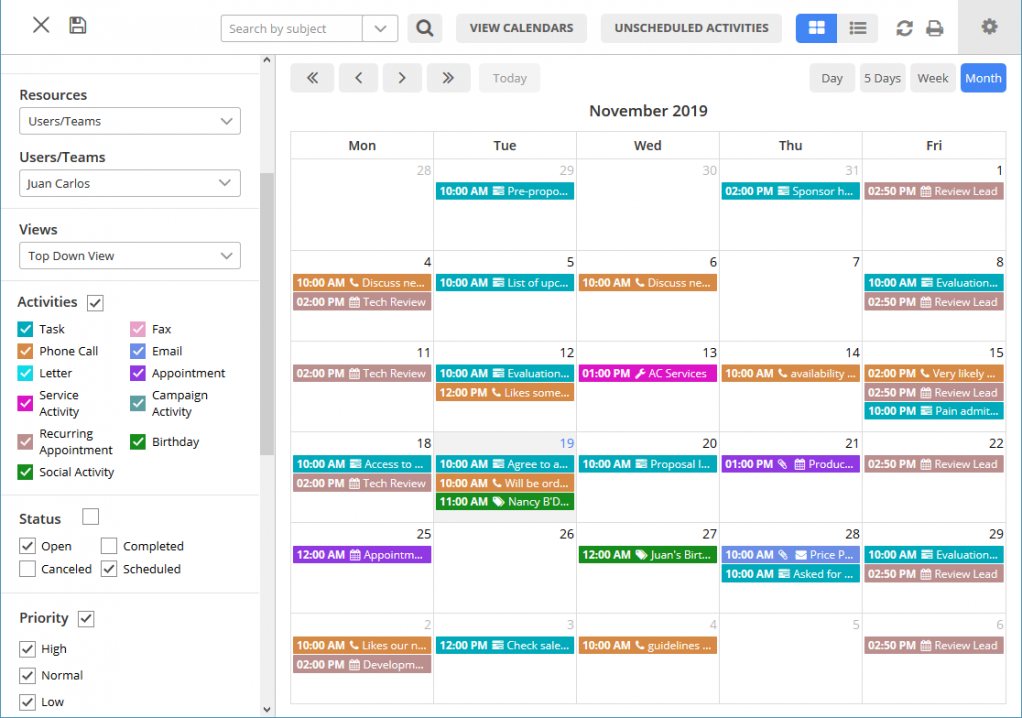 |
Author
Appjetty is a digital software products store specializing in extensions, plugins and apps for host of software platforms like Magento, WordPress, SugarCRM, SuiteCRM, Odoo, Dynamics CRM, etc. Archives
January 2021
Categories
All
|
 RSS Feed
