WelCome To AppJetty
AppJetty At A Glance
|
To conquer a battle, you first need a strategy. Sales territory management is no less than a battle. You need to predict your opponent's move, fortify your positions to target the leads. However, as a sales territory manager, the most crucial element you need to look after is aligning your sales reps on the forefront. Who they shall target and how is of utmost priority.
Developing this entire strategy to acquire customers from scratch can be daunting. You can plan it on a whiteboard, but that's absurd. You need a virtual set up to help you strategize. More likely, you need a tech-driven tool that gives you the power to see and visualize your territory and target customers. A Dynamics CRM Mapping tool can give you that power to manage your sales territory. Let's see what more it can do to help you manage the territories. Data Plotting When a business expands, it becomes difficult to handle the growing number of customers and leads. You can't keep managing by locating addresses manually. Calling out each and every customer is also not feasible. With numerous visits and leads to contact in a day, it's challenging to tackle them in an adequate time. As a result, you and your team end up wasting a lot of energy on non-productive work. However, with a Dynamics 365 field mapping tool, you can plot your data on a map and filter it based on region, territory, proximity, and user. Based on it, you can plan your visits. For example, instead of visiting one lead from area A and another from area B, you can identify total visits in area A and reach them at once instead of multiple trips. The tool also suggests the shortest route. You can forward it to your on-field sales team to help them cover more in a short time. Territory and Lead Allocation As a sales manager, your first task is to allot tasks to your sales rep. Allocating the areas and leads manually can take up a lot of time. Perhaps, it might result in uneven territory distribution. Alternatively, you may overlap the territories while assigning them to your team members. Dynamics CRM Mapping tool curbs it with features to create the territories and assign them to the team directly from the CRM. When you can view and cross-check the allocation, there's no chance of repetition. Performance Analysis No plan is perfect. Even after implementing it, you need to be flexible. There would be ideas that won't yield the results as planned. If you don't analyze or track it, there's no means of putting all these efforts into management. Therefore, keep an eye on your sales reps’ performance over assigned territories. Analyze what's working and what needs a re-work. Perhaps, you need to reassess the method of approaching or the timing for the sales push was off. You can do this by managing data in Excel, but you would be better off with a smart mapping tool. It not only has a powerful dashboard that shows all the sales activities, number of open leads, team performance, follow-ups, and more. Also, helps you plan your future strategies accordingly. Communication Staying updated with your team and every sales reps' daily tasks is not easy. Neither you can expect them to keep you informed, nor can you keep calling everyone asking about their work status. It won't only cost your time and calling budget, but also hamper efficiency. Your team won't focus on leads or simply they can't if they have to notify their every movement to you. Instead, what if you can track their activities in real-time and stay updated about their check-ins and checkouts? There won't be a miscommunication, and your team can focus on their work. Besides, live tracking will help you track your members' whereabouts every moment. Next, you can instruct them to change or update the plans in run-time, which would eventually save their time in the end. Furthermore, you won't have to wait until the end of the day to know about the targets achieved and work done. By tracking their ins and outs, time spent on meetings and custom events, you can analyze their performance. Overall, Sales territory management is not an easy task. You need the expertise to shape the territory management plan. However, tools like Dynamics CRM mapping can simplify the management process. With features like territory mapping, route optimization, advanced reporting, live tracking, you can be assured of already winning half the battle. Summary Sales territory management is different, not everyone’s cup of tea. However, with the right tool, it is possible. Explore the ways of managing it with the Dynamics CRM Mapping tool. Doing deep market research is a must. It gives you insight into latest or future trends, things your customers expect, where your products stand in the market, what new features you can introduce in your products, and more.
There are multiple ways companies carry out research using different automated survey software. Amongst which, two of them are more preferred i.e. agile research and concept testing. These two methodologies have served many companies in the right way and helped them understand what their customers require. The better clarity during the research stage helps them to make the product better. What is agile research?Agile market research is the way agile software is developed. Following are the four things followed in it: - Think - Develop sprints - Experiment - Interaction This can help companies test different ideas, products, or campaigns, before they launch it and know their customers’ requirements. They can make changes on the basis of their customers’ needs. This helps businesses save some money as they won’t have to invest large sums of money in year based heavy research. Companies that use agile research methods are more likely to deliver fast, focused projects, and new updates will be on time. Apart from this, agile research is more data centric which makes companies more customers centric. They are more data driven, information rich, and provide in-depth insights. What is concept testing?It is a process in which you define the concept of the products and how your users will interact with it. With this data, you can tweak your products and get an upper hand at going ahead with it. You can use concept testing for any products, ads, logo, packaging, etc. It gives you a deeper insight and helps you to make decisions and track the success over time. Let’s see major benefits of using agile research and concept testing: Automation:Usually creating surveys takes at least two to three hours as questions need to be well researched and framed in a way that you get detailed answers from customers. Most of the time it becomes complicated to carry out concept testing. This is when you can use automated survey software. Survey designing:You can create a custom theme on the basis of your brand’s reputation, customize Welcome and Thank You pages, create dynamic survey backgrounds, templates, etc. There are also some pre-built questionnaires which are ready to use. Analytics & Reporting:The Survey Rocket dashboard provides you with five different types of reports to measure the success. You get details like response rate, survey status, send status, etc. Various reports like trend reports, detailed statistical data, etc. are available. Each of them will provide you with in depth details about your data. Survey Sharing:Using Survey Rocket you can easily share surveys via WhatsApp, SMS, create email links, and share with a wide audience. Automated email reminders are sent to your customers if they forget to fill the survey, add open shareable emails to surveys, and more. Built-in market research:On the basis of this data you can do some tweaks in your products and serve better. Go one step further and use a net promoter survey to know exactly how your customers are feeling about your products/services. This will be very helpful to know who are likely to be your promoters and who are not. Additionally, you can even ask for suggestions from users and know their needs or demands from your product. Custom surveys:Customizing surveys can work as a boon in many scenarios. You can add images, pie charts, and use colors according to your brands’ reputation. Add, delete, or edit questions you want, decide which questions your customers can see and hide others if needed. All such things will provide control over the way you create surveys, share them around, and use the feedback in a constructive way. Skip Logic:With the help of survey skip logic make your survey short, crisp, and engaging. They are also known as branching logic or conditional survey logic. Depending on the answers they provide you can take them further. You can easily define the rule of survey and create custom skip logic. Major benefit of using skip logic is better customer experience, increased response rate, and accurate analysis. Conclusion:Surveys play a major role in shaping the company and understanding your customers desires and requirements. This is when surveys are conducted using different methods. With the help of a survey rocket take your surveys to a new level. Make the best out of surveys, increase your customers’ interaction and provide better customer feedback. About Us: At AppJetty we have tried to solve major problems of businesses using our products. Survey Rocket aims to help you do something necessary in a truly efficient way. It makes conducting surveys less of a task and more of a tool to get the feedback you need. Get in touch with us Source : https://www.appjetty.com/blog/agile-market-research-concept-testing-the-benefits/ We know the importance of a Magento eCommerce website with features like user-friendly interface, security, online payments, and more. If you are an eCommerce retailer, you also know about the delivery process and its importance in the online business. You know that if you focus on others and fail to recognize the delivery system, you would suffer a considerable loss. Therefore, integrate Magento 2 Delivery Date extension. Or else your customers won’t have a personalized service, or say, they won’t have any idea of their product delivery.
It isn’t good. It’s terrible for your business. With Magento 2 estimated delivery date, you can enhance your customers’ shopping experience. They can specify their delivery time and instructions. The chances of product abandonment will be less. Also, you will see an increase in sales and a decrease in stress. Curious to learn more about it? Keep reading! In this article, we have curated a list of features to help you streamline the process. Freedom to Choose the Delivery Date and Time By integrating the Magento 2 estimated delivery date with your website, you can give your customers the freedom to choose the delivery date and time slot while ordering from the cart. It would have two benefits. First, customers can receive as per their convenience. Next, your delivery person won’t have to make round trips to deliver the product. They would know in advance when they need to deliver it. Delivery Configurations The last-minute order cancellation is due to the unspecified number of delivery days. Mostly, customers don’t know about the exact product delivery date, and they cancel it. But it’s not the case with Magento 2 estimated delivery date. The feature would update your customers about the estimated delivery of the product. You can also configure and mention the minimum processing days from the backend to show it to customers. The configuration also lets you note the maximum orders for full business days or pre-defined time slots. Working and Non-working Time Slots You can define the non-working days (and public holidays) and time slots to show your customers. It would make sure that your customers know about your operating days and hours. This feature assures you of less to no complaint about late deliveries, miscommunication, or any other delivery issues. Instead, it enhances the transparency between you and your customers. Zero Contact Delivery Many big companies like Amazon, have started providing no-contact deliveries. You should also provide your customers with the same to ensure safety. And thus, opt for Magento 2 delivery date extension. It offers a zero contact delivery and allows your customers to opt for it by hitting the check box. Personalized Service Personalization in delivery services means high user engagement. With a delivery extension, you can let your customers add comments about the packaging style or instructions (like leaving the parcel at doorstep, don’t ring the bell, deliver before 12, call before delivery, or more). This simple option to receive the delivery as per their wish will give them a taste of personalized service. Concluding The most important feature of an online business is the delivery service. This feature can either double your customer or reduce it to half. To be precise, it is a must-have to win their loyalty and trust.  It’s again that time of the year when businesses would be flooded with sales, customers standing in long queues to buy their favorite products at low costs, and lots of Christmas vibes going around the city.
But, this time it will be different from every year, from sending gifts to each other online to wishing each other over video calls. This year it will all be different. But that should not stop your business. Holidays are still happening and with no one being able to visit each other or shop for gifts in person, the online shopping experience needs to fill the void. Store owners have to make it inviting for their customers and be able to handle the shipping. Handling shipping is not as simple as packaging and sending. The process needs to be simple, and well done so that there are less chances of missed deliveries, accurate shipping details, and more. Australia Post is one of the few shipping companies that can handle this. Some of their most difficult days in terms of number of parcels delivered are during the christmas break and they always handle it well. Being an online store owner there are plenty of things you can try and do to make sure your business is running smoothly and earning revenue. Over the holiday period, there will be thousands of customers who will be ordering multiple things from your eStore, and there is no chance of making any kind of mistake. The essence of holidays adds up when gifts arrive on time, and customers know where their parcel has reached. To let them arrive on time there needs to be a dedicated feature that allows users to select a particular date and time. Oftentimes customers complain about late delivery or wrong delivery issues. But, not anymore! With Magento 2 Australia Post extension you have a one-stop solution to all delivery, packaging, issues. So, if you are a company located in Australia or run a global eStore business there, then here’s your solution. Let me walk you through ways Magento 2 Australia Post shipping module brings ease to your business operations:
Once you configure, show these services on your website, and let your customers select accordingly. Remember; always serve better than what your customers expect.
Yes, you heard it right. With the help of the Australia Post shipping module, you can let your customers track their shipments and know the exact location of it. Customers can track it either from their account or you can send them an email with all the information.
Conclusion: Over a decade now many customers have complained about the shipping services eStore businesses provide. But, now with Magento 2 Australia post shipping extension, you can provide world class services to your customers. Easily configure everything in the backend and show it on the frontend. Provide ease to customers to select services which they want and show the cost of each of them. Hence, this year go one step further and provide the best of the best to your customers. Everything at their fingertips with just a few clicks. Organic Blog: https://www.appjetty.com/blog/australia-post-shipping-for-seasons-greetings/ Upselling and cross-selling are two of the most useful sales strategies. The best part about it is that your customer has already made a purchase from you. All you have to do is show them how their purchase has more value if they buy a new item that is related.
While it is easier said than done, certain products make for great upsells, like covers and cases for gadgets, handbags, and shoes for clothes, etc. Sometimes these items are quite dependent on the original item. This method of selling piggybacks on sales already made. This also means that it is often the second time a customer is making a purchase from your store, so they can skip the initial steps like creating an account or typing their address. This makes for a much smoother checkout process with fewer chances of cart abandonment. If you are selling an item like a storage card for a camera, then it is a product that makes their original purchase more useful, and so automatically becomes an item you will successfully upsell. You can cross-sell or upsell after purchases or even after surveys you send and that's how you increase sales with the survey. In order to do that, you will have to configure it in your surveys. Here’s how to go about it: After configuring and inserting the details in the survey detail page, welcome page, and survey question page, you can add a Thank you page at the end of the survey. You can customize the Thank you page as per your requirements using the inbuilt Tiny MCE Editor. You can add the custom source code to design the Thank you page and insert the custom links. Once your customers place the order or fill the survey, you can navigate them again on your shopping site by offering some other products related to the placed orders from the Thank you page. Start 30-day Free Trial You can insert the links to other products on this page. This way the customer will see other relevant products. This way you can increase sales of items that can pair well with the item they have already purchased. With an online store, there is no one way to sell. There are multiple options and ways to get your products in the hands of the customers. And it is all about placing them in the right place at the right time. The ‘Thank You’ page after checkout or after a product survey are only some of those places. They also happen to be some of the influential ones since the customer is already thinking about their purchase. Source : https://www.appjetty.com/blog/strategy-for-retention-upselling-cross-selling-using-survey-rocket/  Working all day round the clock without a productivity tool can be a very difficult task. Looking at the need for people to work more efficiently businesses launched various types of products. These products have helped companies make their employees’ tasks easier and helped them be more efficient.
Each productivity tool brings its own features to the table and helps us work more efficiently. One such tool is calendar. Having a calendar that is interactive, makes your adding editing, deleting tasks easy, sends you timely reminders, etc. is a must. But, to manage your calendar efficiently you need to have the right one which helps you instead of adding more burden to your packed schedule. Let me show you some of the challenges employees face when not using a calendar in the right way: Everything is a priority:Not knowing which tasks you should set as priority results in having everything a priority for them. This leaves your team more confused and indecisive in selecting which tasks should be done first, which project needs more of their attention, when do they have meetings with whom, and more. This all becomes chaotic for your employees and results in inefficiency. In turn this can result in your business not flourishing and losing potential clients. Not using right tool:Not using the right calendar can be the biggest mistake you can ever make. If the calendar does not add value to your employees’ schedule then they are very likely to get frustrated and not work properly. Hence, choosing the right calendar which has needed functionalities is an important thing for you as well as your employees. Lack of communication:If the team members can’t share their calendars with each other then lack of communication is an outcome. To overcome this, it is important to have a calendar that your employees can easily sync with each other. These are some of the major reasons why as a company it is essential to have a proper calendar tool. Let's share some of the core features of Calendar 365 exclusive for Dynamics CRM that can help you and your employees. Manage Activity:Creating and managing tasks is one of the most crucial things of the day. With a huge pile of work on your table, it becomes difficult for them to define their priorities and work accordingly. With the help of Dynamics 365 Calendar your employees can easily manage, create, and edit their tasks. And you can also assign and manage tasks for them. Share Calendar with Team:Not knowing schedules of team members can be a management nightmare. For example: if some of your employees are providing on field support then every hour managers have to call and ask about their next appointment. In some cases every day, employees have to report to managers their schedule or meetings. After a certain point this can become a hindrance for employees as well as managers. Considering these issues, with Calendar 365, your employees can share their entire calendar either individually with team members or with the entire team. This decreases the unnecessary interaction between the team members and managers. Once the calendar is shared, managers and team members can know the entire schedule of each other and carry out further activities accordingly. Multi Language Support:Language is one of the most crucial things when dealing with anyone. Providing products in multiple languages can be a huge help for your employees. Calendar 365 for Dynamics CRM supports multiple languages. This can help your employees to understand the product and use it efficiently as well as effectively. Timely Notifications:Just imagine, one of your employees has an important meeting coming up and they have added it to their schedule with a hope that they might get a reminder 30 mins or 60 mins before the meeting. But, it does not happen. And you know reaching late in a meeting or not attending is the worst case scenario for any employee. But, now with Microsoft Dynamics CRM calendar you can get rid of this issue and help your employees attend meetings. Apart from meetings, your employees can add any activity in the calendar and get timely reminders. Resource Scheduling and Calendar Views:For managers, keeping an eye on each and every team members’ working hours is not feasible. To overcome this you can now see work hours, break time, etc. of your team members in the Dynamics calendar itself. You can get all details of their daily tasks and appointments so no need of unnecessary back and forth or hourly conversations with your employees. Further, you can view the calendar in multiple views like gantt charts, lists, graphs, etc. Multiple views of Microsoft Dynamics CRM help you to have a better view of you and your employees’ tasks. This in turn helps you to work efficiently with your team members and bring the best for your company. Manage Multiple Activities:Managing multiple activities does not need multiple calendars. Now do everything in one go with Dynamics Calendar 365. You can easily create, edit, and create custom activities, assign, share, etc. everything with Calendar 365 for Dynamics CRM. Supports Mobile Devices:One cannot always be at their desk to manage all of their work or handle a team. Mobile first is the concept which the majority of companies are trying to implement. And looking at this need for mobile first, Calendar 365 is compatible with mobile devices. Now, you can access your calendar on the go anytime anywhere using your mobile phone. Wrapping it up:Dynamics 365 Calendar is a productive tool and is the right type of calendar. With Dynamics Calendar 365 you can help to get the best out of your team members. Shrug off the tools which are not adding value and give them what they need to get their job done. Start 30-day Free Trial Source : https://www.appjetty.com/blog/7-ways-dynamics-365-help-your-business-grow/ 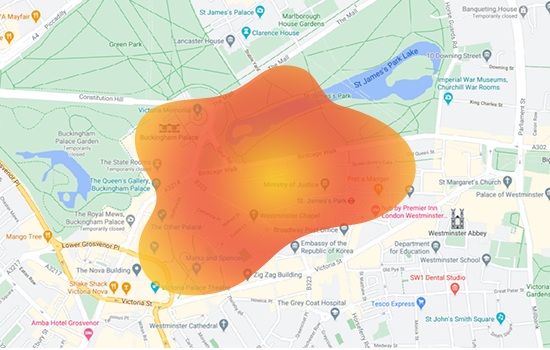 Any company that interacts with a customer, needs to dive deeper into how to do it better. You need to know how they react to your marketing campaigns, what is selling where the buyers’ age group, and whatnot. All of this data already comes to you in your Dynamics CRM.
Going through this data and analyzing it can get cumbersome. So a heat map of all this data overlaid on a map makes it a whole lot easier. Dynamics 365 map Integration provides the facility to visualize and analyze the CRM records on a Heat map by selecting the data sources of the DynamicsCRM. MappyField 365 heatmap provides a graphical representation of the CRM data where values are depicted by color. Heatmap makes it easy to visualize and measure complex data on the map based on the specific region. An administrator can set the color for the records under Heatmap settings and get the records on the heatmap as per the color selection. Please follow the below steps to analyze the specific data sources using MappyFiled 365 heatmap: - Navigate to the MappyField 365 → Heat Map Step-1: Heat Map SettingsConfigure Color for Heatmap from the MappyField 365 Configuration. You can select Color for High, Medium, and Low values data for the heat map. You can differentiate the records as per the selected region/area by selecting the color as per the High/Medium/Low. Step-2: Navigate to the MappyField 365 → Heat MapNavigate to the MappyField 365 app from the Dynamics dashboard or from the app list. From MappyField 365, click on the Heat Map. Once the Heat Map is loaded you can select the required options to visualize the values of the records on the map. Step-3: Visualize the CRM Records on the Heat MapTo visualize and analyze the CRM Records on the Heatmap, you need to select the below fields: Select Datasource: - Select the Entity and its View for which you want to visualize data as a heat map. You will only be able to use those entities which are configured from the “Entity Mappings”. Select Measure: - The measure will determine how you want to filter the records and create a heat map. Select the aggregation method (CRM data) to be used to color-code the region. - By default, the color code would be based on the number of records (ex. Annual Revenue, Market Capitalization, etc) Select Filter: - Select the category in which you want to differentiate the measured data. (ex. Account Name, Business Type, etc). Select a category to filter the data results. Select Display: - Select the ‘Display’ to visualize the selected Datasource and measures on Heatmap. - Here, you can select the type of display from the available options to create a Heatmap using Boundary, No Boundary, Pie Chart, Column Chart. Select Region Type: - Select any ‘Region Type’ to display the Heatmap for the Boundary, Pie Chart, or Column Chart. Define the geographical variant in Region Type: City, State, Country, or Postal Code. After selecting all the details, click on the Search button to create a Heatmap Step 3A: Heatmap by State wise Boundary: - If you have selected the Boundary as “Display” and State as “Region Type”, the heatmap will display the selected Datasource as State- wise with Boundary and color visualization as per High/Medium/Low level. Step 3B: Heat Map by State with No Boundary:- If you have selected the “No Boundary” as Display and “State” as Region Type, it will create a heat map based on the density of the measure without geographical boundaries. - By clicking on the “Summary Card”, all the account details will be listed in the detail card with the selected data sources. Step 3C: Heatmap by State wise Pie Chart- If you have selected the “Pie Chart” as Display and “State” as Region Type, it will display the Heatmap in the form of pie charts of the selected data sources. - By moving a mouse cursor over any Pie Chart, you will see the tooltip detail, and by clicking on any PieChart, the records will be displayed in the summary card. Step 3D: Heatmap by State wise Column Chart- If you have selected the “Column Chart” as Display and “State” as Region Type, it will display the Heatmap in the form of a column chart of the selected data sources. - By moving a mouse cursor over any Column Chart, you will see the tooltip detail, and by clicking on any Column Chart, the records will be displayed in the summary card. Here only the Statewise Heat maps are shown. But a salesperson or an administrator can visualize the heatmap as per other regions by inserting the County, City, or Postal Code and selecting the different data sources with a relevant measure & category. Being a sales manager with DynamcisCRM administrator rights, visualize any records like Sales Revenue, Travel Expenses, Service-based activities, etc. as heatmaps and geographical displays and numerics will tell you what further planning should be done for your sales team. Source :https://www.appjetty.com/blog/visualize-and-analyze-dynamics-crm-data-on-heatmap/ 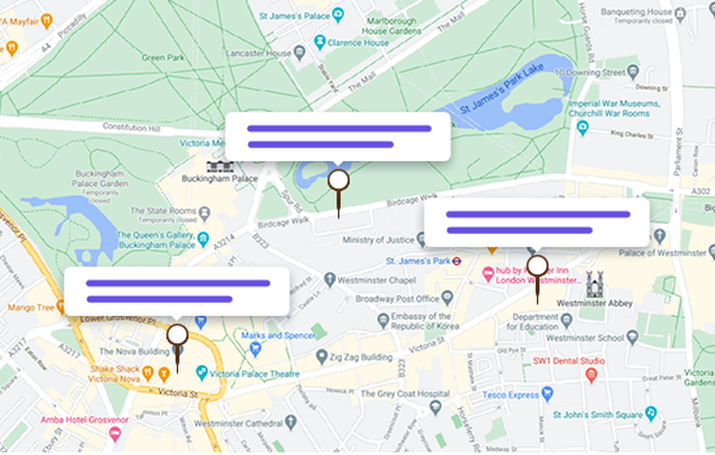 When a salesperson is on the field they need their software to support them and give them all the details quickly. That’s why having a collection of information about each record right in the app is a great way to do it. These tooltips are set up to appear only when you look for them.
The sales manager or DynamicsCRM user with administrator rights can configure the entity details in MappyField 365 to be displayed in the Entity Records (pushpin) details. Once the DynamicsCRM records are plotted on the map, your team member will get the record details as you have configured in ‘Entity Mappings’. MappyField 365 users will get the highlight of the records by hovering the mouse over the plotted record (pushpin) and by clicking on the record, you will get the details of the record in the detailed slider. Tooltip shows quick information about the record when hovering the mouse cursor over the pushpin and Detail attributes appear in the detailed slider by clicking on the specific record. Follow the below steps to configure the tooltip and detail attributes: - Navigate to Entity Mappings - Configure the details of the tooltip attributes and detail attributes - Plot the entity records on the map - Get the tooltip (popup) by moving the cursor on the pushpin - Get the details of the records by clicking on the pushpin Step-1: Navigate to “Entity Mappings”Go to Entity Mappings to configure and setup the entity to be displayed on the map. Here the ‘Account’ entity is selected. By clicking on the entity, you will navigate to the entity detail page. Here from the header, you will get different action buttons. By clicking on the Edit button it will open the new tab which contains the entity map configuration for the selected entity. Step-2: Entity To MapFrom here you can configure the ‘Tooltip attributes’ and ‘Detail attributes’ for the slider. Step-2[A] Click on the ‘Tooltip attributes’ tab to set up tooltip dataNavigate to the ‘Tooltip Attributes’ tab. You can select up to 10 tooltip attributes to display in the tooltip while the mouse cursor moves over the record (any specific pushpin). You can also set up the ‘Display Name’ of the selected attributes that will display on the tooltip. Select the Attributes and edit the Display Name. Click on the Add button to add the attribute to the list. You can remove, by clicking on the remove x icon from the Action column. Once you configure the ‘Tooltip Attributes’, click on the Update button of the Entity To Map. Step-2[B] Click on the ‘Attributes’ tab to set up for slider detailsNavigate to the ‘Attributes tab’. Here you can select up to 10 Detail attributes to display while clicking on the record (any specific pushpin). Select the Detail Attributes from the dropdown list. Category Attributes are the ones that appear in the dropdown for the ‘category’ selection. You can select as many attributes as you want for category selection. Once you configure the ‘Detail Attributes’, click on the Update button of the Entity To Map. Similarly, you can configure the ‘Tooltip Attribute’ and ‘Detail Attribute’ for another entity. Step-3: Plot the Entity RecordsNavigate to the Map section. From the ‘Plot’ tab, select the ‘Entity’ and its ‘View’ to plot the records on the map. By clicking on the Search button, the entity records will be plotted on the map. All the pushpins are the records of the entity. Step-4: Visualize Tooltip and Detail attributes on the mapVisualize the Tooltip and Details attributes on the map. Step-4[A]: Tooltip AttributesOnce the entity records are plotted on the map. you will get the ‘tooltip’ by hovering on any pushpin. You can see the information in the tooltip as per the ‘Entity Mapping → Tooltip Attributes’ configuration. By moving the mouse cursor on the pushpin, you will get just a highlight of the records as a tooltip. Step-4[B]: Detail AttributesBy clicking on any pushpin, the detailed slider will appear from the right side where you will get details related to that record as per the ‘Entity Mapping → Attributes’ configuration. From the detailed slider, you can perform different actions for the selected record. Being a sales manager with DynamcisCRM administrator rights, you can configure the Tooltip and Detail Attributes for any entity from the Entity Mappings and as per the configuration, you and your team will get information in the tooltip and the detailed slider. Dynamics CRM Mapping tool helps to plot your CRM data on the map and manage your sales activities. To take a closer look at how useful the tooltips are on the map, feel free to reach out to us at [email protected] or you can also tweet at us at @appjetty. Source:https://www.appjetty.com/blog/configure-the-tooltip-and-detailed-attributes-in-mappyfield-365/  We live in a digital era where everything is bought, managed, and sold online. Just think how many things you have bought online in the last one year. And as a business owner think about the number you have sold online. Today almost anything and everything is bought and sold online. The Internet is not only making us a global village but also changing the way we shop or sell things.
According to Statista, it is predicted that eCommerce is estimated to reach US$2,437,768m in 2020. This is a huge number and due to pandemic and I am sure this number might have exceeded. In the current times in addition to pandemic there are millions of businesses that have come online to survive and earn some money. But running an eStore is not easy in any way. There are a lot of things that go into bringing businesses online. Let’s see some of the issues that store owners face while growing their business: Constant Competition: Running a business is not an easy job. It comes with a constant urge to innovate and solve real world problems, and make an impact in the market. There is a constant cut throat competition in the market to serve customers better, and innovate in the field. Continuous Changing Trends: There is a constant change in the trends in the market and everyday there are new requirements of customers. This makes it much harder for businesses to satisfy their customers’ needs. To match up with the changing trends, they end up making employees work round the clock. Matching up with customers’ needs and having to serve them right adds up a lot of pressure on businesses. Managing Store and Warehouses: Being an eStore owner it is very common to have multiple warehouses. But managing is very challenging. Store owners often complain about how they cannot manage their inventory, products which are in stock, which product is where, and more. It becomes chaotic to visit multiple stores or warehouses to know your stock, manage staff members, or know particular product details. Managing Sales Record: Knowing which product is selling more and why, is very important. Additionally, having a proper sales report every quarter is crucial as it gives you a better insight into understanding your customers’ needs. But, the major issue is doing the paperwork of multiple stores and warehouses with all the back and forth. Disorganized Inventory: Searching something from a disorganized inventory is equal to finding nothing. Your employees will need to search for one thing from thousands of products in the warehouse and this requires having a lot of manpower and consumes a lot of time. This list of problems can go on and on. Considering these issues, it becomes difficult for eStore owners, admin, or managers to carry out operations easily. Additionally, many times it can even create chaos amongst businesses and customers. This eventually leads to having unsatisfied customers who might abandon your company and services. But, looking at all these issues and to support eStore owners, at AppJetty we have come up with a solution i.e. Magento 2 Admin app. Magemob Admin for Magento 2 allows you to manage your eStore effectively and on the go. Let’s see some of the ways Magento 2 Admin mobile app helps you in managing your eStore effectively: Interactive Dashboard: Our Magemob admin allows your admin to use an interactive dashboard, manage multiple stores or warehouses from the backend easily. The interactive dashboard lets your users get details about the sales trends, new orders, total sales, and more. Admin or you can also generate sales reports with specified number of date and time right from the dashboard. Lastly, the admin app supports multiple stores so you can see data of multiple stores, currencies they support and more. Barcode Scanner: As I said above, it is difficult to search for a particular item in the inventory and needs lots of manpower and wastes time. But not anymore! Magento 2 Admin app comes with a barcode scanner. This makes it easy for you to search from thousands of items easily. Just scan the particular barcode of the product and you get the exact location of the particular item in a few seconds. Sales data report: Time to say goodbye to paperwork and check all your sales reports right from the app. Using Magento 2 Admin mobile app you can see the sales reports based on geography, for particular product categories and more. This gives you details of users, number of items they purchased, and more. Many times while checking you might have an issue of finding the right sales data from but not anymore. With the help of a filter module you can apply various filters on the sales report and see the exact data on the screen. 24/7 Support: Using our Magento 2 Admin app you can easily get access to the backend of your eStore anytime at anyplace. The mobile compatibility lets you see all the information of your store at your fingertips with just a few clicks. Now, be there to support your employees 24/7. Manage Customer Data: Manage all your customers’ data with just a few clicks. With the Admin app you can access all your customers’ data, add, edit, or delete from the backend. With all the control at your fingertips, you can take timely decisions. Manage Products Effectively: Manage and view each of your products effectively. With the help of product listing you can view, edit, add, and delete all your products. This allows you to see all of them in detail, assign or unassign warehouses to them, see sales, and more. Handle Customer Reviews and Reports: You can approve or reject the reviews given by your customers. Additionally, you can even know which are your best selling products, why, and how you can promote them more. Wrapping it up: Integrate our Magento 2 Admin App extension with your eStore and get everything at your fingertips. Take your store with you no matter where you go. Original Blog: https://www.appjetty.com/blog/manage-smartly-with-magemob-admin-app/ With the usage of Microsoft Dynamics 365 increasing in popularity for businesses across the world, there is a higher demand for standard functionality and improved user experience.
Calendar view provides time-centric activity in a more meaningful and user-friendly way. Setting the calendar view in the dashboard allows you and users to check the current activities from the Dynamics System dashboard. In this blog, we talk about how to embed the calendar activities of Calendar 365 into the Dynamics Dashboard. Please follow the below steps: Step 1: Add ‘Calendar 365’ pages in the Dynamics 365 appFrom the Dynamics 365 app dashboard, go to Apps Sitemap editor and open IN APP DESIGNER. Click on ‘Edit Site Map’. Step 2: Select Group & SubareaSelect the group in which you want to add the Calendar 365 page and then click on + and select Subarea. Under the ‘Subarea’ setting, select the below properties: - Type = Web resource - URL = final calendar (For Resource Calendar) and CustomerCalendar.html (for Customer Calendar) - Title = Calendar (you can add your custom title here) Click On Save and Publish. You need to add the following web resources Step-3: To create a Dashboard, move to the Settings → CustomizationFrom ‘Customization’, click on the Customize the System option. Click on ‘Dashboard’ to create a new dashboard. Step-3[A]: Create a DashboardChoose the layout for your required dashboard and click on the Create button. Give the appropriate name to the dashboard and click on WEB RESOURCE. You can add a dashboard for both the calendar views of Calendar 365: Resource Calendar & Customer Calendar. You need to add the Web Resources for Calendar365. For the Resource Calendar, click one frame and select web resource Web resource: aoc_finalCalendar Name: WebResource_Activity Label: Activity of User It will add a ‘Resource Calendar’ as a Dashboard. Now, similarly, if you want to add the calendar for Customer Calendar, click one another frame and select web resource, and fill in the information. Web Resource for Customer Calendar: aoc_CustomerCalendar.html Step-4: Navigate to the Dynamics dashboardOnce the group subarea is configured and the dashboard is created by adding the specific Web Resources, you will get the embedded calendar of Calendar 365 in the Dashboard list. By clicking on the “Calendar Dashboards” from the ‘System Dashboards’, you will get the dashboard of the calendar with current activities. In this way, you can create calendar dashboards of Calendar 365 to check the current activities from Dynamics System Dashboards. Using Dynamics 365 service Calendar, you can see CRM activities on a single screen. To take a closer look at the activity calendar of Calendar 365, and feel free to reach out to us at [email protected] or you can also tweet at us at @appjetty. Source:https://www.appjetty.com/blog/add-the-activity-calendar-of-calendar-365-in-the-dynamics-dashboard/ |
Author
Appjetty is a digital software products store specializing in extensions, plugins and apps for host of software platforms like Magento, WordPress, SugarCRM, SuiteCRM, Odoo, Dynamics CRM, etc. Archives
January 2021
Categories
All
|

 RSS Feed
